Ce document décrit les informations récapitulatives sur le correctif dans le tableau de bord Patch de la console Trusted Cloud . À partir de ce tableau de bord, vous pouvez effectuer les opérations suivantes :
- Affichez les informations récapitulatives sur le correctif pour les VM dans un projet, une organisation ou des dossiers.
- Affichez l'état des jobs d'application de correctifs dans votre projet.
- Affichez l'état des déploiements de correctifs programmés.
Avant de commencer
- Consultez les quotas d'OS Config.
-
Si ce n'est pas déjà fait, configurez l'authentification.
L'authentification est le processus permettant de valider votre identité pour accéder aux services et aux API Trusted Cloud by S3NS .
Pour exécuter du code ou des exemples depuis un environnement de développement local, vous pouvez vous authentifier auprès de Compute Engine en sélectionnant l'une des options suivantes :
Select the tab for how you plan to use the samples on this page:
Console
When you use the Trusted Cloud console to access Trusted Cloud by S3NS services and APIs, you don't need to set up authentication.
gcloud
-
Installez la Google Cloud CLI, puis connectez-vous à la gcloud CLI avec votre identité fédérée. Après vous être connecté, initialisez Google Cloud CLI en exécutant la commande suivante :
gcloud init
- Set a default region and zone.
REST
Pour utiliser les exemples d'API REST de cette page dans un environnement de développement local, vous devez utiliser les identifiants que vous fournissez à gcloud CLI.
Installez la Google Cloud CLI, puis connectez-vous à la gcloud CLI avec votre identité fédérée. Après vous être connecté, initialisez Google Cloud CLI en exécutant la commande suivante :
gcloud init
Pour en savoir plus, consultez la section S'authentifier pour utiliser REST dans la documentation sur l'authentification Trusted Cloud .
Rôles et autorisations requis
Pour obtenir les autorisations nécessaires pour afficher les informations récapitulatives sur le correctif, demandez à votre administrateur de vous accorder les rôles IAM suivants :
-
Afficher le récapitulatif des correctifs pour les VM d'une organisation ou d'un dossier :
Lecteur de rapports de mise à niveau OS Config (
roles/osconfig.upgradeReportViewer
) sur l'organisation ou le dossier -
Afficher le récapitulatif des correctifs pour les VM d'un projet :
Lecteur de rapports de failles OS Config (
roles/osconfig.vulnerabilityReportViewer
) sur le projet
Pour en savoir plus sur l'attribution de rôles, consultez Gérer l'accès aux projets, aux dossiers et aux organisations.
Ces rôles prédéfinis contiennent les autorisations requises pour afficher le récapitulatif des correctifs. Pour connaître les autorisations exactes requises, développez la section Autorisations requises :
Autorisations requises
Les autorisations suivantes sont requises pour afficher le récapitulatif des correctifs :
- Afficher le récapitulatif des correctifs pour les VM d'une organisation ou d'un dossier :
-
osconfig.upgradeReports.getSummary
-
resourcemanager.projects.get
-
resourcemanager.projects.list
-
-
Afficher le récapitulatif des correctifs pour les VM d'un projet (onglet "Projets") :
-
osconfig.upgradeReports.searchSummaries
-
resourcemanager.projects.get
-
resourcemanager.projects.list
-
Vous pouvez également obtenir ces autorisations avec des rôles personnalisés ou d'autres rôles prédéfinis.
Afficher le récapitulatif des correctifs pour les VM d'une organisation ou d'un dossier
Vous pouvez définir le champ d'application d'affichage sur une organisation ou un dossier et afficher le récapitulatif des correctifs pour les VM de tous les projets de cette organisation ou ce dossier.
Seuls les projets de votre organisation ou de votre dossier qui répondent à l'une des exigences suivantes sont répertoriés dans le tableau récapitulatif des correctifs :
- Contient une ou plusieurs VM sur lesquelles VM Manager est activé et en cours d'exécution.
- Contient une ou plusieurs VM sur lesquelles VM Manager s'est exécuté au cours des 7 derniers jours et des données sur les correctifs sont disponibles.
Pour afficher le récapitulatif des correctifs pour les VM d'une organisation ou d'un dossier, procédez comme suit :
- Dans la console Trusted Cloud , accédez à la page Compute Engine > VM Manager > Patch.
- Dans la liste déroulante des projets de la console Trusted Cloud , sélectionnez l'organisation ou le dossier pour lequel vous souhaitez afficher les informations de récapitulatif des correctifs.
- Cliquez sur l'onglet Projets.
- Facultatif : Spécifiez les critères pour les calculs de récapitulatif des correctifs en utilisant le générateur de requêtes.
Consultez les informations de récapitulatif des correctifs dans le tableau récapitulatif des correctifs. Le tableau comprend une ligne pour chaque projet, comme illustré dans la figure suivante :
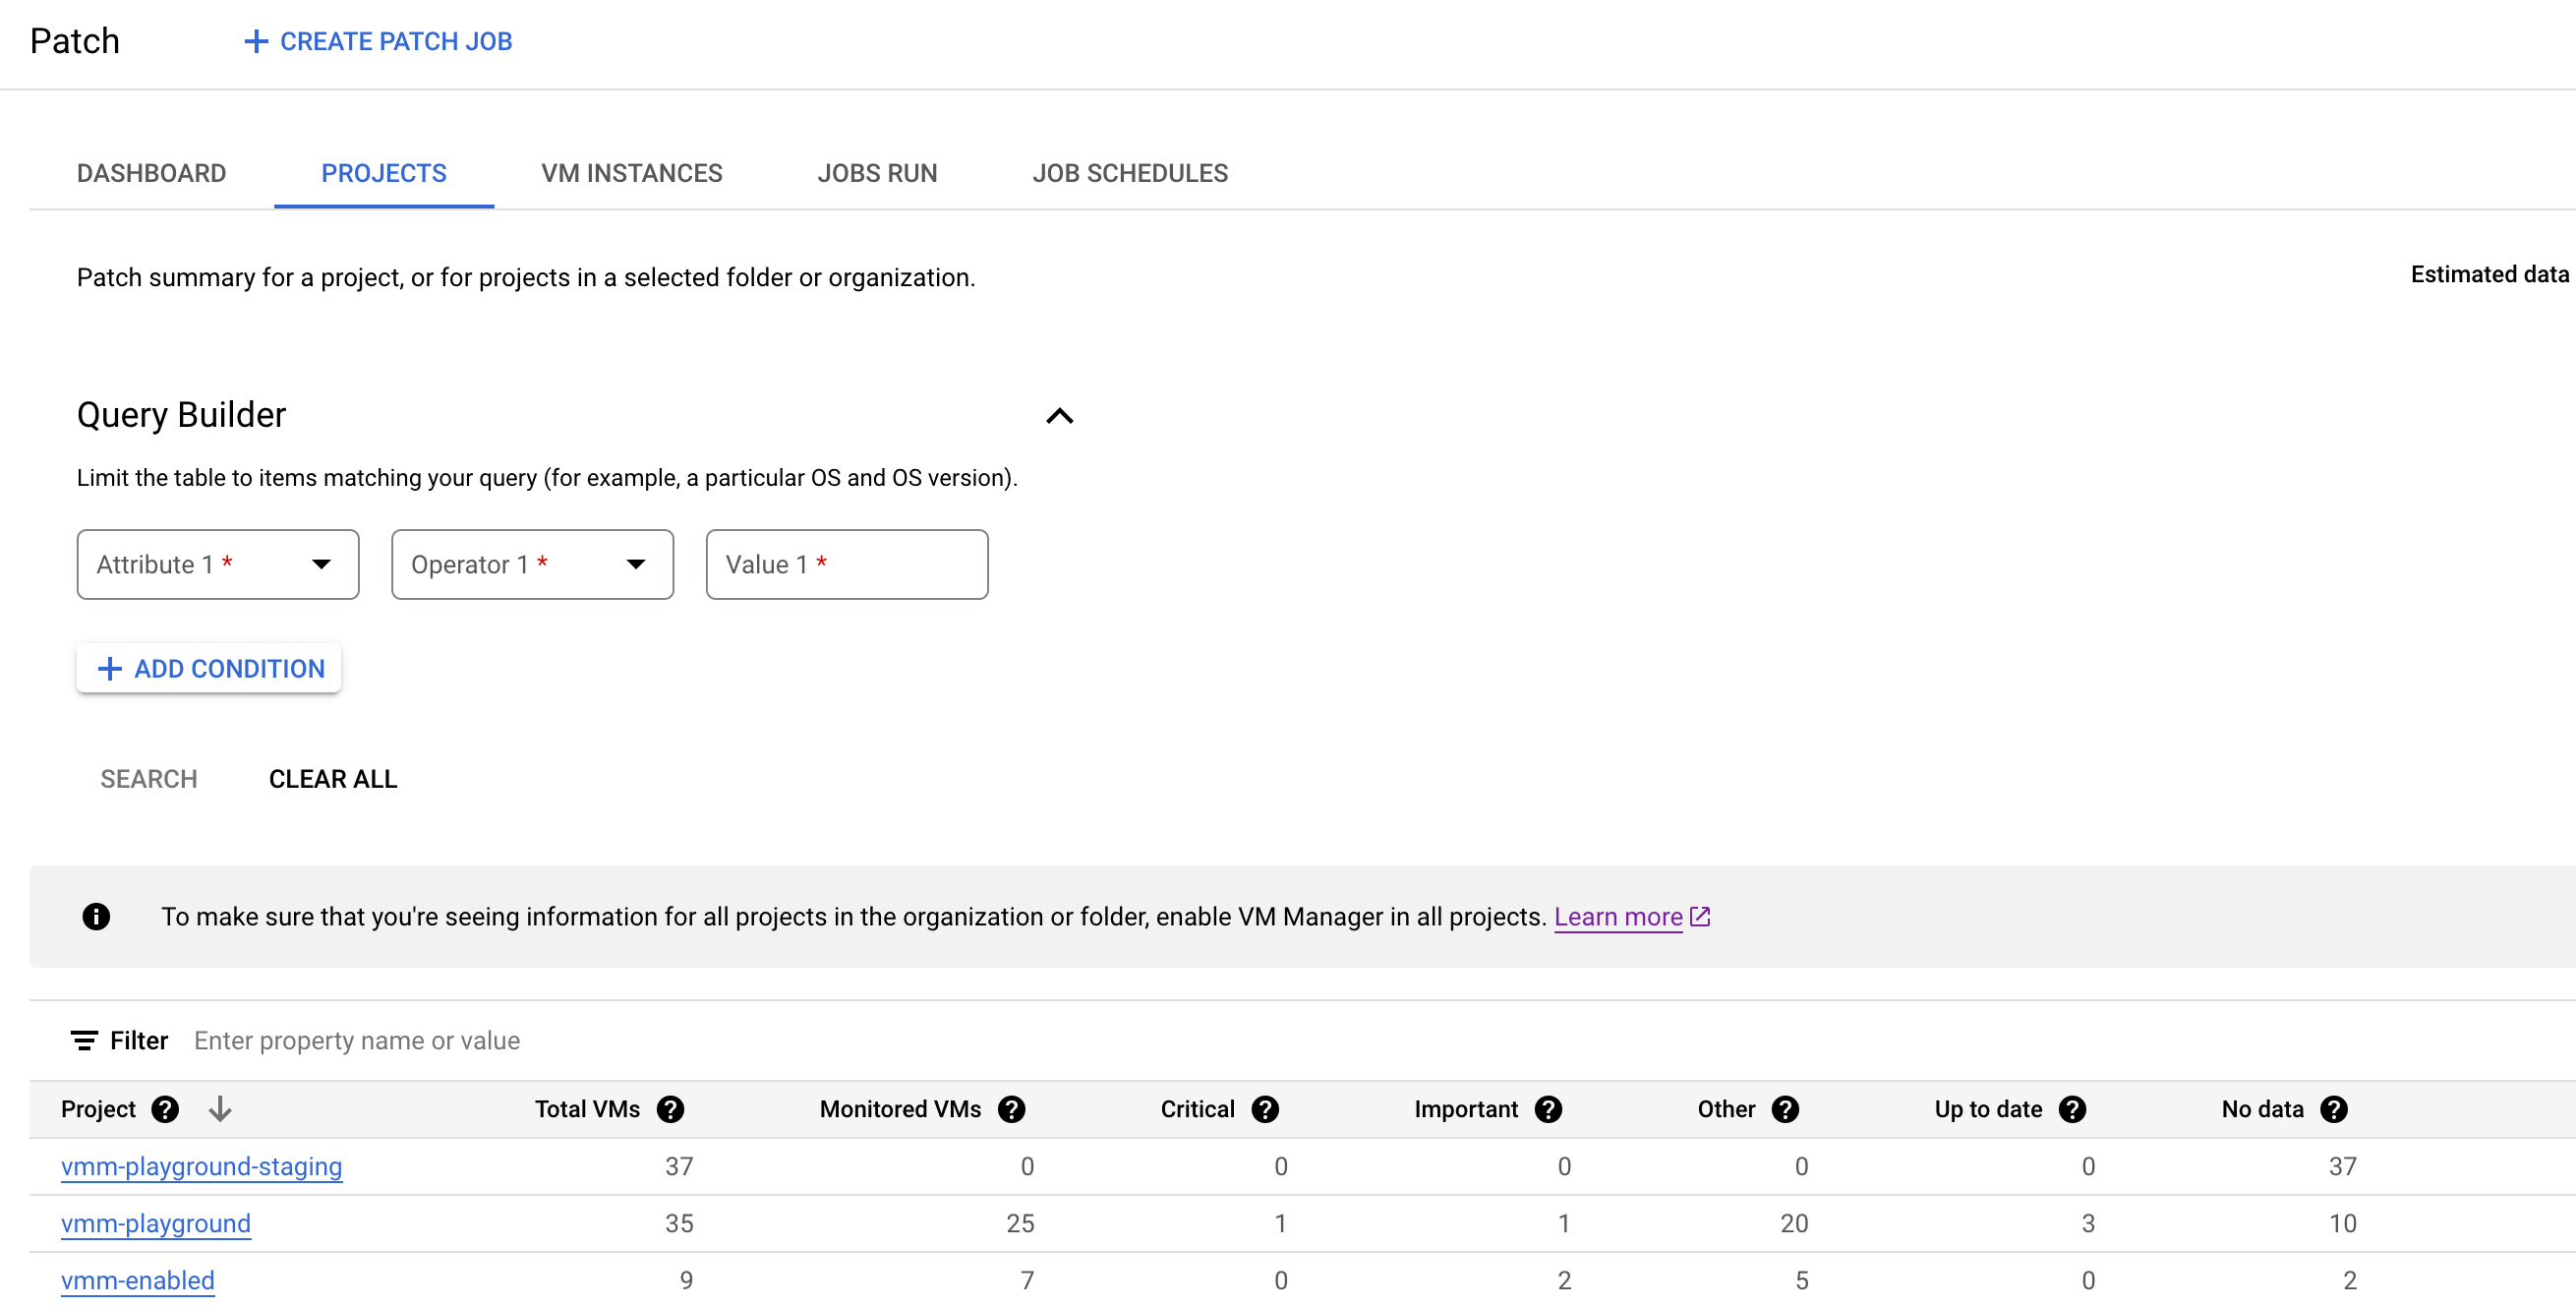
Le tableau récapitulatif des correctifs répertorie les informations suivantes qui répondent aux critères que vous avez spécifiés dans le générateur de requêtes :
Projet : nom des projets de l'organisation qui contiennent au moins une VM et sur lesquels VM Manager est activé.
Cliquez sur le nom du projet pour ouvrir l'onglet Instances de VM qui répertorie l'état d'application de correctif pour les VM individuelles du projet.
Nombre total de VM : nombre total de VM dans chaque projet.
VM surveillées : nombre de VM du projet pour lesquelles l'agent VM Manager est activé et qui sont en cours d'analyse pour les correctifs.
Critique : nombre de VM avec au moins un correctif
CRITICAL
disponible.Important : nombre de VM avec un ou plusieurs correctifs
IMPORTANT
disponibles.Autres : nombre de VM pour lesquelles des correctifs sont disponibles, avec un niveau de gravité inférieur à
CRITICAL
ouIMPORTANT
.À jour : nombre de VM pour lesquelles aucun correctif n'est disponible.
Aucune donnée : nombre de VM pour lesquelles aucune donnée de correctif n'est disponible. VM Manager n'est pas activé pour ces VM ou leur système d'exploitation n'est actuellement pas pris en charge.
Facultatif : Appliquez des filtres de table si vous souhaitez afficher des lignes spécifiques dans le tableau récapitulatif des correctifs :
Par exemple, si vous souhaitez afficher un récapitulatif des correctifs pour les projets comportant plus de 10 VM, définissez l'option de filtre Nombre total de VM sur
>= 10
.
Utiliser le générateur de requêtes pour filtrer les informations récapitulatives sur les correctifs
En fonction des critères que vous spécifiez à l'aide du générateur de requêtes, VM Manager calcule et affiche le récapitulatif des correctifs pour les VM des projets de votre organisation ou de votre dossier. Vous pouvez ensuite utiliser les filtres de la table Récapitulatif des correctifs pour filtrer les données affichées.
Par exemple, lorsque vous définissez l'attribut
OS
dans le générateur de requêtes en tant queDebian
, VM Manager affiche les informations de correctif pour toutes les VM avec Debian OS. Si vous souhaitez afficher le récapitulatif des correctifs pour les VM d'un projet spécifique, utilisez le filtre pour spécifier l'ID du projet.
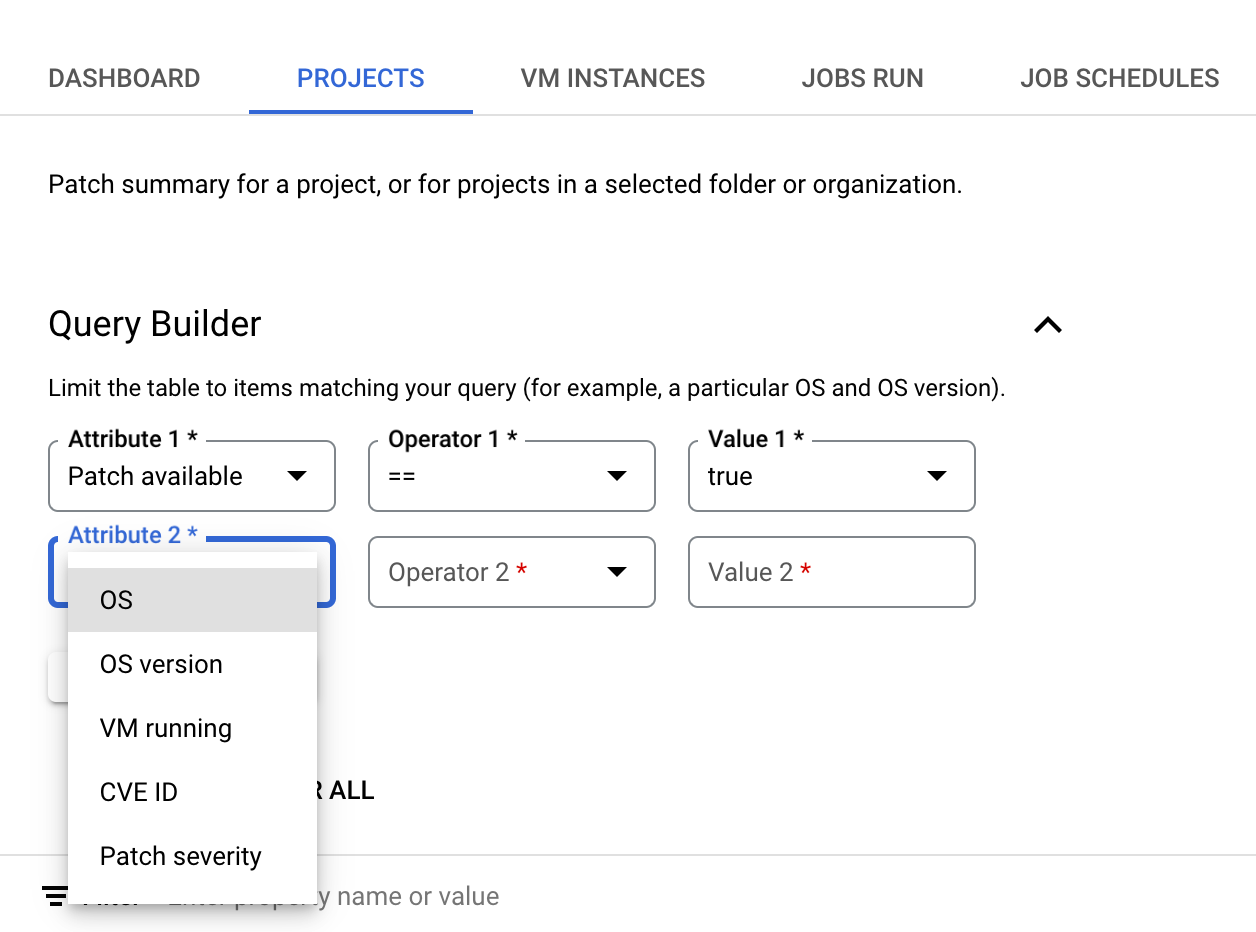
Pour définir une requête dans le générateur de requêtes, procédez comme suit :
Sélectionnez un attribut. Le générateur de requêtes accepte les attributs suivants :
- OS : spécifiez les noms courts des systèmes d'exploitation, tels que
Windows
ouDebian
. - Version d'OS : spécifiez la version du système d'exploitation. Par exemple,
21.04
ou10.0.22000
. Vous pouvez spécifier un seul astérisque (*
) à la fin de la chaîne de version du système d'exploitation afin d'indiquer une correspondance partielle, par exemple10*
. - VM en cours d'exécution : indiquez si vous souhaitez afficher le récapitulatif des correctifs pour les VM à l'état
RUNNING
. - ID CVE : identifiant de la faille CVE corrigée par un correctif spécifique, au format
CVE-2023-12345
. Si cet attribut est défini, seuls les correctifs liés à l'ID CVE donné sont pris en compte pour calculer les informations récapitulatives sur les correctifs. - Correctif disponible : Définissez cet attribut sur
true
pour calculer les informations récapitulatives sur les correctifs uniquement pour les VM avec au moins un correctif disponible. - Gravité du correctif : spécifiez la gravité des correctifs applicables aux VM.
- OS : spécifiez les noms courts des systèmes d'exploitation, tels que
Choisissez l'un des attributs et spécifiez une valeur pour l'attribut. Par exemple, si vous souhaitez afficher le récapitulatif des correctifs pour les VM avec un système d'exploitation spécifique, sélectionnez OS. Vous obtenez ensuite une liste d'opérateurs de comparaison parmi lesquels effectuer un choix.
- Sélectionnez un opérateur (par exemple,
==
). - Dans le champ Valeur, spécifiez la valeur de comparaison. Par exemple,
Debian
.
- Sélectionnez un opérateur (par exemple,
Pour ajouter un autre attribut, cliquez sur Ajouter une condition.
Cliquez sur Rechercher.
Étape suivante
- Créez un job d'application de correctifs.
- Gérer les jobs d'application de correctifs.
- Planifiez des jobs d'application de correctifs.
Sauf indication contraire, le contenu de cette page est régi par une licence Creative Commons Attribution 4.0, et les échantillons de code sont régis par une licence Apache 2.0. Pour en savoir plus, consultez les Règles du site Google Developers. Java est une marque déposée d'Oracle et/ou de ses sociétés affiliées.
Dernière mise à jour le 2025/08/19 (UTC).
[[["Facile à comprendre","easyToUnderstand","thumb-up"],["J'ai pu résoudre mon problème","solvedMyProblem","thumb-up"],["Autre","otherUp","thumb-up"]],[["Il n'y a pas l'information dont j'ai besoin","missingTheInformationINeed","thumb-down"],["Trop compliqué/Trop d'étapes","tooComplicatedTooManySteps","thumb-down"],["Obsolète","outOfDate","thumb-down"],["Problème de traduction","translationIssue","thumb-down"],["Mauvais exemple/Erreur de code","samplesCodeIssue","thumb-down"],["Autre","otherDown","thumb-down"]],["Dernière mise à jour le 2025/08/19 (UTC)."],[[["\u003cp\u003eThe Patch dashboard in the Google Cloud console allows you to view patch summary information for virtual machines (VMs) across projects, organizations, or folders.\u003c/p\u003e\n"],["\u003cp\u003eYou can review the status of patch jobs and scheduled patch deployments from the Patch dashboard.\u003c/p\u003e\n"],["\u003cp\u003eTo view patch summaries, you must have the appropriate IAM roles, such as "OS Config Upgrade Report Viewer" for organizations/folders or "OS Config Vulnerability Report Viewer" for projects.\u003c/p\u003e\n"],["\u003cp\u003eThe patch summary table provides details such as the total number of VMs, monitored VMs, and the number of VMs with critical, important, or other patches available, as well as up to date and no data.\u003c/p\u003e\n"],["\u003cp\u003eUsing the query builder, you can filter the patch summary data by attributes like OS, OS version, VM running status, CVE ID, patch availability, and patch severity.\u003c/p\u003e\n"]]],[],null,["This document describes the patch summary information on the **Patch** dashboard\nof the Google Cloud console. From this dashboard, you can do\nthe following:\n\n- View the patch summary information for your VMs in a project, organization, or folders.\n- View the status of patch jobs in your project.\n- View the status of scheduled patch deployments.\n\nBefore you begin\n\n- Review [OS Config quotas](/compute/vm-manager/docs/os-config-quotas).\n- If you haven't already, set up [authentication](/compute/docs/authentication). Authentication verifies your identity for access to Google Cloud services and APIs. To run code or samples from a local development environment, you can authenticate to Compute Engine by selecting one of the following options:\n\n Select the tab for how you plan to use the samples on this page: \n\n Console\n\n\n When you use the Google Cloud console to access Google Cloud services and\n APIs, you don't need to set up authentication.\n\n gcloud\n 1.\n [Install](/sdk/docs/install) the Google Cloud CLI.\n\n After installation,\n [initialize](/sdk/docs/initializing) the Google Cloud CLI by running the following command:\n\n ```bash\n gcloud init\n ```\n\n\n If you're using an external identity provider (IdP), you must first\n [sign in to the gcloud CLI with your federated identity](/iam/docs/workforce-log-in-gcloud).\n | **Note:** If you installed the gcloud CLI previously, make sure you have the latest version by running `gcloud components update`.\n 2. [Set a default region and zone](/compute/docs/gcloud-compute#set_default_zone_and_region_in_your_local_client).\n\n REST\n\n\n To use the REST API samples on this page in a local development environment, you use the\n credentials you provide to the gcloud CLI.\n 1. [Install](/sdk/docs/install) the Google Cloud CLI. After installation, [initialize](/sdk/docs/initializing) the Google Cloud CLI by running the following command: \n\n ```bash\n gcloud init\n ```\n 2. If you're using an external identity provider (IdP), you must first [sign in to the gcloud CLI with your federated identity](/iam/docs/workforce-log-in-gcloud).\n\n\n For more information, see\n [Authenticate for using REST](/docs/authentication/rest)\n in the Google Cloud authentication documentation.\n\nRequired roles and permissions\n\n\nTo get the permissions that\nyou need to view patch summary,\n\nask your administrator to grant you the\nfollowing IAM roles:\n\n- View patch summary for VMs in an organization or folder: [OS Config Upgrade Report Viewer](/iam/docs/roles-permissions/osconfig#osconfig.upgradeReportViewer) (`roles/osconfig.upgradeReportViewer`) on the organization or folder\n- View patch summary for VMs in a project: [OS Config Vulnerability Report Viewer](/iam/docs/roles-permissions/osconfig#osconfig.vulnerabilityReportViewer) (`roles/osconfig.vulnerabilityReportViewer`) on the project\n\n\nFor more information about granting roles, see [Manage access to projects, folders, and organizations](/iam/docs/granting-changing-revoking-access).\n\n\nThese predefined roles contain\n\nthe permissions required to view patch summary. To see the exact permissions that are\nrequired, expand the **Required permissions** section:\n\n\nRequired permissions\n\nThe following permissions are required to view patch summary:\n\n- View patch summary for VMs in an organization or folder:\n - `osconfig.upgradeReports.getSummary `\n - `resourcemanager.projects.get `\n - `resourcemanager.projects.list`\n- View patch summary for VMs in a project (Projects tab):\n - `osconfig.upgradeReports.searchSummaries `\n - `resourcemanager.projects.get `\n - `resourcemanager.projects.list`\n\n\nYou might also be able to get\nthese permissions\nwith [custom roles](/iam/docs/creating-custom-roles) or\nother [predefined roles](/iam/docs/roles-overview#predefined).\n\nView patch summary for VMs in an organization or folder\n\nYou can set the view scope to an organization or folder and view the patch\nsummary for VMs in all projects in that organization or folder.\n\nOnly those projects in your organization or folder that meet one of the following\nrequirements are listed in the Patch summary table:\n\n- Contains one or more VMs on which VM Manager is enabled and running.\n- Contains one or more VMs on which VM Manager was running in the past 7 days and patch data is available.\n\nTo view patch summary for VMs in an organization or folder, do the following:\n\n1. In the Google Cloud console, go to the **Compute Engine** \\\u003e **VM Manager** \\\u003e **Patch** page.\n\n [Go to the Patch page](https://console.cloud.google.com/compute/patch)\n2. In the project drop-down list on the Google Cloud console, select the organization or folder for which you want to see the patch summary information.\n3. Click **Projects** tab.\n4. Optional: Specify the criteria for patch summary computation by [using the\n query builder](#query-builder).\n5. Review patch summary information in the **Patch summary table**.\n The table includes a row for each project as shown in the following figure:\n\n [](/static/compute/images/manage-os/patch-summary.png)\n\n The Patch summary table lists the following information that meets the\n criteria you've specified in the query builder:\n - **Project**: The name of projects in the organization that contain at least\n one VM and have VM Manager enabled.\n\n Clicking on the project name opens the **VM instances** tab that lists\n the patch status of individual VMs in the project.\n - **Total VMs**: Total number of VMs in each project.\n\n - **Monitored VMs**: Number of VMs in the project that have VM Manager agent\n enabled and are being scanned for patches.\n\n - **Critical** : Number of VMs with at least one `CRITICAL` patch available.\n\n - **Important** : Number of VMs with one or more `IMPORTANT` patches available.\n\n - **Other** : Number of VMs for which there are patches available with a\n severity rating below `CRITICAL` or `IMPORTANT`.\n\n - **Up to date**: Number of VMs without any available patches.\n\n - **No data**: Number of VMs with no patch data available. Either VM Manager\n is not enabled for these VMs, or their operation system is not supported.\n\n6. Optional: Apply table filters if you want to view specific rows in the\n Patch summary table:\n\n \u003cbr /\u003e\n\n [](/static/compute/images/manage-os/table-filter.png)\n\n \u003cbr /\u003e\n\n For example, if you want to see patch summary for projects that have more\n than 10 VMs, then set the filter option **Total VMs** to `\u003e= 10`.\n\nUse query builder to filter the patch summary information\n\nBased on the criteria that you specify using the query builder, VM Manager\ncomputes and displays the patch summary for VMs in the\nprojects in your organization or folder. You can then use the table filters\nin the Patch summary table to filter the displayed data.\n\nFor example, when you set the `OS` attribute in the query builder as `Debian`,\nVM Manager displays patch information for all VMs with Debian OS.\nIf you want to view the patch summary for VMs in a specific project,\nuse the filter to specify the project ID.\n\n\u003cbr /\u003e\n\n[](/static/compute/images/manage-os/query-builder.png)\n\n\u003cbr /\u003e\n\nTo set a query in the query builder, do the following:\n\n1. Select an **Attribute**. The query builder supports the following attributes:\n\n - **OS** : Specify the short names of the operating systems such as `Windows` or `Debian`.\n - **OS version** : Specify the version of the operating system. For example, `21.04` or `10.0.22000`. You can specify a single asterisk (`*`) at the end of the OS version string to denote partial match, for example `10*`.\n - **VM running** : Specify whether you want to view patch summary for VMs that are in the `RUNNING` state.\n - **CVE ID** : The identifier of the CVE that is fixed by a particular patch, in the `CVE-2023-12345` format. If this attribute is set, only those patches that are related to the given CVE ID are considered to compute the patch summary information.\n - **Patch available** : Set this attribute to `true` to compute patch summary information only for those VMs with at least one patch available.\n - **Patch severity**: Specify the severity of patches applicable to the VMs.\n2. Choose one of the attributes and specify a value for the attribute.\n For example, if you want to see patch summary for VMs with a specific operating\n system, then select **OS**. You then get a list of comparison\n operators to choose from.\n\n 1. Select an **Operator** , for example, `==`.\n 2. In the **Value** field, specify the comparison value. For example `Debian`.\n3. To add another attribute, click **Add condition**.\n\n4. Click **Search**.\n\n| **Note:** VM Manager applies the query only to VMs on which VM Manager is enabled.\n\nWhat's next?\n\n- [Create a patch job](/compute/vm-manager/docs/patch/create-patch-job).\n- [Manage patch jobs](/compute/vm-manager/docs/patch/manage-patch-jobs).\n- [Schedule patch jobs](/compute/vm-manager/docs/patch/schedule-patch-jobs)."]] -