將金鑰版本匯入 Cloud KMS

本主題說明如何將加密金鑰匯入 Cloud HSM 或 Cloud Key Management Service,做為新的金鑰版本。

如要進一步瞭解如何匯入金鑰,包括相關限制,請參閱金鑰匯入

完成本主題中的步驟需要 5 到 10 分鐘,不包括「事前準備」步驟。手動包裝金鑰會增加工作複雜度。

事前準備

建議您建立新專案來測試這項功能,方便在測試後清除資料,並確保您具備足夠的「身分與存取權管理」(IAM) 權限來匯入金鑰。

匯入金鑰前,請先準備好專案、本機系統和金鑰。

準備專案

  1. In the Trusted Cloud console, on the project selector page, select or create a Trusted Cloud project.

    Go to project selector

  2. Verify that billing is enabled for your Trusted Cloud project.

  3. Enable the required API.

    Enable the API

  4. Install the Google Cloud CLI.

  5. 設定 gcloud CLI 以使用您的聯合身分。

    詳情請參閱「 使用聯合身分登入 gcloud CLI」。

  6. 如要初始化 gcloud CLI,請執行下列指令:

    gcloud init

  7. 執行匯入作業的使用者需要下列 IAM 權限,才能建立金鑰環、金鑰和匯入工作。如果使用者不是專案擁有者,您可以將下列兩項預先定義的角色指派給使用者:

    • roles/editor
    • roles/cloudkms.importer

    如要進一步瞭解 Cloud KMS 適用的 IAM 角色和權限,請參閱「權限和角色」。

  8. 準備本機系統

    選擇下列其中一個選項,準備好本機系統。建議大多數使用者採用自動金鑰包裝。

    • 如要允許 Google Cloud CLI 在將金鑰傳輸至 Trusted Cloud by S3NS前自動包裝金鑰,您必須在本機系統安裝 Pyca 密碼編譯程式庫。匯入工作會使用 Pyca 程式庫,在將金鑰傳送至 Trusted Cloud之前,先在本機包裝並保護金鑰。
    • 如要手動包裝金鑰,請務必設定 OpenSSL 以手動包裝金鑰

    準備金鑰

    確認金鑰的演算法和長度受到支援。金鑰可用的演算法取決於金鑰是否用於對稱式加密、非對稱式加密或非對稱式簽署,以及金鑰是儲存在軟體還是 HSM 中。您會在匯入要求中指定金鑰的演算法。

    此外,您也必須驗證金鑰的編碼方式,並視需要進行調整。

    金鑰版本建立或匯入後,就無法變更下列項目:

    • 「防護等級」會指出金鑰是否保留在軟體、HSM 或外部金鑰管理系統中。金鑰內容無法從其中一個儲存環境移至另一個環境。所有金鑰版本都具有相同的保護等級。

    • 「用途」會指出金鑰版本是用於對稱式加密、非對稱式加密,還是非對稱式簽署。金鑰用途會限制可用於建立金鑰版本的演算法。金鑰的所有版本用途都相同。

    如果您沒有要匯入的金鑰,但想驗證匯入金鑰的程序,可以使用下列指令在本地系統建立對稱金鑰:

    openssl rand 32 > ${HOME}/test.bin
    

    請僅將這組金鑰用於測試。以這種方式建立的金鑰可能不適合用於實際工作環境。

    如需手動包裝金鑰,請先完成這項作業,再繼續本主題中的程序。

    建立目標金鑰和金鑰環

    Cloud KMS 金鑰是容器物件,內含零或多個金鑰版本。每個金鑰版本都包含加密金鑰。

    將金鑰匯入 Cloud KMS 或 Cloud HSM 時,匯入的金鑰會成為現有 Cloud KMS 或 Cloud HSM 金鑰的新金鑰版本。在本主題的其餘部分,這個金鑰稱為「目標金鑰」。您必須先建立目標金鑰,才能將金鑰內容匯入其中。

    匯入金鑰版本不會影響該金鑰的現有版本。不過,建議您在測試金鑰匯入時建立空白金鑰。空白金鑰沒有版本、未啟用,且無法使用。

    您可以選擇指定新建立的金鑰只能包含匯入的版本,避免在 Cloud KMS 中意外產生新版本。

    金鑰環上存在金鑰;在本主題中,這個金鑰環稱為「目標金鑰環」。目標金鑰環的位置會決定匯入後金鑰內容的可用位置。在某些位置,您無法建立或匯入 Cloud HSM 金鑰。金鑰建立後,就無法移至其他金鑰環或位置。

    請按照下列步驟,使用 Google Cloud CLI 或 Trusted Cloud 控制台,在新的金鑰環上建立空白金鑰。

    控制台

    1. 前往 Trusted Cloud 控制台的「Key Management」頁面。

      前往「金鑰管理」

    2. 按一下 [Create key ring] (建立金鑰環)

    3. 在「Key ring name」(金鑰環名稱) 欄位中輸入金鑰環的名稱。

    4. 在「位置類型」下方,選取位置類型和位置。

    5. 按一下「建立」,「建立金鑰」頁面隨即開啟。

    6. 在「Key name」(金鑰名稱) 欄位中,輸入金鑰的名稱。

    7. 在「Protection level」(防護等級) 中,選取「Software」(軟體) 或「HSM」,然後按一下「Continue」(繼續)

    8. 在「Key material」(金鑰內容) 部分,選取「Imported key」(匯入的金鑰),然後按一下「Continue」(繼續)。 這樣一來,系統就不會建立初始金鑰版本。

    9. 設定金鑰的「用途」和「演算法」,然後按一下「繼續」

    10. 選用:如要讓這個金鑰只包含匯入的金鑰版本,請選取「將金鑰版本設定為僅限匯入」。這樣可避免您在 Cloud KMS 中誤建新的金鑰版本。

    11. 選用:如果是匯入的金鑰,自動輪替功能預設為停用。如要啟用自動輪替,請從「金鑰輪替週期」欄位選取值。

      啟用自動輪替功能後,系統會在 Cloud KMS 中產生新的金鑰版本,輪替後匯入的金鑰版本將不再是預設金鑰版本。

    12. 點選「建立」

    gcloud

    如要在指令列上使用 Cloud KMS,請先安裝或升級至最新版 Google Cloud CLI

    1. 建立目標金鑰環。如要匯入 Cloud HSM 金鑰,請選取支援 Cloud HSM 的位置。

      gcloud kms keyrings create KEY_RING \
        --location LOCATION
      

      進一步瞭解如何建立金鑰環

    2. 建立目標鍵。

      • 指定金鑰的用途
      • 使用 --skip-initial-version-creation 標記,避免建立初始版本。
      • 選用:使用 --import-only 標記,防止在 Cloud KMS 中建立新版本。
      • 選用:請勿指定輪替政策。如果啟用自動輪替功能,系統會在 Cloud KMS 中產生新的金鑰版本,輪替後匯入的金鑰版本就不再是預設金鑰版本。如果指定 --import-only 旗標,則無法指定輪替政策。
      gcloud kms keys create KEY_NAME \
        --location LOCATION \
        --keyring KEY_RING \
        --purpose PURPOSE \
        --skip-initial-version-creation \
        --import-only
      

      您可以進一步瞭解如何建立 Cloud KMS 金鑰Cloud HSM 金鑰

    Go

    如要執行這段程式碼,請先設定 Go 開發環境,並安裝 Cloud KMS Go SDK

    import (
    	"context"
    	"fmt"
    	"io"
    
    	kms "cloud.google.com/go/kms/apiv1"
    	"cloud.google.com/go/kms/apiv1/kmspb"
    )
    
    // createKeyForImport creates a new asymmetric signing key in Cloud HSM.
    func createKeyForImport(w io.Writer, parent, id string) error {
    	// parent := "projects/my-project/locations/us-east1/keyRings/my-key-ring"
    	// id := "my-imported-key"
    
    	// Create the client.
    	ctx := context.Background()
    	client, err := kms.NewKeyManagementClient(ctx)
    	if err != nil {
    		return fmt.Errorf("failed to create kms client: %w", err)
    	}
    	defer client.Close()
    
    	// Build the request.
    	req := &kmspb.CreateCryptoKeyRequest{
    		Parent:      parent,
    		CryptoKeyId: id,
    		CryptoKey: &kmspb.CryptoKey{
    			Purpose: kmspb.CryptoKey_ASYMMETRIC_SIGN,
    			VersionTemplate: &kmspb.CryptoKeyVersionTemplate{
    				ProtectionLevel: kmspb.ProtectionLevel_HSM,
    				Algorithm:       kmspb.CryptoKeyVersion_EC_SIGN_P256_SHA256,
    			},
    			// Ensure that only imported versions may be added to this key.
    			ImportOnly: true,
    		},
    		SkipInitialVersionCreation: true,
    	}
    
    	// Call the API.
    	result, err := client.CreateCryptoKey(ctx, req)
    	if err != nil {
    		return fmt.Errorf("failed to create key: %w", err)
    	}
    	fmt.Fprintf(w, "Created key: %s\n", result.Name)
    	return nil
    }
    

    Java

    如要執行這段程式碼,請先設定 Java 開發環境,然後安裝 Cloud KMS Java SDK

    import com.google.cloud.kms.v1.CreateCryptoKeyRequest;
    import com.google.cloud.kms.v1.CryptoKey;
    import com.google.cloud.kms.v1.CryptoKey.CryptoKeyPurpose;
    import com.google.cloud.kms.v1.CryptoKeyVersion.CryptoKeyVersionAlgorithm;
    import com.google.cloud.kms.v1.CryptoKeyVersionTemplate;
    import com.google.cloud.kms.v1.KeyManagementServiceClient;
    import com.google.cloud.kms.v1.KeyRingName;
    import com.google.cloud.kms.v1.ProtectionLevel;
    import java.io.IOException;
    
    public class CreateKeyForImport {
    
      public void createKeyForImport() throws IOException {
        // TODO(developer): Replace these variables before running the sample.
        String projectId = "your-project-id";
        String locationId = "us-east1";
        String keyRingId = "my-key-ring";
        String id = "my-import-key";
        createKeyForImport(projectId, locationId, keyRingId, id);
      }
    
      // Create a new crypto key to hold imported key versions.
      public void createKeyForImport(String projectId, String locationId, String keyRingId, String id)
          throws IOException {
        // Initialize client that will be used to send requests. This client only
        // needs to be created once, and can be reused for multiple requests. After
        // completing all of your requests, call the "close" method on the client to
        // safely clean up any remaining background resources.
        try (KeyManagementServiceClient client = KeyManagementServiceClient.create()) {
          // Build the parent name from the project, location, and key ring.
          KeyRingName keyRingName = KeyRingName.of(projectId, locationId, keyRingId);
    
          // Create the crypto key.
          CryptoKey createdKey =
              client.createCryptoKey(
                  CreateCryptoKeyRequest.newBuilder()
                      .setParent(keyRingName.toString())
                      .setCryptoKeyId(id)
                      .setCryptoKey(
                          CryptoKey.newBuilder()
                              .setPurpose(CryptoKeyPurpose.ASYMMETRIC_SIGN)
                              .setVersionTemplate(
                                  CryptoKeyVersionTemplate.newBuilder()
                                      .setProtectionLevel(ProtectionLevel.HSM)
                                      .setAlgorithm(CryptoKeyVersionAlgorithm.EC_SIGN_P256_SHA256))
                              // Ensure that only imported versions may be
                              // added to this key.
                              .setImportOnly(true))
                      .setSkipInitialVersionCreation(true)
                      .build());
    
          System.out.printf("Created crypto key %s%n", createdKey.getName());
        }
      }
    }

    Node.js

    如要執行這段程式碼,請先設定 Node.js 開發環境,然後安裝 Cloud KMS Node.js SDK

    //
    // TODO(developer): Uncomment these variables before running the sample.
    //
    // const projectId = 'my-project';
    // const locationId = 'us-east1';
    // const keyRingId = 'my-key-ring';
    // const id = 'my-imported-key';
    
    // Imports the Cloud KMS library
    const {KeyManagementServiceClient} = require('@google-cloud/kms');
    
    // Instantiates a client
    const client = new KeyManagementServiceClient();
    
    // Build the parent key ring name
    const keyRingName = client.keyRingPath(projectId, locationId, keyRingId);
    
    async function createKeyForImport() {
      const [key] = await client.createCryptoKey({
        parent: keyRingName,
        cryptoKeyId: id,
        cryptoKey: {
          purpose: 'ENCRYPT_DECRYPT',
          versionTemplate: {
            algorithm: 'GOOGLE_SYMMETRIC_ENCRYPTION',
            protectionLevel: 'HSM',
          },
          // Optional: ensure that only imported versions may be added to this
          // key.
          importOnly: true,
        },
        // Do not allow KMS to generate an initial version of this key.
        skipInitialVersionCreation: true,
      });
    
      console.log(`Created key for import: ${key.name}`);
      return key;
    }
    
    return createKeyForImport();

    Python

    如要執行這段程式碼,請先設定 Python 開發環境,然後安裝 Cloud KMS Python SDK

    from google.cloud import kms
    
    
    def create_key_for_import(
        project_id: str, location_id: str, key_ring_id: str, crypto_key_id: str
    ) -> None:
        """
    
        Sets up an empty CryptoKey within a KeyRing for import.
    
    
        Args:
            project_id (string): Google Cloud project ID (e.g. 'my-project').
            location_id (string): Cloud KMS location (e.g. 'us-east1').
            key_ring_id (string): ID of the Cloud KMS key ring (e.g. 'my-key-ring').
            crypto_key_id (string): ID of the key to import (e.g. 'my-asymmetric-signing-key').
        """
    
        # Create the client.
        client = kms.KeyManagementServiceClient()
    
        # Build the key. For more information regarding allowed values of these fields, see:
        # https://googleapis.dev/python/cloudkms/latest/_modules/google/cloud/kms_v1/types/resources.html
        purpose = kms.CryptoKey.CryptoKeyPurpose.ASYMMETRIC_SIGN
        algorithm = kms.CryptoKeyVersion.CryptoKeyVersionAlgorithm.EC_SIGN_P256_SHA256
        protection_level = kms.ProtectionLevel.HSM
        key = {
            "purpose": purpose,
            "version_template": {
                "algorithm": algorithm,
                "protection_level": protection_level,
            },
        }
    
        # Build the parent key ring name.
        key_ring_name = client.key_ring_path(project_id, location_id, key_ring_id)
    
        # Call the API.
        created_key = client.create_crypto_key(
            request={
                "parent": key_ring_name,
                "crypto_key_id": crypto_key_id,
                "crypto_key": key,
                # Do not allow KMS to generate an initial version of this key.
                "skip_initial_version_creation": True,
            }
        )
        print(f"Created hsm key: {created_key.name}")


    API

    這些範例使用 curl 做為 HTTP 用戶端,示範如何使用 API。如要進一步瞭解存取權控管,請參閱「存取 Cloud KMS API」一文。

    1. 建立新的金鑰環:

      curl "https://cloudkms.googleapis.com/v1/projects/PROJECT_ID/locations/LOCATION/keyRings?keyRingId=KEY_RING" \
          --request "POST" \
          --header "authorization: Bearer TOKEN" \
          --header "content-type: application/json" \
          --header "x-goog-user-project: PROJECT_ID" \
          --data "{}"
      

      詳情請參閱 KeyRing.create API 說明文件

    2. 建立僅供匯入的空白金鑰:

      curl "https://cloudkms.googleapis.com/v1/projects/PROJECT_ID/locations/LOCATION/keyRings/KEY_RING/cryptoKeys?cryptoKeyId=KEY_NAME&skipInitialVersionCreation=true&importOnly=true" \
          --request "POST" \
          --header "authorization: Bearer TOKEN" \
          --header "content-type: application/json" \
          --header "x-goog-user-project: PROJECT_ID" \
          --data "{"purpose":"PURPOSE", "versionTemplate":{"protectionLevel":"PROTECTION_LEVEL","algorithm":"ALGORITHM"}}"
      

      詳情請參閱 CryptoKey.create API 說明文件

    金鑰環和金鑰現在已存在,但金鑰不含金鑰內容、沒有版本,且未啟用。接著,請建立匯入工作

    建立匯入工作

    匯入工作會定義匯入金鑰的特性,包括金鑰匯入後無法變更的屬性。

    防護等級會定義透過這項匯入工作匯入的金鑰,是會存放在軟體、HSM 還是外部金鑰管理系統。金鑰匯入後,就無法變更防護等級。

    匯入方法會定義用於建立包裝金鑰的演算法,在從本機系統傳輸至目標 Trusted Cloud 專案期間,包裝金鑰會保護匯入的金鑰。您可以選擇 3072 位元或 4096 位元的 RSA 金鑰。除非有特定需求,否則建議使用 3072 位元的包裝金鑰。

    您可以使用 gcloud CLI、Trusted Cloud 控制台或 Cloud Key Management Service API 建立匯入工作。

    控制台

    1. 前往 Trusted Cloud 控制台的「Key Management」頁面。

      前往「金鑰管理」頁面

    2. 按一下目標金鑰環的名稱。

    3. 將「防護等級」設為「軟體」或「HSM」。請使用與目標金鑰相同的防護等級。

    4. 按一下 [Create import job] (建立匯入工作)

    5. 在「Name」(名稱) 欄位中,輸入匯入工作的名稱。

    6. 在「Import method」下拉式選單中,將匯入方法設為「3072 bit RSA」或「4096 bit RSA」

    7. 點選「建立」

    gcloud

    如要在指令列上使用 Cloud KMS,請先安裝或升級至最新版 Google Cloud CLI

    使用下列指令建立匯入工作。

    gcloud kms import-jobs create IMPORT_JOB \
      --location LOCATION \
      --keyring KEY_RING \
      --import-method IMPORT_METHOD \
      --protection-level PROTECTION_LEVEL
    
    • 使用與目標金鑰相同的金鑰環和位置。
    • 將防護等級設為 softwarehsm
    • 將匯入方法設為 rsa-oaep-3072-sha1-aes-256rsa-oaep-4096-sha1-aes-256rsa-oaep-3072-sha256-aes-256rsa-oaep-4096-sha256-aes-256rsa-oaep-3072-sha256rsa-oaep-4096-sha256

    Go

    如要執行這段程式碼,請先設定 Go 開發環境,並安裝 Cloud KMS Go SDK

    import (
    	"context"
    	"fmt"
    	"io"
    
    	kms "cloud.google.com/go/kms/apiv1"
    	"cloud.google.com/go/kms/apiv1/kmspb"
    )
    
    // createImportJob creates a new job for importing keys into KMS.
    func createImportJob(w io.Writer, parent, id string) error {
    	// parent := "projects/PROJECT_ID/locations/global/keyRings/my-key-ring"
    	// id := "my-import-job"
    
    	// Create the client.
    	ctx := context.Background()
    	client, err := kms.NewKeyManagementClient(ctx)
    	if err != nil {
    		return fmt.Errorf("failed to create kms client: %w", err)
    	}
    	defer client.Close()
    
    	// Build the request.
    	req := &kmspb.CreateImportJobRequest{
    		Parent:      parent,
    		ImportJobId: id,
    		ImportJob: &kmspb.ImportJob{
    			// See allowed values and their descriptions at
    			// https://cloud.google.com/kms/docs/algorithms#protection_levels
    			ProtectionLevel: kmspb.ProtectionLevel_HSM,
    			// See allowed values and their descriptions at
    			// https://cloud.google.com/kms/docs/key-wrapping#import_methods
    			ImportMethod: kmspb.ImportJob_RSA_OAEP_3072_SHA1_AES_256,
    		},
    	}
    
    	// Call the API.
    	result, err := client.CreateImportJob(ctx, req)
    	if err != nil {
    		return fmt.Errorf("failed to create import job: %w", err)
    	}
    	fmt.Fprintf(w, "Created import job: %s\n", result.Name)
    	return nil
    }
    

    Java

    如要執行這段程式碼,請先設定 Java 開發環境,然後安裝 Cloud KMS Java SDK

    import com.google.cloud.kms.v1.ImportJob;
    import com.google.cloud.kms.v1.ImportJob.ImportMethod;
    import com.google.cloud.kms.v1.KeyManagementServiceClient;
    import com.google.cloud.kms.v1.KeyRingName;
    import com.google.cloud.kms.v1.ProtectionLevel;
    import java.io.IOException;
    
    public class CreateImportJob {
    
      public void createImportJob() throws IOException {
        // TODO(developer): Replace these variables before running the sample.
        String projectId = "your-project-id";
        String locationId = "us-east1";
        String keyRingId = "my-key-ring";
        String id = "my-import-job";
        createImportJob(projectId, locationId, keyRingId, id);
      }
    
      // Create a new import job.
      public void createImportJob(String projectId, String locationId, String keyRingId, String id)
          throws IOException {
        // Initialize client that will be used to send requests. This client only
        // needs to be created once, and can be reused for multiple requests. After
        // completing all of your requests, call the "close" method on the client to
        // safely clean up any remaining background resources.
        try (KeyManagementServiceClient client = KeyManagementServiceClient.create()) {
          // Build the parent name from the project, location, and key ring.
          KeyRingName keyRingName = KeyRingName.of(projectId, locationId, keyRingId);
    
          // Build the import job to create, with parameters.
          ImportJob importJob =
              ImportJob.newBuilder()
                  // See allowed values and their descriptions at
                  // https://cloud.google.com/kms/docs/algorithms#protection_levels
                  .setProtectionLevel(ProtectionLevel.HSM)
                  // See allowed values and their descriptions at
                  // https://cloud.google.com/kms/docs/key-wrapping#import_methods
                  .setImportMethod(ImportMethod.RSA_OAEP_3072_SHA1_AES_256)
                  .build();
    
          // Create the import job.
          ImportJob createdImportJob = client.createImportJob(keyRingName, id, importJob);
          System.out.printf("Created import job %s%n", createdImportJob.getName());
        }
      }
    }

    Node.js

    如要執行這段程式碼,請先設定 Node.js 開發環境,然後安裝 Cloud KMS Node.js SDK

    //
    // TODO(developer): Uncomment these variables before running the sample.
    //
    // const projectId = 'my-project';
    // const locationId = 'us-east1';
    // const keyRingId = 'my-key-ring';
    // const id = 'my-import-job';
    
    // Imports the Cloud KMS library
    const {KeyManagementServiceClient} = require('@google-cloud/kms');
    
    // Instantiates a client
    const client = new KeyManagementServiceClient();
    
    // Build the parent key ring name
    const keyRingName = client.keyRingPath(projectId, locationId, keyRingId);
    
    async function createImportJob() {
      const [importJob] = await client.createImportJob({
        parent: keyRingName,
        importJobId: id,
        importJob: {
          protectionLevel: 'HSM',
          importMethod: 'RSA_OAEP_3072_SHA256',
        },
      });
    
      console.log(`Created import job: ${importJob.name}`);
      return importJob;
    }
    
    return createImportJob();

    Python

    如要執行這段程式碼,請先設定 Python 開發環境,然後安裝 Cloud KMS Python SDK

    from google.cloud import kms
    
    
    def create_import_job(
        project_id: str, location_id: str, key_ring_id: str, import_job_id: str
    ) -> None:
        """
        Create a new import job in Cloud KMS.
    
        Args:
            project_id (string): Google Cloud project ID (e.g. 'my-project').
            location_id (string): Cloud KMS location (e.g. 'us-east1').
            key_ring_id (string): ID of the Cloud KMS key ring (e.g. 'my-key-ring').
            import_job_id (string): ID of the import job (e.g. 'my-import-job').
        """
    
        # Create the client.
        client = kms.KeyManagementServiceClient()
    
        # Retrieve the fully-qualified key_ring string.
        key_ring_name = client.key_ring_path(project_id, location_id, key_ring_id)
    
        # Set paramaters for the import job, allowed values for ImportMethod and ProtectionLevel found here:
        # https://googleapis.dev/python/cloudkms/latest/_modules/google/cloud/kms_v1/types/resources.html
    
        import_method = kms.ImportJob.ImportMethod.RSA_OAEP_3072_SHA1_AES_256
        protection_level = kms.ProtectionLevel.HSM
        import_job_params = {
            "import_method": import_method,
            "protection_level": protection_level,
        }
    
        # Call the client to create a new import job.
        import_job = client.create_import_job(
            {
                "parent": key_ring_name,
                "import_job_id": import_job_id,
                "import_job": import_job_params,
            }
        )
    
        print(f"Created import job: {import_job.name}")


    API

    這些範例使用 curl 做為 HTTP 用戶端,示範如何使用 API。如要進一步瞭解存取權控管,請參閱「存取 Cloud KMS API」一文。

    如要建立匯入工作,請使用 ImportJobs.create 方法:

    curl "https://cloudkms.googleapis.com/v1/projects/PROJECT_ID/locations/LOCATION/keyRings/KEY_RING/importJobs?import_job_id=IMPORT_JOB_ID" \
        --request "POST" \
        --header "authorization: Bearer TOKEN" \
        --header "content-type: application/json" \
        --data '{"import_method": "IMPORT_METHOD", "protection_level": "PROTECTION_LEVEL"}'
    

    更改下列內容:

    查看匯入工作的狀態

    匯入工作的初始狀態為 PENDING_GENERATION。當狀態為 ACTIVE 時,您就可以使用該工作匯入金鑰。

    匯入工作會在三天後失效。如果匯入工作已過期,您必須建立新的工作。

    您可以使用 Google Cloud CLI、Trusted Cloud 控制台或 Cloud Key Management Service API,查看匯入工作的狀態。

    控制台

    1. 前往 Trusted Cloud 控制台的「Key Management」頁面。

      前往「金鑰管理」頁面

    2. 按一下包含匯入工作的金鑰環名稱。

    3. 按一下頁面頂端的 [Import Jobs] (匯入工作) 分頁標籤。

    4. 狀態會顯示在該匯入作業名稱旁的 [Status] (狀態) 下方。

    gcloud

    如要在指令列上使用 Cloud KMS,請先安裝或升級至最新版 Google Cloud CLI

    匯入工作處於有效狀態時,您可以使用該工作匯入金鑰。這項作業可能需要幾分鐘才能完成。使用這項指令確認匯入工作是否處於啟用狀態。使用您建立匯入工作時的所在位置和金鑰環。

    gcloud kms import-jobs describe IMPORT_JOB \
      --location LOCATION \
      --keyring KEY_RING \
      --format="value(state)"
    

    輸出結果會與下列內容相似:

    state: ACTIVE

    Go

    如要執行這段程式碼,請先設定 Go 開發環境,並安裝 Cloud KMS Go SDK

    import (
    	"context"
    	"fmt"
    	"io"
    
    	kms "cloud.google.com/go/kms/apiv1"
    	"cloud.google.com/go/kms/apiv1/kmspb"
    )
    
    // checkStateImportJob checks the state of an ImportJob in KMS.
    func checkStateImportJob(w io.Writer, name string) error {
    	// name := "projects/PROJECT_ID/locations/global/keyRings/my-key-ring/importJobs/my-import-job"
    
    	// Create the client.
    	ctx := context.Background()
    	client, err := kms.NewKeyManagementClient(ctx)
    	if err != nil {
    		return fmt.Errorf("failed to create kms client: %w", err)
    	}
    	defer client.Close()
    
    	// Call the API.
    	result, err := client.GetImportJob(ctx, &kmspb.GetImportJobRequest{
    		Name: name,
    	})
    	if err != nil {
    		return fmt.Errorf("failed to get import job: %w", err)
    	}
    	fmt.Fprintf(w, "Current state of import job %q: %s\n", result.Name, result.State)
    	return nil
    }
    

    Java

    如要執行這段程式碼,請先設定 Java 開發環境,然後安裝 Cloud KMS Java SDK

    import com.google.cloud.kms.v1.ImportJob;
    import com.google.cloud.kms.v1.ImportJobName;
    import com.google.cloud.kms.v1.KeyManagementServiceClient;
    import java.io.IOException;
    
    public class CheckStateImportJob {
    
      public void checkStateImportJob() throws IOException {
        // TODO(developer): Replace these variables before running the sample.
        String projectId = "your-project-id";
        String locationId = "us-east1";
        String keyRingId = "my-key-ring";
        String importJobId = "my-import-job";
        checkStateImportJob(projectId, locationId, keyRingId, importJobId);
      }
    
      // Check the state of an import job in Cloud KMS.
      public void checkStateImportJob(
          String projectId, String locationId, String keyRingId, String importJobId)
          throws IOException {
        // Initialize client that will be used to send requests. This client only
        // needs to be created once, and can be reused for multiple requests. After
        // completing all of your requests, call the "close" method on the client to
        // safely clean up any remaining background resources.
        try (KeyManagementServiceClient client = KeyManagementServiceClient.create()) {
          // Build the parent name from the project, location, and key ring.
          ImportJobName importJobName = ImportJobName.of(projectId, locationId, keyRingId, importJobId);
    
          // Retrieve the state of an existing import job.
          ImportJob importJob = client.getImportJob(importJobName);
          System.out.printf(
              "Current state of import job %s: %s%n", importJob.getName(), importJob.getState());
        }
      }
    }

    Node.js

    如要執行這段程式碼,請先設定 Node.js 開發環境,然後安裝 Cloud KMS Node.js SDK

    //
    // TODO(developer): Uncomment these variables before running the sample.
    //
    // const projectId = 'my-project';
    // const locationId = 'us-east1';
    // const keyRingId = 'my-key-ring';
    // const importJobId = 'my-import-job';
    
    // Imports the Cloud KMS library
    const {KeyManagementServiceClient} = require('@google-cloud/kms');
    
    // Instantiates a client
    const client = new KeyManagementServiceClient();
    
    // Build the import job name
    const importJobName = client.importJobPath(
      projectId,
      locationId,
      keyRingId,
      importJobId
    );
    
    async function checkStateImportJob() {
      const [importJob] = await client.getImportJob({
        name: importJobName,
      });
    
      console.log(
        `Current state of import job ${importJob.name}: ${importJob.state}`
      );
      return importJob;
    }
    
    return checkStateImportJob();

    Python

    如要執行這段程式碼,請先設定 Python 開發環境,然後安裝 Cloud KMS Python SDK

    from google.cloud import kms
    
    
    def check_state_import_job(
        project_id: str, location_id: str, key_ring_id: str, import_job_id: str
    ) -> None:
        """
        Check the state of an import job in Cloud KMS.
    
        Args:
            project_id (string): Google Cloud project ID (e.g. 'my-project').
            location_id (string): Cloud KMS location (e.g. 'us-east1').
            key_ring_id (string): ID of the Cloud KMS key ring (e.g. 'my-key-ring').
            import_job_id (string): ID of the import job (e.g. 'my-import-job').
        """
    
        # Create the client.
        client = kms.KeyManagementServiceClient()
    
        # Retrieve the fully-qualified import_job string.
        import_job_name = client.import_job_path(
            project_id, location_id, key_ring_id, import_job_id
        )
    
        # Retrieve the state from an existing import job.
        import_job = client.get_import_job(name=import_job_name)
    
        print(f"Current state of import job {import_job.name}: {import_job.state}")


    API

    這些範例使用 curl 做為 HTTP 用戶端,示範如何使用 API。如要進一步瞭解存取權控管,請參閱「存取 Cloud KMS API」一文。

    如要檢查匯入工作的狀態,請使用 ImportJobs.get 方法:

    curl "https://cloudkms.googleapis.com/v1/projects/PROJECT_ID/locations/LOCATION/keyRings/KEY_RING/importJobs/IMPORT_JOB_ID" \
        --request "GET" \
        --header "authorization: Bearer TOKEN"
    

    匯入工作啟用後,您就能發出匯入金鑰的要求

    防止修改匯入工作

    匯入工作會決定匯入金鑰的許多特徵,包括金鑰的演算法,以及匯入的金鑰是 HSM 金鑰還是軟體金鑰。您可以設定 IAM 權限,禁止使用者建立匯入工作,但允許他們使用匯入工作匯入金鑰。

    1. 請只將 importjobs.create 權限授予主要管理員。
    2. 將特定匯入工作的 importjobs.useToImport 權限授予將使用該工作匯入金鑰的作業人員。
    3. 建立匯入工作時,請指定透過該工作匯入的金鑰版本的防護等級和演算法。

    在匯入工作到期前,如果使用者擁有 importjobs.useToImport,但沒有特定匯入工作的 importjobs.create 權限,則可以匯入金鑰,但無法修改匯入工作的特性。

    匯入金鑰

    查看匯入工作的狀態後,即可提出匯入要求。

    您可以使用不同的標記提出匯入要求,具體取決於您是否希望 Google Cloud CLI 自動包裝金鑰,或是您是否已手動包裝金鑰

    無論您是手動或自動包裝金鑰,都必須將演算法設為支援的演算法,且該演算法須符合待匯入金鑰的長度,並指定金鑰用途。

    • 用途為 ENCRYPT_DECRYPT 的金鑰會使用 google-symmetric-encryption 演算法,長度為 32。

    • 用途為 ASYMMETRIC_DECRYPTASYMMETRIC_SIGN 的金鑰支援多種演算法和長度。

      金鑰建立後就無法變更用途,但後續建立的金鑰版本長度可以與初始金鑰版本不同。

    自動包裝及匯入金鑰

    如要使用自動包裝功能,請務必使用 Google Cloud CLI。請使用類似下列的指令。將 --target-key-file 設為要包裝及匯入的未包裝金鑰位置。請勿設定 --wrapped-key-file

    您可以選擇將 --public-key-file 標記設為已下載公開金鑰的位置。匯入大量金鑰時,這項設定可避免在每次匯入時下載公開金鑰。舉例來說,您可以編寫指令碼,下載公開金鑰一次,然後在匯入每個金鑰時提供公開金鑰的位置。

    gcloud kms keys versions import \
        --import-job IMPORT_JOB \
        --location LOCATION \
        --keyring KEY_RING \
        --key KEY_NAME \
        --algorithm ALGORITHM \
        --target-key-file PATH_TO_UNWRAPPED_KEY
    

    金鑰會由與匯入工作相關聯的包裝金鑰包裝,然後傳輸至 Trusted Cloud,並匯入為目標金鑰的新金鑰版本。

    匯入手動包裝的金鑰

    請按照本節的操作說明,匯入手動包裝的金鑰。將 --wrapped-key-file 設為您手動包裝的金鑰位置。請勿設定 --target-key-file

    您可以選擇將 --public-key-file 標記設為已下載公開金鑰的位置。匯入大量金鑰時,這項設定可避免在每次匯入時下載公開金鑰。舉例來說,您可以編寫指令碼,下載公開金鑰一次,然後在匯入每個金鑰時提供公開金鑰的位置。

    控制台

    1. 在Trusted Cloud 控制台中開啟「Key Management」(金鑰管理) 頁面。

    2. 按一下包含匯入工作的金鑰環名稱。系統會顯示目標金鑰,以及金鑰環上的任何其他金鑰。

    3. 按一下目標金鑰名稱,然後點選「匯入金鑰版本」

    4. 在「Select import job」(選取匯入工作) 下拉式選單中,選取您的匯入工作。

    5. 在「Upload the wrapped key」(上傳經過包裝的金鑰) 選取工具中,選取您已包裝的金鑰。

    6. 如果您要匯入非對稱金鑰,請在「Algorithm」(演算法) 下拉式選單中選取某個演算法。「Import key version」(匯入金鑰版本) 頁面外觀會像這樣:
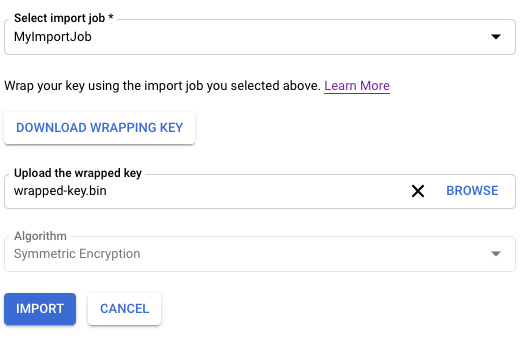
      匯入金鑰版本

    7. 按一下「匯入」

    gcloud

    如要在指令列上使用 Cloud KMS,請先安裝或升級至最新版 Google Cloud CLI

    請使用類似下列的指令。

    gcloud kms keys versions import \
      --import-job IMPORT_JOB \
      --location LOCATION \
      --keyring KEY_RING \
      --key KEY_NAME \
      --algorithm ALGORITHM \
      --wrapped-key-file PATH_TO_WRAPPED_KEY
    

    詳情請參閱 gcloud kms keys versions import --help 指令的輸出內容。

    Go

    如要執行這段程式碼,請先設定 Go 開發環境,並安裝 Cloud KMS Go SDK

    import (
    	"context"
    	"crypto/ecdsa"
    	"crypto/elliptic"
    	"crypto/rand"
    	"crypto/rsa"
    	"crypto/sha1"
    	"crypto/x509"
    	"encoding/pem"
    	"fmt"
    	"io"
    
    	kms "cloud.google.com/go/kms/apiv1"
    	"cloud.google.com/go/kms/apiv1/kmspb"
    	"github.com/google/tink/go/kwp/subtle"
    )
    
    // importManuallyWrappedKey wraps key material and imports it into KMS.
    func importManuallyWrappedKey(w io.Writer, importJobName, cryptoKeyName string) error {
    	// importJobName := "projects/PROJECT_ID/locations/global/keyRings/my-key-ring/importJobs/my-import-job"
    	// cryptoKeyName := "projects/PROJECT_ID/locations/global/keyRings/my-key-ring/cryptoKeys/my-imported-key"
    
    	// Generate a ECDSA keypair, and format the private key as PKCS #8 DER.
    	key, err := ecdsa.GenerateKey(elliptic.P256(), rand.Reader)
    	if err != nil {
    		return fmt.Errorf("failed to generate keypair: %w", err)
    	}
    	keyBytes, err := x509.MarshalPKCS8PrivateKey(key)
    	if err != nil {
    		return fmt.Errorf("failed to format private key: %w", err)
    	}
    
    	// Create the client.
    	ctx := context.Background()
    	client, err := kms.NewKeyManagementClient(ctx)
    	if err != nil {
    		return fmt.Errorf("failed to create kms client: %w", err)
    	}
    	defer client.Close()
    
    	// Generate a temporary 32-byte key for AES-KWP and wrap the key material.
    	kwpKey := make([]byte, 32)
    	if _, err := rand.Read(kwpKey); err != nil {
    		return fmt.Errorf("failed to generate AES-KWP key: %w", err)
    	}
    	kwp, err := subtle.NewKWP(kwpKey)
    	if err != nil {
    		return fmt.Errorf("failed to create KWP cipher: %w", err)
    	}
    	wrappedTarget, err := kwp.Wrap(keyBytes)
    	if err != nil {
    		return fmt.Errorf("failed to wrap target key with KWP: %w", err)
    	}
    
    	// Retrieve the public key from the import job.
    	importJob, err := client.GetImportJob(ctx, &kmspb.GetImportJobRequest{
    		Name: importJobName,
    	})
    	if err != nil {
    		return fmt.Errorf("failed to retrieve import job: %w", err)
    	}
    	pubBlock, _ := pem.Decode([]byte(importJob.PublicKey.Pem))
    	pubAny, err := x509.ParsePKIXPublicKey(pubBlock.Bytes)
    	if err != nil {
    		return fmt.Errorf("failed to parse import job public key: %w", err)
    	}
    	pub, ok := pubAny.(*rsa.PublicKey)
    	if !ok {
    		return fmt.Errorf("unexpected public key type %T, want *rsa.PublicKey", pubAny)
    	}
    
    	// Wrap the KWP key using the import job key.
    	wrappedWrappingKey, err := rsa.EncryptOAEP(sha1.New(), rand.Reader, pub, kwpKey, nil)
    	if err != nil {
    		return fmt.Errorf("failed to wrap KWP key: %w", err)
    	}
    
    	// Concatenate the wrapped KWP key and the wrapped target key.
    	combined := append(wrappedWrappingKey, wrappedTarget...)
    
    	// Build the request.
    	req := &kmspb.ImportCryptoKeyVersionRequest{
    		Parent:     cryptoKeyName,
    		ImportJob:  importJobName,
    		Algorithm:  kmspb.CryptoKeyVersion_EC_SIGN_P256_SHA256,
    		WrappedKey: combined,
    	}
    
    	// Call the API.
    	result, err := client.ImportCryptoKeyVersion(ctx, req)
    	if err != nil {
    		return fmt.Errorf("failed to import crypto key version: %w", err)
    	}
    	fmt.Fprintf(w, "Created crypto key version: %s\n", result.Name)
    	return nil
    }
    

    Java

    如要執行這段程式碼,請先設定 Java 開發環境,然後安裝 Cloud KMS Java SDK

    import com.google.cloud.kms.v1.CryptoKeyName;
    import com.google.cloud.kms.v1.CryptoKeyVersion;
    import com.google.cloud.kms.v1.ImportCryptoKeyVersionRequest;
    import com.google.cloud.kms.v1.ImportJob;
    import com.google.cloud.kms.v1.ImportJobName;
    import com.google.cloud.kms.v1.KeyManagementServiceClient;
    import com.google.crypto.tink.subtle.Kwp;
    import com.google.protobuf.ByteString;
    import java.io.IOException;
    import java.security.GeneralSecurityException;
    import java.security.KeyFactory;
    import java.security.KeyPair;
    import java.security.KeyPairGenerator;
    import java.security.PublicKey;
    import java.security.SecureRandom;
    import java.security.spec.ECGenParameterSpec;
    import java.security.spec.MGF1ParameterSpec;
    import java.security.spec.X509EncodedKeySpec;
    import java.util.Base64;
    import javax.crypto.Cipher;
    import javax.crypto.spec.OAEPParameterSpec;
    import javax.crypto.spec.PSource;
    
    public class ImportManuallyWrappedKey {
    
      public void importManuallyWrappedKey() throws GeneralSecurityException, IOException {
        // TODO(developer): Replace these variables before running the sample.
        String projectId = "your-project-id";
        String locationId = "us-east1";
        String keyRingId = "my-key-ring";
        String cryptoKeyId = "my-crypto-key";
        String importJobId = "my-import-job";
        importManuallyWrappedKey(projectId, locationId, keyRingId, cryptoKeyId, importJobId);
      }
    
      // Generates and imports local key material into Cloud KMS.
      public void importManuallyWrappedKey(
          String projectId, String locationId, String keyRingId, String cryptoKeyId, String importJobId)
          throws GeneralSecurityException, IOException {
    
        // Generate a new ECDSA keypair, and format the private key as PKCS #8 DER.
        KeyPairGenerator generator = KeyPairGenerator.getInstance("EC");
        generator.initialize(new ECGenParameterSpec("secp256r1"));
        KeyPair kp = generator.generateKeyPair();
        byte[] privateBytes = kp.getPrivate().getEncoded();
    
        // Initialize client that will be used to send requests. This client only
        // needs to be created once, and can be reused for multiple requests. After
        // completing all of your requests, call the "close" method on the client to
        // safely clean up any remaining background resources.
        try (KeyManagementServiceClient client = KeyManagementServiceClient.create()) {
          // Build the crypto key and import job names from the project, location,
          // key ring, and ID.
          final CryptoKeyName cryptoKeyName =
              CryptoKeyName.of(projectId, locationId, keyRingId, cryptoKeyId);
          final ImportJobName importJobName =
              ImportJobName.of(projectId, locationId, keyRingId, importJobId);
    
          // Generate a temporary 32-byte key for AES-KWP and wrap the key material.
          byte[] kwpKey = new byte[32];
          new SecureRandom().nextBytes(kwpKey);
          Kwp kwp = new Kwp(kwpKey);
          final byte[] wrappedTargetKey = kwp.wrap(privateBytes);
    
          // Retrieve the public key from the import job.
          ImportJob importJob = client.getImportJob(importJobName);
          String publicKeyStr = importJob.getPublicKey().getPem();
          // Manually convert PEM to DER. :-(
          publicKeyStr = publicKeyStr.replace("-----BEGIN PUBLIC KEY-----", "");
          publicKeyStr = publicKeyStr.replace("-----END PUBLIC KEY-----", "");
          publicKeyStr = publicKeyStr.replaceAll("\n", "");
          byte[] publicKeyBytes = Base64.getDecoder().decode(publicKeyStr);
          PublicKey publicKey =
              KeyFactory.getInstance("RSA").generatePublic(new X509EncodedKeySpec(publicKeyBytes));
    
          // Wrap the KWP key using the import job key.
          Cipher cipher = Cipher.getInstance("RSA/ECB/OAEPWithSHA-1AndMGF1Padding");
          cipher.init(
              Cipher.ENCRYPT_MODE,
              publicKey,
              new OAEPParameterSpec(
                  "SHA-1", "MGF1", MGF1ParameterSpec.SHA1, PSource.PSpecified.DEFAULT));
          byte[] wrappedWrappingKey = cipher.doFinal(kwpKey);
    
          // Concatenate the wrapped KWP key and the wrapped target key.
          ByteString combinedWrappedKeys =
              ByteString.copyFrom(wrappedWrappingKey).concat(ByteString.copyFrom(wrappedTargetKey));
    
          // Import the wrapped key material.
          CryptoKeyVersion version =
              client.importCryptoKeyVersion(
                  ImportCryptoKeyVersionRequest.newBuilder()
                      .setParent(cryptoKeyName.toString())
                      .setImportJob(importJobName.toString())
                      .setAlgorithm(CryptoKeyVersion.CryptoKeyVersionAlgorithm.EC_SIGN_P256_SHA256)
                      .setRsaAesWrappedKey(combinedWrappedKeys)
                      .build());
    
          System.out.printf("Imported: %s%n", version.getName());
        }
      }
    }

    Node.js

    如要執行這段程式碼,請先設定 Node.js 開發環境,然後安裝 Cloud KMS Node.js SDK

    //
    // TODO(developer): Uncomment these variables before running the sample.
    //
    // const projectId = 'my-project';
    // const locationId = 'us-east1';
    // const keyRingId = 'my-key-ring';
    // const cryptoKeyId = 'my-imported-key';
    // const importJobId = 'my-import-job';
    
    // Imports the Cloud KMS library
    const {KeyManagementServiceClient} = require('@google-cloud/kms');
    
    // Instantiates a client
    const client = new KeyManagementServiceClient();
    
    // Build the crypto key and importjob resource names
    const cryptoKeyName = client.cryptoKeyPath(
      projectId,
      locationId,
      keyRingId,
      cryptoKeyId
    );
    const importJobName = client.importJobPath(
      projectId,
      locationId,
      keyRingId,
      importJobId
    );
    
    async function wrapAndImportKey() {
      // Generate a 32-byte key to import.
      const crypto = require('crypto');
      const targetKey = crypto.randomBytes(32);
    
      const [importJob] = await client.getImportJob({name: importJobName});
    
      // Wrap the target key using the import job key
      const wrappedTargetKey = crypto.publicEncrypt(
        {
          key: importJob.publicKey.pem,
          oaepHash: 'sha256',
          padding: crypto.constants.RSA_PKCS1_OAEP_PADDING,
        },
        targetKey
      );
    
      // Import the target key version
      const [version] = await client.importCryptoKeyVersion({
        parent: cryptoKeyName,
        importJob: importJobName,
        algorithm: 'GOOGLE_SYMMETRIC_ENCRYPTION',
        wrappedKey: wrappedTargetKey,
      });
    
      console.log(`Imported key version: ${version.name}`);
      return version;
    }
    
    return wrapAndImportKey();

    Python

    如要執行這段程式碼,請先設定 Python 開發環境,然後安裝 Cloud KMS Python SDK

    import os
    
    # Import the client library and Python standard cryptographic libraries.
    from cryptography.hazmat import backends
    from cryptography.hazmat.primitives import hashes
    from cryptography.hazmat.primitives import keywrap
    from cryptography.hazmat.primitives import serialization
    from cryptography.hazmat.primitives.asymmetric import ec
    from cryptography.hazmat.primitives.asymmetric import padding
    from google.cloud import kms
    
    
    def import_manually_wrapped_key(
        project_id: str,
        location_id: str,
        key_ring_id: str,
        crypto_key_id: str,
        import_job_id: str,
    ) -> None:
        """
        Generates and imports local key material to Cloud KMS.
    
        Args:
            project_id (string): Google Cloud project ID (e.g. 'my-project').
            location_id (string): Cloud KMS location (e.g. 'us-east1').
            key_ring_id (string): ID of the Cloud KMS key ring (e.g. 'my-key-ring').
            crypto_key_id (string): ID of the key to import (e.g. 'my-asymmetric-signing-key').
            import_job_id (string): ID of the import job (e.g. 'my-import-job').
        """
    
        # Generate some key material in Python and format it in PKCS #8 DER as
        # required by Google Cloud KMS.
        key = ec.generate_private_key(ec.SECP256R1, backends.default_backend())
        formatted_key = key.private_bytes(
            serialization.Encoding.DER,
            serialization.PrivateFormat.PKCS8,
            serialization.NoEncryption(),
        )
    
        print(f"Generated key bytes: {formatted_key!r}")
    
        # Create the client.
        client = kms.KeyManagementServiceClient()
    
        # Retrieve the fully-qualified crypto_key and import_job string.
        crypto_key_name = client.crypto_key_path(
            project_id, location_id, key_ring_id, crypto_key_id
        )
        import_job_name = client.import_job_path(
            project_id, location_id, key_ring_id, import_job_id
        )
    
        # Generate a temporary 32-byte key for AES-KWP and wrap the key material.
        kwp_key = os.urandom(32)
        wrapped_target_key = keywrap.aes_key_wrap_with_padding(
            kwp_key, formatted_key, backends.default_backend()
        )
    
        # Retrieve the public key from the import job.
        import_job = client.get_import_job(name=import_job_name)
        import_job_pub = serialization.load_pem_public_key(
            bytes(import_job.public_key.pem, "UTF-8"), backends.default_backend()
        )
    
        # Wrap the KWP key using the import job key.
        wrapped_kwp_key = import_job_pub.encrypt(
            kwp_key,
            padding.OAEP(
                mgf=padding.MGF1(algorithm=hashes.SHA1()),
                algorithm=hashes.SHA1(),
                label=None,
            ),
        )
    
        # Import the wrapped key material.
        client.import_crypto_key_version(
            {
                "parent": crypto_key_name,
                "import_job": import_job_name,
                "algorithm": kms.CryptoKeyVersion.CryptoKeyVersionAlgorithm.EC_SIGN_P256_SHA256,
                "rsa_aes_wrapped_key": wrapped_kwp_key + wrapped_target_key,
            }
        )
    
        print(f"Imported: {import_job.name}")


    API

    這些範例使用 curl 做為 HTTP 用戶端,示範如何使用 API。如要進一步瞭解存取權控管,請參閱「存取 Cloud KMS API」一文。

    使用 cryptoKeyVersions.import 方法匯入金鑰。

    curl "https://cloudkms.googleapis.com/v1/projects/PROJECT_ID/locations/LOCATION/keyRings/KEY_RING/cryptoKeys/KEY_NAME/cryptoKeyVersions:import" \
        --request "POST" \
        --header "authorization: Bearer TOKEN" \
        --header "content-type: application/json" \
        --data '{"importJob": "IMPORT_JOB_ID", "algorithm": "ALGORITHM", "wrappedKey": "WRAPPED_KEY"}'
    

    更改下列內容:

    • IMPORT_JOB_ID:對應匯入作業的完整資源名稱。

    • ALGORITHM:要匯入的金鑰 algorithm,類型為 CryptoKeyVersionAlgorithm

    • WRAPPED_KEY:以 Base64 格式手動包裝的金鑰。

    系統會發出金鑰匯入要求。你可以監控狀態

    查看已匯入金鑰版本的狀態

    已匯入金鑰版本的初始狀態為 PENDING_IMPORT。當狀態為 ENABLED 時,代表金鑰版本已成功匯入。如果匯入失敗,狀態會顯示 IMPORT_FAILED

    您可以使用 Google Cloud CLI、Trusted Cloud 控制台或 Cloud Key Management Service API,查看匯入要求的狀態。

    控制台

    1. 在Trusted Cloud 控制台中開啟「Key Management」(金鑰管理) 頁面。

    2. 按一下包含匯入工作的金鑰環名稱。

    3. 按一下頁面頂端的 [Import Jobs] (匯入工作) 分頁標籤。

    4. 狀態會顯示在該匯入作業名稱旁的 [Status] (狀態) 下方。

    gcloud

    如要在指令列上使用 Cloud KMS,請先安裝或升級至最新版 Google Cloud CLI

    請使用 versions list 指令來查看狀態。使用您在本主題中稍早建立的相同位置、目標金鑰環和目標金鑰。

    gcloud kms keys versions list \
      --keyring KEY_RING \
      --location LOCATION \
      --key KEY_NAME
    

    Go

    如要執行這段程式碼,請先設定 Go 開發環境,並安裝 Cloud KMS Go SDK

    import (
    	"context"
    	"fmt"
    	"io"
    
    	kms "cloud.google.com/go/kms/apiv1"
    	"cloud.google.com/go/kms/apiv1/kmspb"
    )
    
    // checkStateImportedKey checks the state of a CryptoKeyVersion in KMS.
    func checkStateImportedKey(w io.Writer, name string) error {
    	// name := "projects/PROJECT_ID/locations/global/keyRings/my-key-ring/cryptoKeys/my-imported-key/cryptoKeyVersions/1"
    
    	// Create the client.
    	ctx := context.Background()
    	client, err := kms.NewKeyManagementClient(ctx)
    	if err != nil {
    		return fmt.Errorf("failed to create kms client: %w", err)
    	}
    	defer client.Close()
    
    	// Call the API.
    	result, err := client.GetCryptoKeyVersion(ctx, &kmspb.GetCryptoKeyVersionRequest{
    		Name: name,
    	})
    	if err != nil {
    		return fmt.Errorf("failed to get crypto key version: %w", err)
    	}
    	fmt.Fprintf(w, "Current state of crypto key version %q: %s\n", result.Name, result.State)
    	return nil
    }
    

    Java

    如要執行這段程式碼,請先設定 Java 開發環境,然後安裝 Cloud KMS Java SDK

    import com.google.cloud.kms.v1.CryptoKeyVersion;
    import com.google.cloud.kms.v1.CryptoKeyVersionName;
    import com.google.cloud.kms.v1.KeyManagementServiceClient;
    import java.io.IOException;
    
    public class CheckStateImportedKey {
    
      public void checkStateImportedKey() throws IOException {
        // TODO(developer): Replace these variables before running the sample.
        String projectId = "your-project-id";
        String locationId = "us-east1";
        String keyRingId = "my-key-ring";
        String cryptoKeyId = "my-crypto-key";
        String cryptoKeyVersionId = "1";
        checkStateImportedKey(projectId, locationId, keyRingId, cryptoKeyId, cryptoKeyVersionId);
      }
    
      // Check the state of an imported key in Cloud KMS.
      public void checkStateImportedKey(
          String projectId,
          String locationId,
          String keyRingId,
          String cryptoKeyId,
          String cryptoKeyVersionId)
          throws IOException {
        // Initialize client that will be used to send requests. This client only
        // needs to be created once, and can be reused for multiple requests. After
        // completing all of your requests, call the "close" method on the client to
        // safely clean up any remaining background resources.
        try (KeyManagementServiceClient client = KeyManagementServiceClient.create()) {
          // Build the version name from its path components.
          CryptoKeyVersionName versionName =
              CryptoKeyVersionName.of(
                  projectId, locationId, keyRingId, cryptoKeyId, cryptoKeyVersionId);
    
          // Retrieve the state of an existing version.
          CryptoKeyVersion version = client.getCryptoKeyVersion(versionName);
          System.out.printf(
              "Current state of crypto key version %s: %s%n", version.getName(), version.getState());
        }
      }
    }

    Node.js

    如要執行這段程式碼,請先設定 Node.js 開發環境,然後安裝 Cloud KMS Node.js SDK

    //
    // TODO(developer): Uncomment these variables before running the sample.
    //
    // const projectId = 'my-project';
    // const locationId = 'us-east1';
    // const keyRingId = 'my-key-ring';
    // const cryptoKeyId = 'my-imported-key';
    // const cryptoKeyVersionId = '1';
    
    // Imports the Cloud KMS library
    const {KeyManagementServiceClient} = require('@google-cloud/kms');
    
    // Instantiates a client
    const client = new KeyManagementServiceClient();
    
    // Build the key version name
    const keyVersionName = client.cryptoKeyVersionPath(
      projectId,
      locationId,
      keyRingId,
      cryptoKeyId,
      cryptoKeyVersionId
    );
    
    async function checkStateCryptoKeyVersion() {
      const [keyVersion] = await client.getCryptoKeyVersion({
        name: keyVersionName,
      });
    
      console.log(
        `Current state of key version ${keyVersion.name}: ${keyVersion.state}`
      );
      return keyVersion;
    }
    
    return checkStateCryptoKeyVersion();

    Python

    如要執行這段程式碼,請先設定 Python 開發環境,然後安裝 Cloud KMS Python SDK

    from google.cloud import kms
    
    
    def check_state_imported_key(
        project_id: str, location_id: str, key_ring_id: str, import_job_id: str
    ) -> None:
        """
        Check the state of an import job in Cloud KMS.
    
        Args:
            project_id (string): Google Cloud project ID (e.g. 'my-project').
            location_id (string): Cloud KMS location (e.g. 'us-east1').
            key_ring_id (string): ID of the Cloud KMS key ring (e.g. 'my-key-ring').
            import_job_id (string): ID of the import job (e.g. 'my-import-job').
        """
    
        # Create the client.
        client = kms.KeyManagementServiceClient()
    
        # Retrieve the fully-qualified import_job string.
        import_job_name = client.import_job_path(
            project_id, location_id, key_ring_id, import_job_id
        )
    
        # Retrieve the state from an existing import job.
        import_job = client.get_import_job(name=import_job_name)
    
        print(f"Current state of import job {import_job.name}: {import_job.state}")


    API

    這些範例使用 curl 做為 HTTP 用戶端,示範如何使用 API。如要進一步瞭解存取權控管,請參閱「存取 Cloud KMS API」一文。

    呼叫 ImportJob.get 方法,然後查看 state 欄位。如果 statePENDING_GENERATION,代表匯入工作仍在建立中。請定期重新查看狀態,直到狀態變成 ACTIVE 為止。

    匯入初始金鑰版本後,金鑰的狀態會變更為「有效」。如果是對稱金鑰,您必須將匯入的金鑰版本設為主要版本,才能使用金鑰。

    對稱金鑰:設定主要版本

    匯入對稱金鑰時必須執行這個步驟,非對稱金鑰則不適用。非對稱金鑰沒有主要版本。您必須使用 Google Cloud CLI 設定主要版本。

    gcloud kms keys set-primary-version KEY_NAME\
        --location=LOCATION\
        --keyring=KEY_RING\
        --version=KEY_VERSION
    

    重新匯入先前刪除的金鑰

    Cloud Key Management Service 支援金鑰重新匯入作業,可讓您提供原始金鑰內容,將先前匯入且處於 DESTROYEDIMPORT_FAILED 狀態的金鑰版本還原為 ENABLED 狀態。如果因為初始匯入失敗而從未匯入原始金鑰內容,則可提供任何金鑰內容。

    限制

    • 只能重新匯入先前匯入的 CryptoKeyVersions
    • 如果先前已成功匯入金鑰內容,重新匯入的金鑰內容必須與原始金鑰內容完全相符。
    • CryptoKeyVersions,在發布這項功能前刪除的CryptoKeyVersions無法重新匯入。如果版本符合重新匯入資格,CryptoKeyVersionreimport_eligible 欄位會顯示 true,否則會顯示 false

    軟體和 Cloud HSM 金鑰可以重新匯入,但外部金鑰無法重新匯入。

    重新匯入已刪除的金鑰

    按照「建立匯入工作」中的步驟,建立用於重新匯入的 ImportJob。您可以使用現有 ImportJob 或新的 ImportJob,只要防護等級與原始防護等級相符即可。

    控制台

    1. 前往 Trusted Cloud 控制台的「Key Management」頁面。

      前往「金鑰管理」頁面

    2. 按一下金鑰環名稱,該金鑰環包含您要重新匯入金鑰版本的金鑰。

    3. 按一下您要重新匯入金鑰版本的金鑰。

    4. 按一下要重新匯入的金鑰版本旁邊的三點圖示。

    5. 選取「重新匯入金鑰版本」

    6. 在「Select import job」(選取匯入工作) 下拉式選單中,選取您的匯入工作。

    7. 在「Upload the wrapped key」(上傳經過包裝的金鑰) 選取工具中,選取您已包裝的金鑰。這個金鑰必須與原始金鑰內容相符。

    8. 按一下「重新匯入」

    gcloud

    如要在指令列上使用 Cloud KMS,請先安裝或升級至最新版 Google Cloud CLI

    1. 使用原始金鑰材料重新匯入金鑰版本。

      gcloud kms keys versions import \
      --location LOCATION \
      --keyring KEY_RING \
      --key KEY_NAME \
      --version KEY_VERSION \
      --algorithm ALGORITHM \
      --import-job IMPORT_JOB \
      --target-key-file PATH_TO_KEY \
      

    API

    這些範例使用 curl 做為 HTTP 用戶端,示範如何使用 API。如要進一步瞭解存取權控管,請參閱「存取 Cloud KMS API」一文。

    1. cryptoKeyVersions.import 方法的要求主體中,將 cryptoKeyVersion 欄位設為要匯入的版本金鑰版本名稱。這必須是加密金鑰的子項。

    2. 在要求主體中,將 algorithm 欄位設為待匯入金鑰的演算法。這個值必須與原始金鑰版本的演算法相符。algorithm 欄位的類型為 CryptoKeyVersionAlgorithm

    3. 在要求主體中,將 wrappedKeyMaterial 欄位設為您已包裝的金鑰內容。

    4. 呼叫 cryptoKeyVersions.import方法。cryptoKeyVersions.import 回應的類型為 CryptoKeyVersion。金鑰成功匯入後的狀態為 ENABLED,接著您即可在 Cloud KMS 中使用該金鑰。

    後續步驟