Wenn Sie Feedback oder Unterstützung für dieses Feature benötigen, senden Sie eine E-Mail an bigquery-ide-plugin@google.com.
In diesem Dokument wird beschrieben, wie Sie das BigQuery-JupyterLab-Plug-in installieren und verwenden, um Folgendes zu tun:
BigQuery-Daten analysieren
Verwenden Sie die BigQuery DataFrames API.
BigQuery DataFrames-Notebook in Cloud Composer bereitstellen
Das BigQuery JupyterLab-Plug-in umfasst alle Funktionen des Dataproc JupyterLab-Plug-ins, z. B. das Erstellen einer Dataproc Serverless-Laufzeitvorlage, das Starten und Verwalten von Notebooks und die Entwicklung mit Apache. Spark, Code bereitstellen und Ressourcen verwalten
BigQuery JupyterLab-Plug-in installieren
So installieren und verwenden Sie das BigQuery JupyterLab-Plug-in:
Prüfen Sie in Ihrem lokalen Terminal, ob Python 3.8 oder höher auf dem System installiert ist:
Standardmäßig wird Ihre Sitzung in dem Projekt und in der Region ausgeführt, die Sie beim Ausführen von gcloud init festgelegt haben. So ändern Sie die Projekt- und Regionseinstellungen für Ihre Sitzung:
Klicken Sie im JupyterLab-Menü auf Einstellungen > Google BigQuery-Einstellungen.
Sie müssen das Plug-in neu starten, damit die Änderungen wirksam werden.
Daten auswerten
So arbeiten Sie mit Ihren BigQuery-Daten in JupyterLab:
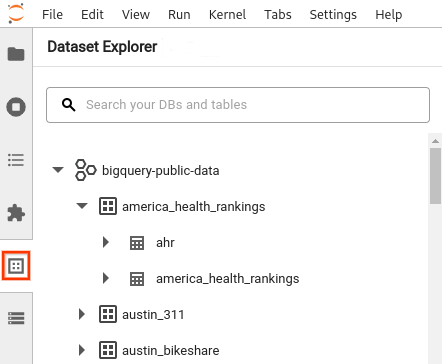
Öffnen Sie in der JupyterLab-Seitenleiste den Bereich Dataset Explorer (Datensatz-Explorer): Klicken Sie auf das Symbol für Datensätze .
Wenn Sie ein Projekt maximieren möchten, klicken Sie im Bereich Dataset Explorer neben dem Projektnamen auf den Maximierungspfeil arrow_right.
Im Bereich Dataset Explorer werden alle Datasets in einem Projekt angezeigt, die sich in der BigQuery-Region befinden, die Sie für die Sitzung konfiguriert haben. Sie können auf verschiedene Arten mit einem Projekt und einem Dataset interagieren:
Klicken Sie auf den Namen eines Datasets, um Informationen dazu aufzurufen.
Zum Aufrufen aller Tabellen in einem Dataset klicken Sie neben dem Dataset auf den Erweiterungspfeil arrow_right.
Klicken Sie auf den Namen der Tabelle, um Informationen zu einer Tabelle aufzurufen.
So fragen Sie Ihre BigQuery-Daten aus JupyterLab ab:
Klicken Sie auf Datei > Neuer Launcher, um die Launcher-Seite zu öffnen.
Klicken Sie im Bereich BigQuery-Notebooks auf die Karte BigQuery DataFrames. Es wird ein neues Notebook geöffnet, in dem die ersten Schritte mit BigQuery DataFrames beschrieben werden.
BigQuery DataFrames-Notebooks unterstützen die Python-Entwicklung in einem lokalen Python-Kernel. BigQuery DataFrames-Vorgänge werden aus der Ferne in BigQuery ausgeführt, der Rest des Codes jedoch lokal auf Ihrem Computer. Wenn ein Vorgang in BigQuery ausgeführt wird, werden unter der Codezelle eine Abfragejob-ID und ein Link zum Job angezeigt.
Klicken Sie auf Job öffnen, um den Job in der Trusted Cloud -Konsole aufzurufen.
BigQuery DataFrames-Notebook bereitstellen
Sie können ein BigQuery DataFrames-Notebook mithilfe einer serverlosen Dataproc-Laufzeitvorlage in Cloud Composer bereitstellen. Sie müssen mindestens die Laufzeitversion 2.1 verwenden.
Klicken Sie in Ihrem JupyterLab-Notebook auf calendar_monthJob Scheduler.
Geben Sie unter Jobname einen eindeutigen Namen für den Job ein.
Geben Sie unter Umgebung den Namen der Cloud Composer-Umgebung ein, in der Sie den Job bereitstellen möchten.
Wenn Ihr Notebook parametrisiert ist, fügen Sie Parameter hinzu.
Geben Sie für die Fehlerbehandlung bei der Notebookausführung eine Ganzzahl für Wiederholungsanzahl und einen Wert (in Minuten) für Wiederholungsverzögerung ein.
Wählen Sie aus, welche Ausführungsbenachrichtigungen gesendet werden sollen, und geben Sie dann die Empfänger ein.
Benachrichtigungen werden über die SMTP-Konfiguration von Airflow gesendet.
Wählen Sie einen Zeitplan für das Notebook aus.
Klicken Sie auf Erstellen.
Wenn Sie Ihr Notebook erfolgreich geplant haben, wird es in der Liste der geplanten Jobs in der ausgewählten Cloud Composer-Umgebung angezeigt.
[[["Leicht verständlich","easyToUnderstand","thumb-up"],["Mein Problem wurde gelöst","solvedMyProblem","thumb-up"],["Sonstiges","otherUp","thumb-up"]],[["Benötigte Informationen nicht gefunden","missingTheInformationINeed","thumb-down"],["Zu umständlich/zu viele Schritte","tooComplicatedTooManySteps","thumb-down"],["Nicht mehr aktuell","outOfDate","thumb-down"],["Problem mit der Übersetzung","translationIssue","thumb-down"],["Problem mit Beispielen/Code","samplesCodeIssue","thumb-down"],["Sonstiges","otherDown","thumb-down"]],["Zuletzt aktualisiert: 2025-08-17 (UTC)."],[[["\u003cp\u003eThe BigQuery JupyterLab plugin allows users to explore BigQuery data, utilize the BigQuery DataFrames API, and deploy notebooks to Cloud Composer.\u003c/p\u003e\n"],["\u003cp\u003eInstallation of the plugin requires Python 3.8 or later, the gcloud CLI, Pipenv, and JupyterLab, with specific commands provided for each step.\u003c/p\u003e\n"],["\u003cp\u003eThe plugin's Dataset Explorer pane enables browsing project datasets, tables, and allows modification of project and region settings within JupyterLab.\u003c/p\u003e\n"],["\u003cp\u003eBigQuery DataFrames notebooks support local Python development with remote execution of operations on BigQuery, and provide job details and links within the notebook interface.\u003c/p\u003e\n"],["\u003cp\u003eUsers can deploy BigQuery DataFrames notebooks to Cloud Composer by creating scheduled jobs, specifying the Cloud Composer environment, setting job parameters, and configuring notifications.\u003c/p\u003e\n"]]],[],null,["# Use the BigQuery JupyterLab plugin\n==================================\n\n|\n| **Preview**\n|\n|\n| This product or feature is subject to the \"Pre-GA Offerings Terms\" in the General Service Terms section\n| of the [Service Specific Terms](/terms/service-terms#1).\n|\n| Pre-GA products and features are available \"as is\" and might have limited support.\n|\n| For more information, see the\n| [launch stage descriptions](/products#product-launch-stages).\n\nTo request feedback or support for this feature, send an email to\n[bigquery-ide-plugin@google.com](mailto:bigquery-ide-plugin@google.com).\n\nThis document shows you how to install and use the BigQuery\nJupyterLab plugin to do the following:\n\n- Explore your BigQuery data.\n- Use the BigQuery DataFrames API.\n- Deploy a BigQuery DataFrames notebook to [Cloud Composer](/composer/docs/concepts/overview).\n\nThe BigQuery JupyterLab plugin includes all the\nfunctionality of the\n[Dataproc JupyterLab plugin](/dataproc-serverless/docs/quickstarts/jupyterlab-sessions),\nsuch as creating a Dataproc Serverless runtime template,\nlaunching and managing notebooks, developing with Apache Spark, deploying your code,\nand managing your resources.\n\nInstall the BigQuery JupyterLab plugin\n--------------------------------------\n\nTo install and use the BigQuery JupyterLab plugin, follow these\nsteps:\n\n1. In your local terminal, check to make sure you have Python 3.8 or later\n installed on your system:\n\n python3 --version\n\n2. [Install the gcloud CLI.](/sdk/docs/install)\n\n3. In your local terminal,\n [initialize the gcloud CLI](/sdk/docs/initializing):\n\n gcloud init\n\n4. Install Pipenv, a Python virtual environment tool:\n\n pip3 install pipenv\n\n5. Create a new virtual environment:\n\n pipenv shell\n\n6. Install JupyterLab in the new virtual environment:\n\n pipenv install jupyterlab\n\n7. Install the BigQuery JupyterLab plugin:\n\n pipenv install bigquery-jupyter-plugin\n\n8. If your installed version of JupyterLab is earlier\n than 4.0.0, then enable the plugin extension:\n\n jupyter server extension enable bigquery_jupyter_plugin\n\n9. Launch JupyterLab:\n\n jupyter lab\n\n JupyterLab opens in your browser.\n\n| **Note:** On macOS, if you receive an `SSL: CERTIFICATE_VERIFY_FAILED` error in your terminal when you launch JupyterLab, update your Python SSL certificate by executing `/Applications/Python 3.11/Install Certificates.command`. This file is located in the Python home directory.\n\nUpdate your project and region settings\n---------------------------------------\n\nBy default, your session runs in the project and region that you set when you\nran `gcloud init`. To change the project and region settings for your\nsession, do the following:\n\n- In the JupyterLab menu, click **Settings \\\u003e Google BigQuery Settings**.\n\nYou must restart the plugin for the changes to take effect.\n\nExplore data\n------------\n\nTo work with your BigQuery data in JupyterLab, do the following:\n\n1. In the JupyterLab sidebar, open the **Dataset Explorer** pane: click the datasets icon.\n2. To expand a project, in the **Dataset Explorer** pane, click the\n arrow_right expander arrow next to the\n project name.\n\n The **Dataset Explorer** pane shows all of the datasets in a project that\n are located in the BigQuery region that you configured for\n the session. You can interact with a project and dataset in various ways:\n - To view information about a dataset, click the name of the dataset.\n - To display all of the tables in a dataset, click the arrow_right expander arrow next to the dataset.\n - To view information about a table, click the name of the table.\n - To change the project or BigQuery region, [update your settings](#configure).\n\nExecute notebooks\n-----------------\n\nTo query your BigQuery data from JupyterLab, do the following:\n\n1. To open the launcher page, click **File \\\u003e New Launcher**.\n2. In the **BigQuery Notebooks** section, click the **BigQuery DataFrames** card. A new notebook opens that shows you how to get started with BigQuery DataFrames.\n\nBigQuery DataFrames notebooks support Python development in a local\nPython kernel. BigQuery DataFrames operations are executed remotely on\nBigQuery, but the rest of code is executed locally on your\nmachine. When an operation is executed in BigQuery, a query job\nID and link to the job appear below the code cell.\n\n- To view the job in the Google Cloud console, click **Open Job**.\n\nDeploy a BigQuery DataFrames notebook\n-------------------------------------\n\nYou can deploy a BigQuery DataFrames notebook to Cloud Composer\nby using a [Dataproc Serverless runtime template](/dataproc-serverless/docs/quickstarts/jupyterlab-sessions#create_a_serverless_runtime_template). You must use\nruntime version 2.1 or later.\n\n1. In your JupyterLab notebook, click calendar_month**Job Scheduler**.\n2. For **Job name**, enter a unique name for your job.\n3. For **Environment**, enter the name of the Cloud Composer environment to which you want to deploy the job.\n4. If your notebook is parameterized, add parameters.\n5. Enter the name of the [Serverless runtime template](/dataproc-serverless/docs/quickstarts/jupyterlab-sessions#create_a_serverless_runtime_template).\n6. To handle notebook execution failures, enter an integer for **Retry count** and a value (in minutes) for **Retry delay**.\n7. Select which execution notifications to send, and then enter the recipients.\n\n Notifications are sent using the Airflow SMTP configuration.\n8. Select a schedule for the notebook.\n\n9. Click **Create**.\n\nWhen you successfully schedule your notebook, it appears on the list of\nscheduled jobs in your selected Cloud Composer environment.\n\nWhat's next\n-----------\n\n- Try the [BigQuery DataFrames quickstart](/bigquery/docs/dataframes-quickstart).\n- Learn more about the [BigQuery DataFrames Python API](/bigquery/docs/reference/bigquery-dataframes).\n- Use the JupyterLab for [serverless batch and notebook sessions](/dataproc-serverless/docs/quickstarts/jupyterlab-sessions) with Dataproc."]]