Get started with BigQuery by using BigQuery Studio to create a
dataset, load data into a table, and query the table.
Before you begin
Before you can explore BigQuery, you must sign in to
Trusted Cloud console and create a project. If you don't enable billing in your
project, then all of the data you upload will be in the BigQuery sandbox.
The sandbox makes it possible for you to learn BigQuery at no
charge while working with a limited set of BigQuery features. For
more information, see
Enable the BigQuery sandbox.
In the Trusted Cloud console, on the project selector page,
select or create a Trusted Cloud project.
Optional: If you
select an existing project, make sure that you
enable
the BigQuery API. The BigQuery API is automatically
enabled in new projects.
Create a BigQuery dataset
Use the Trusted Cloud console to create a dataset to store the data. You
create your dataset in the US multi-region location. For information on
BigQuery regions and multi-regions, see
Locations.
In the Trusted Cloud console, open the BigQuery Studio
page.
For Location type, select Multi-region, and then choose
US (multiple regions in United States). The public datasets are
stored in the us multi-region location. For simplicity,
store your dataset in the same location.
Leave the remaining default settings as they are, and click
Create dataset.
Download the file that contains the source data
The file that you're downloading contains approximately 7 MB of data about
popular baby names. It's provided by the US Social Security Administration.
Download the US Social Security Administration's data by opening the
following URL in a new browser tab:
https://www.ssa.gov/OACT/babynames/names.zip
Extract the file.
For more information about the dataset schema, see the zip file's
NationalReadMe.pdf file.
To see what the data looks like, open the yob2024.txt file. This file
contains comma-separated values for name, assigned sex at birth, and number
of children with that name. The file has no header row.
Note the location of the yob2024.txt file so that you can find it later.
Load data into a table
Next, load the data into a new table.
In the
Explorer
pane, expand your project name.
Next to the babynames dataset, click
more_vertView
actions and select Open.
Click
add_boxCreate
table.
Unless otherwise indicated, use the default values for all settings.
On the Create table page, do the following:
In the Source section, for
Create table
from, choose Upload from the
list.
In the Select file field, click Browse.
Navigate to and open your local yob2024.txt file, and click
Open.
From the
File
format list, choose CSV.
In the Destination section, in the
Table
field, enter names_2024.
In the Schema section, click the
Edit
as text toggle, and paste the following
schema definition into the text field:
Wait for BigQuery to create the table and load the data.
Preview table data
To preview the table data, follow these steps:
In the
Explorer
pane, expand your project and babynames dataset, and then
select the names_2024 table.
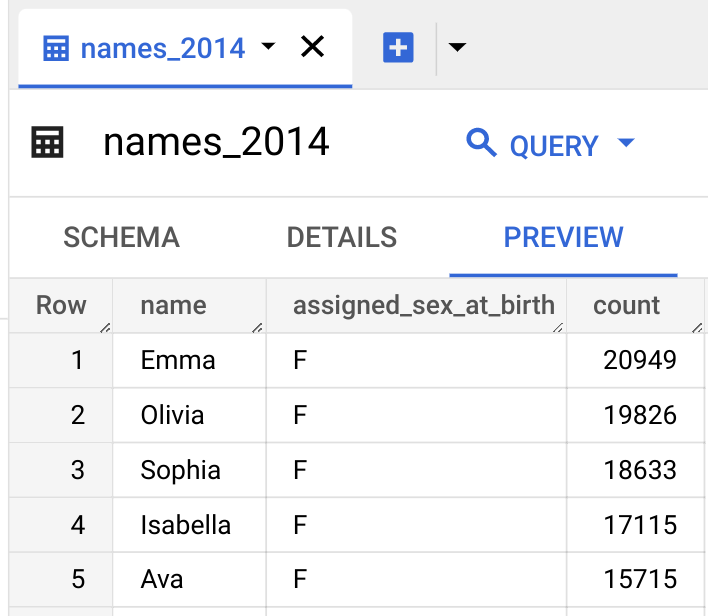
Click the
Preview tab. BigQuery displays the first
few rows of the table.
The Preview tab is not available for all table types. For example, the
Preview tab is not displayed for external tables or views.
Query table data
Next, query the table.
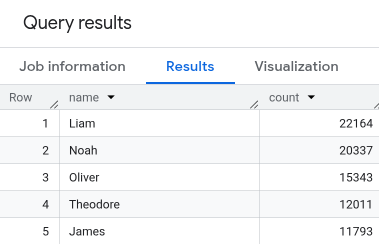
Next to the names_2024 tab, click the add_boxSQL query option. A new editor tab opens.
In the query editor, paste the following query. This query retrieves the
top five names for babies born in the US that were assigned male at birth in
2024.
[[["Easy to understand","easyToUnderstand","thumb-up"],["Solved my problem","solvedMyProblem","thumb-up"],["Other","otherUp","thumb-up"]],[["Missing the information I need","missingTheInformationINeed","thumb-down"],["Too complicated / too many steps","tooComplicatedTooManySteps","thumb-down"],["Out of date","outOfDate","thumb-down"],["Samples / code issue","samplesCodeIssue","thumb-down"],["Other","otherDown","thumb-down"]],["Last updated 2025-08-25 UTC."],[[["\u003cp\u003eThis guide demonstrates how to use the Google Cloud console to create a BigQuery dataset, using the "babynames" dataset as an example.\u003c/p\u003e\n"],["\u003cp\u003eYou will learn how to download a sample dataset from the US Social Security Administration, containing popular baby names, and then load it into a BigQuery table.\u003c/p\u003e\n"],["\u003cp\u003eThe process includes creating a table named "names_2014," defining its schema, and loading the downloaded CSV data into it.\u003c/p\u003e\n"],["\u003cp\u003eThe guide illustrates how to preview the data within the newly created table and subsequently run a query to retrieve the top five male baby names from the year 2014.\u003c/p\u003e\n"],["\u003cp\u003eInstructions are provided on how to clean up the resources created in the tutorial to avoid incurring additional charges.\u003c/p\u003e\n"]]],[],null,["# Load and query data in BigQuery Studio\n======================================\n\nGet started with BigQuery by using BigQuery Studio to create a\ndataset, load data into a table, and query the table.\n\n*** ** * ** ***\n\nTo follow step-by-step guidance for this task directly in the\nGoogle Cloud console, click **Guide me**:\n\n[Guide me](https://console.cloud.google.com/freetrial?redirectPath=/?walkthrough_id=bigquery--bigquery-quickstart-load-data-console)\n\n*** ** * ** ***\n\nBefore you begin\n----------------\n\nBefore you can explore BigQuery, you must sign in to Google Cloud console and create a project. If you don't enable billing in your project, then all of the data you upload will be in the BigQuery sandbox. The sandbox makes it possible for you to learn BigQuery at no charge while working with a limited set of BigQuery features. For more information, see [Enable the BigQuery sandbox](/bigquery/docs/sandbox).\n\n\u003cbr /\u003e\n\n- Sign in to your Google Cloud account. If you're new to Google Cloud, [create an account](https://console.cloud.google.com/freetrial) to evaluate how our products perform in real-world scenarios. New customers also get $300 in free credits to run, test, and deploy workloads.\n- In the Google Cloud console, on the project selector page,\n select or create a Google Cloud project.\n\n | **Note**: If you don't plan to keep the resources that you create in this procedure, create a project instead of selecting an existing project. After you finish these steps, you can delete the project, removing all resources associated with the project.\n\n [Go to project selector](https://console.cloud.google.com/projectselector2/home/dashboard)\n-\n\n\n Enable the BigQuery API.\n\n\n [Enable the API](https://console.cloud.google.com/flows/enableapi?apiid=bigquery)\n\n- In the Google Cloud console, on the project selector page,\n select or create a Google Cloud project.\n\n | **Note**: If you don't plan to keep the resources that you create in this procedure, create a project instead of selecting an existing project. After you finish these steps, you can delete the project, removing all resources associated with the project.\n\n [Go to project selector](https://console.cloud.google.com/projectselector2/home/dashboard)\n-\n\n\n Enable the BigQuery API.\n\n\n [Enable the API](https://console.cloud.google.com/flows/enableapi?apiid=bigquery)\n\n1. Optional: If you select an existing project, make sure that you [enable\n the BigQuery API](https://console.cloud.google.com/flows/enableapi?apiid=bigquery). The BigQuery API is automatically enabled in new projects.\n\nCreate a BigQuery dataset\n-------------------------\n\nUse the Google Cloud console to create a dataset to store the data. You\ncreate your dataset in the US multi-region location. For information on\nBigQuery regions and multi-regions, see\n[Locations](/bigquery/docs/dataset-locations).\n\n1. In the Google Cloud console, open the BigQuery Studio page.\n[Go to BigQuery Studio](https://console.cloud.google.com/bigquery)\n2. In the **Explorer** pane, click your project name.\n3. Click more_vert **View actions**.\n4. Select **Create dataset**.\n5. On the **Create dataset** page, do the following:\n 1. For **Dataset ID** , enter `babynames`.\n 2. For **Location type** , select **Multi-region** , and then choose **US (multiple regions in United States)** . The public datasets are stored in the `us` multi-region location. For simplicity, store your dataset in the same location.\n 3. Leave the remaining default settings as they are, and click **Create dataset**.\n\nDownload the file that contains the source data\n-----------------------------------------------\n\nThe file that you're downloading contains approximately 7 MB of data about popular baby names. It's provided by the US Social Security Administration.\n\n\u003cbr /\u003e\n\nFor more information about the data, see the Social Security Administration's\n[Background information for popular names](http://www.ssa.gov/OACT/babynames/background.html).\n\n1. Download the US Social Security Administration's data by opening the\n following URL in a new browser tab:\n\n https://www.ssa.gov/OACT/babynames/names.zip\n\n2. Extract the file.\n\n For more information about the dataset schema, see the zip file's\n `NationalReadMe.pdf` file.\n3. To see what the data looks like, open the `yob2024.txt` file. This file\n contains comma-separated values for name, assigned sex at birth, and number\n of children with that name. The file has no header row.\n\n4. Note the location of the `yob2024.txt` file so that you can find it later.\n\nLoad data into a table\n----------------------\n\nNext, load the data into a new table.\n\n1. In the **Explorer** pane, expand your project name.\n2. Next to the **babynames** dataset, click more_vert **View\n actions** and select **Open**.\n3. Click add_box **Create\n table** .\n\n Unless otherwise indicated, use the default values for all settings.\n4. On the **Create table** page, do the following:\n 1. In the **Source** section, for **Create table\n from**, choose **Upload** from the list.\n 2. In the **Select file** field, click **Browse**.\n 3. Navigate to and open your local `yob2024.txt` file, and click **Open**.\n 4. From the **File\n format** list, choose **CSV**.\n 5. In the **Destination** section, in the **Table** field, enter `names_2024`.\n 6. In the **Schema** section, click the **Edit\n as text** toggle, and paste the following schema definition into the text field: \n\n name:string,assigned_sex_at_birth:string,count:integer\n\n 7. Click **Create\n table**.\n\n Wait for BigQuery to create the table and load the data.\n\nPreview table data\n------------------\n\nTo preview the table data, follow these steps:\n\n1. In the **Explorer** pane, expand your project and `babynames` dataset, and then select the `names_2024` table.\n2. Click the **Preview** tab. BigQuery displays the first few rows of the table.\n\nThe **Preview** tab is not available for all table types. For example, the **Preview** tab is not displayed for external tables or views.\n\nQuery table data\n----------------\n\nNext, query the table.\n\n1. Next to the **names_2024** tab, click the add_box **SQL query** option. A new editor tab opens.\n2. In the query editor, paste the following query. This query retrieves the top five names for babies born in the US that were assigned male at birth in 2024. \n\n\n SELECT\n name,\n count\n FROM\n `babynames.names_2024`\n WHERE\n assigned_sex_at_birth = 'M'\n ORDER BY\n count DESC\n LIMIT\n 5;\n \n3. Click **Run**. The results are displayed in the **Query results** section. \n\nYou have successfully queried a table in a public dataset and then loaded your\nsample data into BigQuery using the Google Cloud console.\n\nClean up\n--------\n\n\nTo avoid incurring charges to your Google Cloud account for\nthe resources used on this page, follow these steps.\n\n1. In the Google Cloud console, open the BigQuery page.\n[Go to BigQuery](https://console.cloud.google.com/bigquery)\n2. In the **Explorer** pane, click the `babynames` dataset that you created.\n3. Expand the more_vert **View actions** option and click **Delete**.\n4. In the **Delete dataset** dialog, confirm the delete command: type the word `delete` and then click **Delete**.\n\nWhat's next\n-----------\n\n- To learn more about loading data into BigQuery, see [Introduction to loading data](/bigquery/docs/loading-data).\n- To learn more about querying data, see [Overview of BigQuery analytics](/bigquery/docs/query-overview).\n- To learn how to load a JSON file with nested and repeated data, see [Loading nested and repeated JSON data](/bigquery/docs/loading-data-cloud-storage-json#loading_nested_and_repeated_json_data).\n- To learn more about accessing BigQuery programmatically, see the [REST API](/bigquery/docs/reference/rest/v2) reference or the [BigQuery client libraries](/bigquery/docs/reference/libraries) page."]]