新しい空のディスクを VM にアタッチした場合は、使用する前にディスクをフォーマットしてマウントする必要があります。すでにデータが含まれているディスクをアタッチした場合は、ディスクを使用する前にマウントする必要があります。
始める前に
-
まだ設定していない場合は、認証を設定します。認証とは、 Trusted Cloud by S3NS サービスと API にアクセスするために ID を確認するプロセスです。ローカル開発環境からコードまたはサンプルを実行するには、次のいずれかのオプションを選択して Compute Engine に対する認証を行います。
Select the tab for how you plan to use the samples on this page:
Console
When you use the Trusted Cloud console to access Trusted Cloud by S3NS services and APIs, you don't need to set up authentication.
gcloud
-
After installing the Google Cloud CLI, sign in to the gcloud CLI with your federated identity and then initialize it by running the following command:
gcloud init
- Set a default region and zone.
[VM インスタンス] ページに移動します。
新しい空のディスクがアタッチされている VM の横にある [RDP] ボタンをクリックします。ブラウザ上でインスタンスに対する RDP 接続が開きます。
Windows [スタート] ボタンを右クリックして [ディスクの管理] を選択します。
新しいディスクのパーティショニング スキームを選択するように求められます。[GPT] を選択して、[OK] をクリックします。
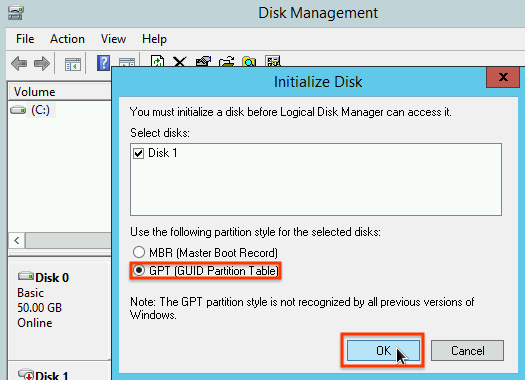
ディスクが初期化されたら、未割り当てディスク領域を右クリックして、[新しいシンプル ボリューム] を選択します。
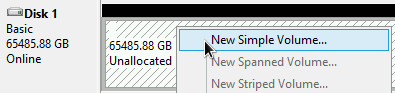
新しいシンプル ボリューム ウィザードの指示に従って新しいボリュームを構成します。任意のパーティション形式を使用できますが、この例では
NTFS
を選択します。[クイック フォーマットする] にもチェックを入れて、フォーマット処理を高速化します。必要に応じて、[アロケーション ユニットサイズ] フィールドでクラスタのサイズを設定します。クラスタのサイズによってパーティションの最大サイズが制限されます。ゾーン永続ディスクとこのパーティションのサイズを後で変更するのであれば、この点に注意してください。ウィザードが完了してボリュームのフォーマットが終了したら、接続されたディスクのリストで
Status
列を調べて、新しいディスクがHealthy
ステータスとなっていることを確認します。- 永続ディスクのサイズを変更する方法を確認する。
- 予期しないデータ損失を防ぐため、スナップショットを使用してディスクを定期的にバックアップする方法を学習する。
REST
このページの REST API サンプルをローカル開発環境で使用するには、gcloud CLI に指定した認証情報を使用します。
After installing the Google Cloud CLI, sign in to the gcloud CLI with your federated identity and then initialize it by running the following command:
gcloud init
詳細については、 Trusted Cloud 認証ドキュメントの REST を使用して認証するをご覧ください。
VM に接続する
Windows VM で非ブートディスクをフォーマットしてマウントする
Windows ディスク管理ユーティリティを使用して、新しいディスクをフォーマットして Windows VM にマウントします。
これで、ディスクにファイルを書き込むことができます。
次のステップ
特に記載のない限り、このページのコンテンツはクリエイティブ・コモンズの表示 4.0 ライセンスにより使用許諾されます。コードサンプルは Apache 2.0 ライセンスにより使用許諾されます。詳しくは、Google Developers サイトのポリシーをご覧ください。Java は Oracle および関連会社の登録商標です。
最終更新日 2025-07-21 UTC。
[[["わかりやすい","easyToUnderstand","thumb-up"],["問題の解決に役立った","solvedMyProblem","thumb-up"],["その他","otherUp","thumb-up"]],[["必要な情報がない","missingTheInformationINeed","thumb-down"],["複雑すぎる / 手順が多すぎる","tooComplicatedTooManySteps","thumb-down"],["最新ではない","outOfDate","thumb-down"],["翻訳に関する問題","translationIssue","thumb-down"],["サンプル / コードに問題がある","samplesCodeIssue","thumb-down"],["その他","otherDown","thumb-down"]],["最終更新日 2025-07-21 UTC。"],[[["\u003cp\u003eNew blank disks attached to a Windows VM must be formatted and mounted before use, while disks with existing data only need to be mounted.\u003c/p\u003e\n"],["\u003cp\u003eAuthentication is required to access Google Cloud services and APIs, with options for Console, gcloud CLI, and REST API access.\u003c/p\u003e\n"],["\u003cp\u003eTo connect to the VM, navigate to the VM instances page and use the RDP button.\u003c/p\u003e\n"],["\u003cp\u003eFormatting and mounting a new disk on a Windows VM is done using the Windows Disk Management utility, typically involving selecting GPT partitioning and creating a new simple volume with an \u003ccode\u003eNTFS\u003c/code\u003e format.\u003c/p\u003e\n"],["\u003cp\u003eAfter formatting, ensure the disk status in Disk Management is \u003ccode\u003eHealthy\u003c/code\u003e to confirm it is ready for use.\u003c/p\u003e\n"]]],[],null,["# Format and mount a non-boot disk on a Windows VM\n\nWindows\n\n*** ** * ** ***\n\nIf you attached a new, blank disk to your VM, before you can use it you must\nformat and mount the disk. If you attached a disk that already contains data,\nthen you must mount the disk before you can use it.\n\nBefore you begin\n----------------\n\n- If you haven't already, set up [authentication](/compute/docs/authentication). Authentication verifies your identity for access to Google Cloud services and APIs. To run code or samples from a local development environment, you can authenticate to Compute Engine by selecting one of the following options:\n\n Select the tab for how you plan to use the samples on this page: \n\n ### Console\n\n\n When you use the Google Cloud console to access Google Cloud services and\n APIs, you don't need to set up authentication.\n\n ### gcloud\n\n 1.\n [Install](/sdk/docs/install) the Google Cloud CLI.\n\n After installation,\n [initialize](/sdk/docs/initializing) the Google Cloud CLI by running the following command:\n\n ```bash\n gcloud init\n ```\n\n\n If you're using an external identity provider (IdP), you must first\n [sign in to the gcloud CLI with your federated identity](/iam/docs/workforce-log-in-gcloud).\n | **Note:** If you installed the gcloud CLI previously, make sure you have the latest version by running `gcloud components update`.\n 2. [Set a default region and zone](/compute/docs/gcloud-compute#set_default_zone_and_region_in_your_local_client).\n\n ### REST\n\n\n To use the REST API samples on this page in a local development environment, you use the\n credentials you provide to the gcloud CLI.\n 1. [Install](/sdk/docs/install) the Google Cloud CLI. After installation, [initialize](/sdk/docs/initializing) the Google Cloud CLI by running the following command: \n\n ```bash\n gcloud init\n ```\n 2. If you're using an external identity provider (IdP), you must first [sign in to the gcloud CLI with your federated identity](/iam/docs/workforce-log-in-gcloud).\n\n\n For more information, see\n [Authenticate for using REST](/docs/authentication/rest)\n in the Google Cloud authentication documentation.\n\nConnect to the VM\n-----------------\n\n1. Go to the **VM instances** page.\n\n [Go to the VM instances page](https://console.cloud.google.com/compute/instances)\n2. Click the **RDP** button next to the VM that has the new blank disk attached.\n The browser opens an RDP connection to the instance.\n\nFormat and mount a non-boot disk on a Windows VM\n------------------------------------------------\n\nUse the [Windows Disk Management utility](https://learn.microsoft.com/windows-server/storage/disk-management/initialize-new-disks)\nto format and mount the new disk on a Windows VM.\n\n1. Right-click the Windows Start button and select **Disk Management**.\n\n2. Disk Management prompts you to select a partitioning scheme for the new disk.\n Select **GPT** and click **OK**.\n\n3. After the disk initializes, right-click the unallocated disk space\n and select **New Simple Volume**.\n\n4. Follow the instructions in the **New Simple Volume Wizard** to configure\n the new volume. You can use any partition format that you like, but for\n this example select `NTFS`. Also, check **Perform a quick format**\n to speed up the formatting process. Optionally, set the cluster size\n in the **Allocation unit size** field. The cluster size\n [limits the maximum size of the partition](https://learn.microsoft.com/windows-server/storage/file-server/ntfs-overview).\n Keep this in mind if you try to resize the zonal persistent disk and this\n partition later.\n\n5. After you complete the wizard and the volume is formatted, check\n the `Status` column on the list of attached disks to ensure that the\n new disk has a `Healthy` status.\n\nYou can now write files to the disk.\n\nWhat's next\n-----------\n\n- Learn how to [resize your persistent disks](/compute/docs/disks/resize-persistent-disk).\n- Learn how to regularly [back up your disks using snapshots](/compute/docs/disks/create-snapshots) to prevent unintended data loss."]] -