
Work with user-defined functions in Python
A Python user-defined function (UDF) lets you implement a scalar function in Python and use it in a SQL query. Python UDFs are similar to SQL and Javascript UDFs, but with additional capabilities. Python UDFs let you install third-party libraries from the Python Package Index (PyPI) and let you access external services using a Cloud resource connection.
Python UDFs are built and run on BigQuery managed resources.
Limitations
python-3.11is the only supported runtime.- You can't create a temporary Python UDF.
- You can't use a Python UDF with a materialized view.
- The results of a query that calls a Python UDF aren't cached because the return value of a Python UDF is always assumed to be non-deterministic.
- Assured workloads aren't supported.
- These data types are not supported:
JSON,RANGE,INTERVAL, andGEOGRAPHY. - Containers that run Python UDFs can only be configured up to 4 vCpu and 16 GiB.
- Encrypting Python UDF code with Customer-managed encryption keys (CMEK) isn't supported.
- Python UDFs support VPC Service Controls, but VPC networks aren't supported.
Required roles
The required IAM roles are based on whether you are a Python UDF owner or a Python UDF user.
UDF owners
A Python UDF owner typically creates or updates a UDF. Additional roles are also
required if you create a Python UDF that references a Cloud resource connection.
This connection is required only if your UDF uses the
WITH CONNECTION clause to access
an external service.
To get the permissions that you need to create or update a Python UDF, ask your administrator to grant you the following IAM roles:
- BigQuery Data Editor (
roles/bigquery.dataEditor) on the dataset - BigQuery Job User (
roles/bigquery.jobUser) on the project - BigQuery Connection Admin (
roles/bigquery.connectionAdmin) on the project
For more information about granting roles, see Manage access to projects, folders, and organizations.
These predefined roles contain the permissions required to create or update a Python UDF. To see the exact permissions that are required, expand the Required permissions section:
Required permissions
The following permissions are required to create or update a Python UDF:
-
Create a Python UDF using the
CREATE FUNCTIONstatement:bigquery.routines.createon the dataset -
Update a Python UDF using the
CREATE FUNCTIONstatement:bigquery.routines.updateon the dataset -
Run a
CREATE FUNCTIONstatement query job:bigquery.jobs.createon the project -
Create a new Cloud resource connection:
bigquery.connections.createon the project -
Use a connection in the
CREATE FUNCTIONstatement:bigquery.connections.delegateon the connection
You might also be able to get these permissions with custom roles or other predefined roles.
For more information about roles in BigQuery, see Predefined IAM roles.
UDF users
A Python UDF user invokes a UDF created by someone else. Additional roles are also required if you invoke a Python UDF that references a Cloud resource connection.
To get the permissions that you need to invoke a Python UDF created by someone else, ask your administrator to grant you the following IAM roles:
- BigQuery User (
roles/bigquery.user) on the project - BigQuery Data Viewer (
roles/bigquery.dataViewer) on the dataset - BigQuery Connection User (
roles/bigquery.connectionUser) on the connection
For more information about granting roles, see Manage access to projects, folders, and organizations.
These predefined roles contain the permissions required to invoke a Python UDF created by someone else. To see the exact permissions that are required, expand the Required permissions section:
Required permissions
The following permissions are required to invoke a Python UDF created by someone else:
-
To run a query job that references a Python UDF:
bigquery.jobs.createon the project -
To invoke a Python UDF created by someone else:
bigquery.routines.geton the dataset -
To run a Python UDF that references a Cloud resource connection:
bigquery.connections.useon the connection
You might also be able to get these permissions with custom roles or other predefined roles.
For more information about roles in BigQuery, see Predefined IAM roles.
Create a persistent Python UDF
Follow these rules when you create a Python UDF:
The body of the Python UDF must be a quoted string literal that represents the Python code. To learn more about quoted string literals, see Formats for quoted literals.
The body of the Python UDF must include a Python function that is used in the
entry_pointargument in the Python UDF options list.A Python runtime version needs to be specified in the
runtime_versionoption. The only supported Python runtime version ispython-3.11. For a full list of available options, see the Function option list for theCREATE FUNCTIONstatement.
To create a persistent Python UDF, use the CREATE FUNCTION statement
without the TEMP or TEMPORARY keyword. To delete a persistent Python UDF,
use the DROP FUNCTION statement.
Example
To see an example of creating a persistent Python UDF, choose on of the following options:
Console
The following example creates a persistent Python UDF named multiplyInputs
and calls the UDF from within a SELECT statement:
Go to the BigQuery page.
In the query editor, enter the following
CREATE FUNCTIONstatement:CREATE FUNCTION `PROJECT_ID.DATASET_ID`.multiplyInputs(x FLOAT64, y FLOAT64) RETURNS FLOAT64 LANGUAGE python OPTIONS(runtime_version="python-3.11", entry_point="multiply") AS r''' def multiply(x, y): return x * y '''; -- Call the Python UDF. WITH numbers AS (SELECT 1 AS x, 5 as y UNION ALL SELECT 2 AS x, 10 as y UNION ALL SELECT 3 as x, 15 as y) SELECT x, y, `PROJECT_ID.DATASET_ID`.multiplyInputs(x, y) AS product FROM numbers;
Replace PROJECT_ID.DATASET_ID with your project ID and dataset ID.
Click Run.
This example produces the following output:
+-----+-----+--------------+
| x   | y   | product      |
+-----+-----+--------------+
| 1   | 5   |  5.0         |
| 2   | 10  | 20.0         |
| 3   | 15  | 45.0         |
+-----+-----+--------------+
BigQuery DataFrames
The following example uses BigQuery DataFrames to turn a custom function into a Python UDF:
Container build status
When you create a Python UDF using the CREATE FUNCTION statement,
BigQuery creates or updates a container image that is based on a
base image. The container is built on the base image using your code and any
specified package dependencies.
Creating the container is a long-running process. The first query after you run
the CREATE FUNCTION statement waits for the image build to complete. If there
are no external dependencies, the container image is typically created in
less than a minute.
The size of all Python UDF containers per project and per region is restricted to a sum total of 10GiB. For more information, see User-defined function limits for persistent UDFs. Your container build fails if your project has reached the quota.
To see the status of your container build, choose one of the following:
Console
Go to the BigQuery Studio page.
In the left pane, expand your project and then click Datasets.
Click the link to open the dataset that contains your Python UDF.
On the dataset page, click the Routines tab.
In the Routine ID column, click your Python UDF.
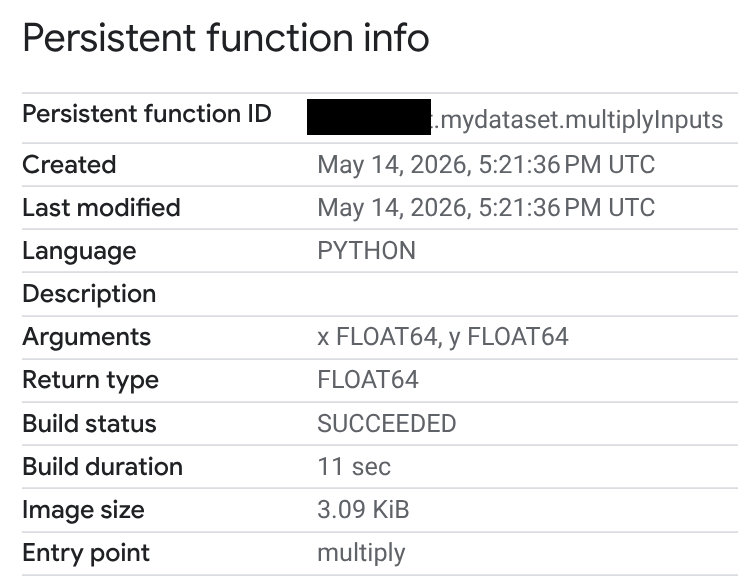
On the Persistent function info page, you can view the build status, build duration, and image size. The build status is one of the following:
- In progress
- Succeeded
- Failed
If a build fails, the function information page provides detailed error messages so you can troubleshoot issues such as syntax errors or problems installing external packages.
SQL
To query the build status fields in the INFORMATION_SCHEMA.ROUTINES view,
follow these steps:
Go to the BigQuery Studio page.
Switch to the query editor or click SQL query.
Enter the following query to retrieve the
BUILD_STATUSfields from theINFORMATION_SCHEMA.ROUTINESview. TheBUILD_STATUScolumn is aSTRUCTtype in GoogleSQL:SELECT build_status.* FROM `PROJECT_ID.DATASET_ID`.INFORMATION_SCHEMA.ROUTINES;Replace PROJECT_ID.DATASET_ID with your project ID and dataset ID.
The output should look like the following. Error fields are omitted:
+---------------+--------------------------------+------------------------+------------------+
| build_state   | build_state_update_time        | build_duration_seconds | image_size_bytes |
+---------------+--------------------------------+------------------------+------------------+
| SUCCEEDED     | 2026-05-14 17:21:49.736000 UTC |                     11 |             3167 |
+---------------+--------------------------------+------------------------+------------------+
API
View the container build status by using RoutineBuildStatus in the API.
Create a vectorized Python UDF
You can implement your Python UDF to process a batch of rows instead of a single row by using vectorization. Vectorization can improve query performance. You can create a vectorized UDF using either Pandas or Apache Arrow.
To control batching behavior, specify the maximum number of rows in each batch
by using the max_batching_rows option in the CREATE OR REPLACE FUNCTION
option list. If you specify max_batching_rows, BigQuery
determines the number of rows in a batch, up to the max_batching_rows limit.
If max_batching_rows is not specified, the number of rows to batch is
determined automatically.
Use Pandas
A vectorized Python UDF has a single pandas.DataFrame argument that must
be annotated. The pandas.DataFrame argument has the same number of columns as
the Python UDF parameters defined in the CREATE FUNCTION statement. The column
names in the pandas.DataFrame argument have the same names as the UDF's
parameters.
Your function needs to return either a pandas.Series or a single-column
pandas.DataFrame with the same number of rows as the input.
The following example creates a vectorized Python UDF named multiplyInputs
with two parameters—x and y:
Go to the BigQuery page.
In the query editor, enter the following
CREATE FUNCTIONstatement:CREATE FUNCTION `PROJECT_ID.DATASET_ID`.multiplyVectorized(x FLOAT64, y FLOAT64) RETURNS FLOAT64 LANGUAGE python OPTIONS(runtime_version="python-3.11", entry_point="vectorized_multiply") AS r''' import pandas as pd def vectorized_multiply(df: pd.DataFrame): return df['x'] * df['y'] ''';
Replace PROJECT_ID.DATASET_ID with your project ID and dataset ID.
Calling the UDF is the same as in the previous example.
Click Run.
Use Apache Arrow
The following example uses the Apache Arrow
RecordBatch interface. When you use the RecordBatch interface, the
function passes a batch of rows of columns of equal length to the entrypoint.
The following example uses Apache Arrow to create a vectorized Python
UDF named multiplyVectorizedArrow.
Go to the BigQuery page.
In the query editor, enter the following
CREATE FUNCTIONstatement:CREATE FUNCTION `PROJECT_ID.DATASET_ID`.multiplyVectorizedArrow(x FLOAT64, y FLOAT64) RETURNS FLOAT64 LANGUAGE python OPTIONS( runtime_version="python-3.11", entry_point="vectorized_multiply_arrow" ) AS r''' import pyarrow as pa import pyarrow.compute as pc def vectorized_multiply_arrow(batch: pa.RecordBatch): # Access columns directly from the Arrow RecordBatch x = batch.column('x') y = batch.column('y') # Use pyarrow.compute for vectorized operations return pc.multiply(x, y) ''';
Replace PROJECT_ID.DATASET_ID with your project ID and dataset ID.
Calling the UDF is the same as in the previous examples.
Click Run.
Call a Python UDF
If you have permission to invoke a Python UDF, then you can call it like any
other function. To use a function defined in a different project, use the fully
qualified name for the function. For example, to call an XML extraction function
named cw_xml_extract
in another project, complete the following steps.
Console
Go to the BigQuery page.
In the query editor, enter the following example:
SELECT
  `PROJECT_ID.DATASET_ID`.`cw_xml_extract`(xml, '//title/text()') AS `title`
FROM UNNEST([
  STRUCT('''<book id="1">
    <title>The Great Gatsby</title>
    <author>F. Scott Fitzgerald</author>
  </book>''' AS xml),
  STRUCT('''<book id="2">
    <title>1984</title>
    <author>George Orwell</author>
  </book>''' AS xml),
  STRUCT('''<book id="3">
    <title>Brave New World</title>
    <author>Aldous Huxley</author>
  </book>''' AS xml)
])
Click Run.
This example produces the following output:
+--------------------------+
| title                    |
+--------------------------+
| The Great Gatsby         |
| 1984                     |
| Brave New World          |
+--------------------------+
BigQuery DataFrames
The following example uses the BigQuery
DataFrames
sql_scalar,
read_gbq_function,
and
apply
methods to call a Python UDF:
Supported Python UDF data types
The following table defines the mapping between BigQuery data types, Python data types, and Pandas data types:
| BigQuery data type | Python built-in data type used by standard UDF | Pandas data type used by vectorized UDF | PyArrow data type used for ARRAY and STRUCT in vectorized UDF |
|---|---|---|---|
BOOL |
bool |
BooleanDtype |
DataType(bool) |
INT64 |
int |
Int64Dtype |
DataType(int64) |
FLOAT64 |
float |
FloatDtype |
DataType(double) |
STRING |
str |
StringDtype |
DataType(string) |
BYTES |
bytes |
binary[pyarrow] |
DataType(binary) |
TIMESTAMP |
Function parameter: Function return value: |
Function parameter: Function return value: |
TimestampType(timestamp[us]), with timezone |
DATE |
datetime.date |
date32[pyarrow] |
DataType(date32[day]) |
TIME |
datetime.time |
time64[pyarrow] |
Time64Type(time64[us]) |
DATETIME |
datetime.datetime (without timezone) |
timestamp[us][pyarrow] |
TimestampType(timestamp[us]), without timezone |
ARRAY |
list |
list<...>[pyarrow], where the element data type is a pandas.ArrowDtype |
ListType |
STRUCT |
dict |
struct<...>[pyarrow], where the field data type is a pandas.ArrowDtype |
StructType |
Supported runtime versions
BigQuery Python UDFs support the python-3.11 runtime. This
Python version includes some additional pre-installed packages. For system
libraries, check the runtime base image.
| Runtime version | Python version | Includes |
|---|---|---|
| python-3.11 | Python 3.11 | numpy 1.26.3 pyarrow 14.0.2 pandas 2.1.4 python-dateutil 2.8.2 absl-py 2.0.0 pytz 2023.3.post1 tzdata 2023.4 six 1.16.0 |
Use third-party packages
You can use the CREATE FUNCTION option list to use modules other than
those provided by the Python standard library and pre-installed packages.
You can install packages from the Python Package Index (PyPI), or you can
import Python files from Cloud Storage.
Install a package from the Python package index
When you install a package, you must provide the package name, and you can optionally provide the package version using Python package version specifiers.
If the package is in the runtime, that package is used unless a particular
version is specified in the CREATE FUNCTION option list. If a package version
is not specified, and the package isn't in the runtime, the latest available
version is used. Only packages with the wheels binary format are
supported.
The following example shows you how to create a Python UDF that installs the
scipy package using the CREATE OR REPLACE FUNCTION option list:
Go to the BigQuery page.
In the query editor, enter the following
CREATE FUNCTIONstatement:CREATE FUNCTION `PROJECT_ID.DATASET_ID`.area(radius FLOAT64) RETURNS FLOAT64 LANGUAGE python OPTIONS (entry_point='area_handler', runtime_version='python-3.11', packages=['scipy==1.15.3']) AS r""" import scipy def area_handler(radius): return scipy.constants.pi*radius*radius """; SELECT `PROJECT_ID.DATASET_ID`.area(4.5);
Replace PROJECT_ID.DATASET_ID with your project ID and dataset ID.
Click Run.
Import additional Python files as libraries
You can extend your Python UDFs using the Function option list by importing Python files from Cloud Storage.
In your UDF's Python code, you can import the Python files from
Cloud Storage as modules by using the import statement followed by the
path to the Cloud Storage object. For example, if you are importing
gs://BUCKET_NAME/path/to/lib1.py, then your import statement would be import
path.to.lib1.
The Python filename needs to be a Python identifier. Each folder name in the
object name (after the /) should be a valid Python identifier. Within the
ASCII range (U+0001..U+007F), the following characters can be used in
identifiers:
- Uppercase and lowercase letters A through Z.
- Underscores.
- The digits zero through nine, but a number cannot appear as the first character in the identifier.
The following example shows you how to create a Python UDF that imports the
lib1.py client library package from a Cloud Storage bucket named
my_bucket:
Go to the BigQuery page.
In the query editor, enter the following
CREATE FUNCTIONstatement:CREATE FUNCTION `PROJECT_ID.DATASET_ID`.myFunc(a FLOAT64, b STRING) RETURNS STRING LANGUAGE python OPTIONS ( entry_point='compute', runtime_version='python-3.11', library=['gs://BUCKET_NAME/PATH/lib1.py']) AS r""" import path.to.lib1 as lib1 def compute(a, b): # doInterestingStuff is a function defined in # gs://BUCKET_NAME/PATH/lib1.py return lib1.doInterestingStuff(a, b); """;
Replace the following:
- PROJECT_ID: your project ID.
- DATASET_ID: your dataset ID.
- BUCKET_NAME: the name of the
Cloud Storage bucket that contains
lib1.py. - PATH: the path to the Cloud Storage bucket.
Click Run.
Configure container limits for Python UDFs
You can use the CREATE FUNCTION option list to specify CPU, memory, and
container request concurrency limits for containers that run Python UDFs.
By default, containers are allocated the following resources:
- The memory allocated is
512Mi. - The CPU allocated is
1.0vCPU. - The container request concurrency limit is
80.
The following example creates a Python UDF using the CREATE FUNCTION option
list to specify container limits:
Go to the BigQuery page.
In the query editor, enter the following
CREATE FUNCTIONstatement:CREATE FUNCTION `PROJECT_ID.DATASET_ID`.square_area(length FLOAT64) RETURNS FLOAT64 LANGUAGE python OPTIONS (entry_point='square_area', runtime_version='python-3.11', container_memory='CONTAINER_MEMORY', container_cpu=CONTAINER_CPU, container_request_concurrency=CONTAINER_REQUEST_CONCURRENCY) AS r""" def square_area(length): return length*length """; SELECT `PROJECT_ID.DATASET_ID`.square_area(4.5);
Replace the following:
- PROJECT_ID.DATASET_ID: your project ID and dataset ID.
- CONTAINER_MEMORY: the memory value in the
following format:
<integer_number><unit>. The unit must be one of these values:Mi(MiB),M(MB),Gi(GiB), orG(GB). For example,2Gi. - CONTAINER_CPU: the CPU value. Python UDFs support
fractional CPU values between
0.33and1.0and non-fractional CPU values of1,2, and4. - CONTAINER_REQUEST_CONCURRENCY: the maximum number
of concurrent requests per Python UDF container instance. The value must
be an integer from
1to1000.
Click Run.
Supported CPU values
Python UDFs support fractional CPU values between 0.33 and 1.0 and
non-fractional CPU values of 1, 2, and 4. Containers that run Python UDFs
can be configured up to 4 vCpu. The default value is 1.0. Fractional
input values are rounded to two decimal places before they're applied to the
container.
Supported memory values
Python UDF containers support memory values in the following format:
<integer_number><unit>. The unit must be one of these values: Mi, M, Gi,
G. The minimum amount of memory you can configure is 256Mi. The maximum
amount of memory you can configure is 16Gi.
Based on the memory value you choose, you must also specify an appropriate amount of CPU. The following table shows the minimum and maximum CPU values for each memory value:
| Memory | Minimum CPU | Maximum CPU |
|---|---|---|
256Mi to 512Mi |
0.33 |
2 |
Greater than 512Mi and less than or equal to 1Gi |
0.5 |
2 |
Greater than 1Gi and less than 2Gi |
1 |
2 |
2Gi to 4Gi |
1 |
4 |
Greater than 4Gi and up to 8Gi |
2 |
4 |
Greater than 8Gi and up to 16Gi |
4 |
4 |
Alternatively, if you've determined the amount of CPU you're allocating, you can use the following table to determine the appropriate memory range:
| CPU | Minimum memory | Maximum memory |
|---|---|---|
Less than 0.5 |
256Mi |
512Mi |
0.5 to less than 1 |
256Mi |
1Gi |
1 |
256Mi |
4Gi |
2 |
256Mi |
8Gi |
4 |
2Gi |
16Gi |
Call Cloud de Confiance by S3NS or online services in Python code
A Python UDF accesses a Cloud de Confiance by S3NS service or an external service by using the Cloud resource connection service account. The connection's service account must be granted permissions to access the service. The permissions required vary depending on the service that is accessed and the APIs that are called from your Python code.
If you create a Python UDF without using a Cloud resource connection, the function is executed in an environment that blocks network access. If your UDF accesses online services, you must create the UDF with a Cloud resource connection. If you don't, the UDF is blocked from accessing the network until an internal connection timeout is reached. When you use a Cloud resource connection, implement the following:
Timeouts. When you make network calls within your Python UDF, always include a reasonable timeout. This prevents the UDF from hanging indefinitely if the external service is slow to respond or is unreachable.
Use Error Handling. Wrap your network call code in a
try...exceptblock to gracefully handle potential errors, such as connection errors, timeouts, or HTTP failure status codes. This allows your UDF to return a meaningful error or a fallback value instead of causing the query to fail or stop responding.
The following example shows you how to access the Cloud Translation service
from a Python UDF. This example has two projects—a project named
my_query_project where you create the UDF and the Cloud resource connection,
and a project where you are running the Cloud Translation named
my_translate_project.
Create a Cloud resource connection
First, you create a Cloud resource connection in my_query_project. To create
the cloud resource connection, follow these steps.
Console
Go to the BigQuery page.
In the left pane, click Explorer:

If you don't see the left pane, click Expand left pane to open the pane.
In the Explorer pane, expand your project name, and then click Connections.
On the Connections page, click Create connection.
For Connection type, choose Vertex AI remote models, remote functions, BigLake and Spanner (Cloud Resource).
In the Connection ID field, enter a name for your connection.
For Location type, select a location for your connection. The connection should be colocated with your other resources such as datasets.
Click Create connection.
Click Go to connection.
In the Connection info pane, copy the service account ID for use in a later step.
SQL
Use the CREATE CONNECTION statement:
In the Cloud de Confiance console, go to the BigQuery page.
In the query editor, enter the following statement:
CREATE CONNECTION [IF NOT EXISTS] `CONNECTION_NAME`
OPTIONS (
  connection_type = "CLOUD_RESOURCE",
  friendly_name = "FRIENDLY_NAME",
  description = "DESCRIPTION"
  );
Replace the following:
-
CONNECTION_NAME: the name of the connection in either thePROJECT_ID.LOCATION.CONNECTION_ID,LOCATION.CONNECTION_ID, orCONNECTION_IDformat. If the project or location are omitted, then they are inferred from the project and location where the statement is run. -
FRIENDLY_NAME(optional): a descriptive name for the connection. -
DESCRIPTION(optional): a description of the connection.
-
Click Run.
For more information about how to run queries, see Run an interactive query.
bq
In a command-line environment, create a connection:
bq mk --connection --location=REGION --project_id=PROJECT_ID \
    --connection_type=CLOUD_RESOURCE CONNECTION_ID
The
--project_idparameter overrides the default project.Replace the following:
REGION: your connection regionPROJECT_ID: your Cloud de Confiance project IDCONNECTION_ID: an ID for your connection
When you create a connection resource, BigQuery creates a unique system service account and associates it with the connection.
Troubleshooting: If you get the following connection error, update the Google Cloud SDK:
Flags parsing error: flag --connection_type=CLOUD_RESOURCE: value should be one of...
Retrieve and copy the service account ID for use in a later step:
bq show --connection PROJECT_ID.REGION.CONNECTION_ID
The output is similar to the following:
name                          properties
1234.REGION.CONNECTION_ID     {"serviceAccountId": "connection-1234-9u56h9@gcp-sa-bigquery-condel.s3ns-system.iam.gserviceaccount.com"}
Python
Before trying this sample, follow the Python setup instructions in the BigQuery quickstart using client libraries. For more information, see the BigQuery Python API reference documentation.
To authenticate to BigQuery, set up Application Default Credentials. For more information, see Set up authentication for client libraries.
Before running code samples, set the GOOGLE_CLOUD_UNIVERSE_DOMAIN environment
variable to s3nsapis.fr.
Node.js
Before trying this sample, follow the Node.js setup instructions in the BigQuery quickstart using client libraries. For more information, see the BigQuery Node.js API reference documentation.
To authenticate to BigQuery, set up Application Default Credentials. For more information, see Set up authentication for client libraries.
Before running code samples, set the GOOGLE_CLOUD_UNIVERSE_DOMAIN environment
variable to s3nsapis.fr.
Terraform
Use the
google_bigquery_connection
resource.
To authenticate to BigQuery, set up Application Default Credentials. For more information, see Set up authentication for client libraries.
The following example creates a Cloud resource connection named
my_cloud_resource_connection in the US region:
To apply your Terraform configuration in a Cloud de Confiance project, complete the steps in the following sections.
Prepare Cloud Shell
- Launch Cloud Shell.
-
Set the default Cloud de Confiance project where you want to apply your Terraform configurations.
You only need to run this command once per project, and you can run it in any directory.
export GOOGLE_CLOUD_PROJECT=PROJECT_ID
Environment variables are overridden if you set explicit values in the Terraform configuration file.
Prepare the directory
Each Terraform configuration file must have its own directory (also called a root module).
-
In Cloud Shell, create a directory and a new
file within that directory. The filename must have the
.tfextension—for examplemain.tf. In this tutorial, the file is referred to asmain.tf.mkdir DIRECTORY && cd DIRECTORY && touch main.tf
-
If you are following a tutorial, you can copy the sample code in each section or step.
Copy the sample code into the newly created
main.tf.Optionally, copy the code from GitHub. This is recommended when the Terraform snippet is part of an end-to-end solution.
- Review and modify the sample parameters to apply to your environment.
- Save your changes.
-
Initialize Terraform. You only need to do this once per directory.
terraform init
Optionally, to use the latest Google provider version, include the
-upgradeoption:terraform init -upgrade
Apply the changes
-
Review the configuration and verify that the resources that Terraform is going to create or
update match your expectations:
terraform plan
Make corrections to the configuration as necessary.
-
Apply the Terraform configuration by running the following command and entering
yesat the prompt:terraform apply
Wait until Terraform displays the "Apply complete!" message.
- Open your Cloud de Confiance project to view the results. In the Cloud de Confiance console, navigate to your resources in the UI to make sure that Terraform has created or updated them.
Grant access to the connection's service account
You need the service account ID you copied previously when you configure permissions for the connection. When you create a connection resource, BigQuery creates a unique system service account and associates it with the connection.
To grant the Cloud resource connection service account access to your projects,
grant the service account the Service usage consumer role
(roles/serviceusage.serviceUsageConsumer) in my_query_project and the Cloud
Translation API user role (roles/cloudtranslate.user) in
my_translate_project.
Console
Go to the IAM page.
Verify that
my_query_projectis selected.Click Grant Access.
In the New principals field, enter the Cloud resource connection's service account ID that you copied previously.
In the Select a role field, choose Service usage, and then select Service usage consumer.
Click Save.
In the project selector, choose
my_translate_project.Go to the IAM page.
Click Grant Access.
In the New principals field, enter the Cloud resource connection's service account ID that you copied previously.
In the Select a role field, choose Cloud translation, and then select Cloud Translation API user.
Click Save.
SQL
Use the GRANT statement
to grant the Service usage consumer role (roles/serviceusage.serviceUsageConsumer)
to the service account in my_query_project:
In the Cloud de Confiance console, go to the BigQuery page.
In the query editor, enter the following statement:
  GRANT `roles/serviceusage.serviceUsageConsumer`
  ON PROJECT `my_query_project`
  TO "connection:SERVICE_ACCOUNT_ID";
Replace
SERVICE_ACCOUNT_IDwith the service account ID you copied previously.Click Run.
For more information about how to run queries, see Run an interactive query.
Use the GRANT statement
to grant the Cloud Translation API user role (roles/cloudtranslate.user)
in my_translate_project:
In the Cloud de Confiance console, go to the BigQuery page.
In the query editor, enter the following statement:
  GRANT `roles/cloudtranslate.user`
  ON PROJECT `my_translate_project`
  TO "connection:SERVICE_ACCOUNT_ID";
Replace
SERVICE_ACCOUNT_IDwith the service account ID you copied previously.Click Run.
For more information about how to run queries, see Run an interactive query.
Create a Python UDF that calls the Cloud Translation service
In my_query_project, create a Python UDF that calls the Cloud Translation
service using your Cloud resource connection.
In the Cloud de Confiance console, go to the BigQuery page.
Enter the following
CREATE FUNCTIONstatement in the query editor:CREATE FUNCTION `PROJECT_ID.DATASET_ID`.translate_to_es(x STRING) RETURNS STRING LANGUAGE python WITH CONNECTION `PROJECT_ID.REGION.CONNECTION_ID` OPTIONS (entry_point='do_translate', runtime_version='python-3.11', packages=['google-cloud-translate>=3.11', 'google-api-core']) AS r""" from google.api_core.retry import Retry from google.cloud import translate project = "my_translate_project" translate_client = translate.TranslationServiceClient() def do_translate(x : str) -> str: response = translate_client.translate_text( request={ "parent": f"projects/PROJECT_ID/locations/us-central1", "contents": [x], "target_language_code": "es", "mime_type": "text/plain", }, retry=Retry(), ) return response.translations[0].translated_text """; -- Call the UDF. WITH text_table AS (SELECT "Hello" AS text UNION ALL SELECT "Good morning" AS text UNION ALL SELECT "Goodbye" AS text) SELECT text, `PROJECT_ID.DATASET_ID`.translate_to_es(text) AS translated_text FROM text_table;
Replace the following:
PROJECT_ID: the project ID.DATASET_ID: the dataset ID.REGION: your connection's region.CONNECTION_ID: the connection ID.
Click Run.
The output should look like the following:
+--------------------------+-------------------------------+
| text                     | translated_text               |
+--------------------------+-------------------------------+
| Hello                    | Hola                          |
| Good morning             | Buen dia                      |
| Goodbye                  | Adios                         |
+--------------------------+-------------------------------+
Use VPC Service Controls
Python UDFs inherit the VPC Service Controls perimeter of the project that runs the query job. This perimeter protects your jobs from data exfiltration, and it ensures that service interactions are secure.
When you invoke a Python UDF inside the VPC Service Controls perimeter, it has the following network connectivity:
- Python UDFs that don't use a Cloud resource connection are fully isolated. All outbound traffic is blocked.
- Python UDFs that use a Cloud resource connection are blocked from public
internet access. Python UDFs can only access Cloud de Confiance by S3NS services that
support VPC Service Controls. Outbound traffic to any destination other than
restricted.googleapis.comis blocked.
Configure Python UDFs to access Cloud de Confiance by S3NS services securely within VPC Service Controls
To access Cloud de Confiance by S3NS services from Python UDFs while enforcing VPC Service Controls, follow these steps:
- Create the Python UDF using the
CREATE FUNCTION statement's
WITH CONNECTIONclause. - Include the BigQuery project where the query job runs and the target service project in the service perimeter. Alternatively, configure a perimeter bridge.
- Add the target service API to the perimeter configuration. For example,
translate.googleapis.comif you're connecting to the Cloud Translation API.
For more details on configuring a VPC Service Controls perimeter, see:
Best practices
When you create Python UDFs, follow these best practices:
- Optimize your query logic for batching. Complex query structures can disable batching. This forces slow, row-by-row processing, which significantly increases latency on large datasets.
- Optimize the data payload. The size of individual rows can impact the efficiency of the batching feature. Keep each row as small as possible to maximize the number of rows that can be processed in a single batch.
- Configure container limits
efficiently. Scalability is a function of CPU, memory, and request
concurrency. Check monitoring metrics to tune the container configuration.
If CPU utilization is high, increase CPU allocation using the
container_cpulimit, or reduce container request concurrency using thecontainer_request_concurrencylimit. - When you use iterative tuning, start with default values. If performance is suboptimal, analyze monitoring metrics to identify specific bottlenecks.
- Implement API timeouts. When your Python UDF accesses the internet, set a timeout on the API call to avoid unexpected behavior. An example of internet access is reading from a Cloud Storage bucket.
View Python UDF metrics
Python UDFs export metrics to Cloud Monitoring. These metrics help you monitor various aspects of your UDF's operational health and resource consumption, providing insights into the performance and behavior of your UDF instances.
Monitoring resource type
The metrics for Python UDFs are reported under the following Cloud Monitoring resource type:
- Type:
bigquery.googleapis.com/ManagedRoutineInvocation - Display Name: BigQuery Managed Routine Invocation
- Labels:
resource_container: the ID of the project where the query job ran.location: the location where the query job ran.query_job_id: the ID of the query job that invoked the Python UDF.routine_project_id: the project ID where the invoked routine is stored.routine_dataset_id: the dataset ID where the invoked routine is stored.routine_id: the ID of the invoked routine.
Metrics
The following metrics are available for the
bigquery.googleapis.com/ManagedRoutineInvocation resource type:
| Metric | Description | Unit | Value type |
|---|---|---|---|
bigquery.googleapis.com/managed_routine/python/cpu_utilizations |
When a Python UDF is invoked, this metric shows the distribution of CPU utilization across all Python UDF instances for the query job. | A percentage value | DISTRIBUTION |
bigquery.googleapis.com/managed_routine/python/memory_utilizations |
When a Python UDF is invoked, this metric shows the distribution of memory utilization across all Python UDF instances for the query job. | A percentage value | DISTRIBUTION |
bigquery.googleapis.com/managed_routine/python/max_request_concurrencies |
This metric shows the distribution of the maximum number of concurrent requests served by each Python UDF instance. | Count | DISTRIBUTION |
View metrics
To view the metrics for your Python UDFs, choose one of the options in the following sections.
Job details
To view Python UDF metrics for a specific query job, follow these steps:
Go to the BigQuery page.
Click Job history.
In the Job ID column, click the query job ID.
On the Query job details page, click Cloud Monitoring dashboard. This link displays a dashboard that is filtered to show the Python UDF metrics for the job.
Metrics Explorer
To view Python UDF metrics in the Metrics Explorer, follow these steps:
Go to the Cloud Monitoring Metrics explorer page.
Click Select a metric, and in the Filter field, type
BigQuery Managed Routine Invocationorbigquery.googleapis.com/ManagedRoutineInvocation.Choose Bigquery Managed Routine > Managed_routine.
Click any of the available metrics such as the following:
- Instance CPU utilization
- Instance memory utilization
- Max concurrent requests
Click Apply.
By default, the metrics are displayed in a chart.
You can filter and group the metrics using the labels defined in the Monitoring resource types. To filter the metrics, follow these steps:
In the Filter field choose a resource type such as
query_job_idorroutine_id.In the Value field, enter the job ID or routine ID, or choose one from the list.
Cloud Monitoring dashboards
To view Python UDF metrics using the monitoring dashboards, follow these steps:
Go to the Cloud Monitoring Dashboards page.
Click the BigQuery Managed Routine Query Monitoring dashboard.
This dashboard provides an overview of key metrics across your UDFs.
To filter this dashboard, follow these steps:
Click Filter.
In the Filter by resource list, choose an option such as project ID, location, routine ID, or job ID.
Supported locations
Python UDFs are supported in all BigQuery multi-region and regional locations.
Pricing
Python UDF charges are billed using the BigQuery Services SKU.
Charges include the following:
Building or rebuilding the UDF container image. This charge is proportional to the duration required to build the corresponding image with customer code and dependencies.
- If you're using the Routines API, the latest build duration is in
the
BuildStatusfield. You can also view the build duration in theBuildStatuscolumn in theINFORMATION_SCHEMA.ROUTINESview. - To view the total cost of builds per project, you can filter your
billing report by using the following:
- Key:
goog-bq-feature-type - Value:
MANAGED_ROUTINE_BUILD
- Key:
- If you're using the Routines API, the latest build duration is in
the
Python UDF customers are also charged for the cost of invoking a Python UDF. This charge is proportional to the amount of compute and memory consumed when the Python UDF is invoked.
- To view Python UDF costs per query, you can query the
ExternalServiceCostsfield using the Job API. You can also view costs per query by viewing theexternal_service_costscolumn in theINFORMATION_SCHEMA.JOBSview and applying the following filter:'external_service_costs.external_service="MANAGED_ROUTINE_EXECUTION"'. - To view the total cost of running Python UDFs per project, you can
filter the billing report by using the following:
- Key:
goog-bq-feature-type - Value:
MANAGED_ROUTINE_EXECUTION
- Key:
- To view Python UDF costs per query, you can query the
If Python UDFs result in external or internet network egress, you also see a Premium Tier internet egress charge based on the BigQuery Egress SKUs.