
To achieve high availability for SQL Server across two distinct zones in Compute Engine, you can deploy a SQL Server Failover Cluster Instance (FCI) on Linux that uses multi-writer disks. Unlike traditional shared-nothing architectures, this configuration lets you simultaneously attach nodes in different zones to the same disk. This guide describes how to deploy a highly available SQL Server FCI on Linux in Compute Engine by using the low-latency, synchronous replication of Google Cloud Hyperdisk.
This design ensures that SQL Server remains available even in the unlikely event of a zonal outage. Combining Pacemaker for cluster orchestration with the cross-zone resilience of Compute Engine provides a robust, high-performance solution for mission-critical database workloads that require shared-storage simplicity.
Benefits of implementing high-availability with multi-writer disks
Using a SQL Server FCI with multi-writer disks instead of Always On Availability Groups (AG) on Linux removes the complexity of managing multiple data copies and the synchronization overhead that AG configurations incur.
A shared volume architecture is also more storage-efficient when compared to AG architectures that use full data replicas on each node. Shared volumes can also reduce disk costs in mirror scenarios.
Key Highlights of this Architecture
- Zonal Redundancy: Data protection in the rare event of a node failure or zonal outage.
- Simplified management: Reduces the complexity of managing multiple data copies compared to Always On Availability Groups.
- Storage efficiency: utilizes a single shared volume for data and logs, optimized using multi-writer capability.
- Linux Native Orchestration: Uses industry-standard high-availability extensions (HAE) for seamless failover.
In an on-premises environment, you can let WSFC perform ARP announcements if a failover occurs to notify network equipment about an IP address change. Cloud de Confiance, however, disregards ARP announcements. Consequently, you must implement internal load balancer (see Running Windows Server Failover Clustering)
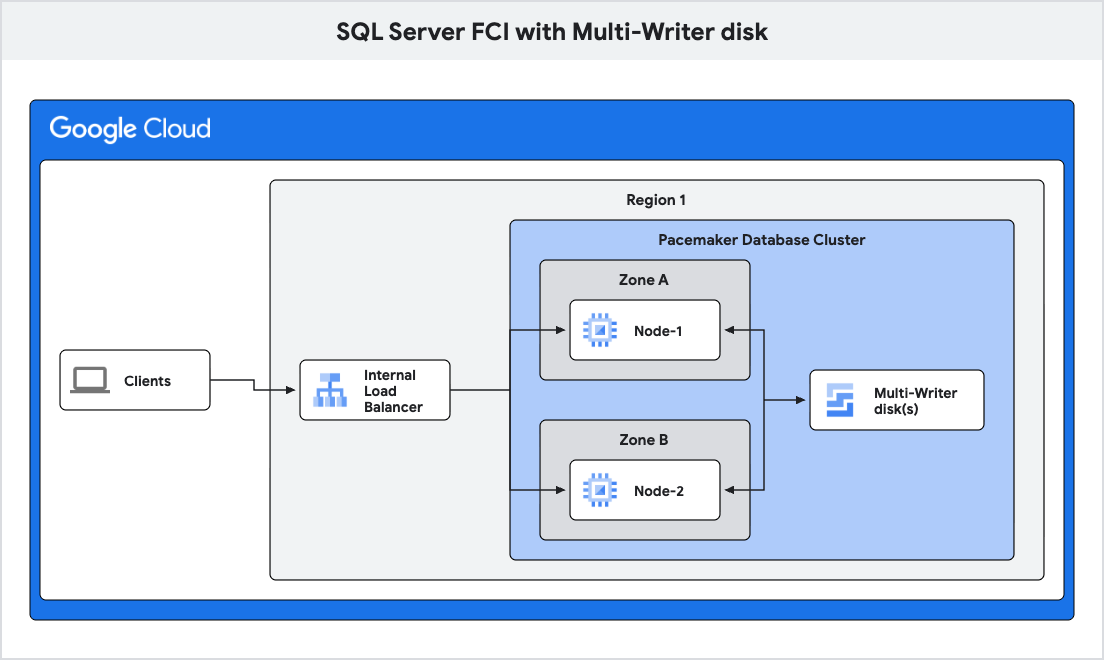
The article assumes that you have basic knowledge of SQL Server, Active Directory, and Compute Engine.
Objectives
This tutorial shows you how to complete the following tasks to reach your objective:- Create SQL Server deployment on Linux.
- Create, attach and configure multi-writer disk.
- Configure Pacemaker cluster.
- Set up the load balancer.
- Perform a failover test.
Costs
This tutorial uses billable components of Cloud de Confiance by S3NS, including:
Use the pricing calculator to generate a cost estimate based on your projected usage.
Before you begin
For this tutorial, you need a Cloud de Confiance project. You can create a new one, or select a project you already created:
-
In the Cloud de Confiance console, on the project selector page, select or create a Cloud de Confiance project.
Roles required to select or create a project
- Select a project: Selecting a project doesn't require a specific IAM role—you can select any project that you've been granted a role on.
-
Create a project: To create a project, you need the Project Creator role
(
roles/resourcemanager.projectCreator), which contains theresourcemanager.projects.createpermission. Learn how to grant roles.
-
Verify that billing is enabled for your Cloud de Confiance project.
-
In the Cloud de Confiance console, activate Cloud Shell.
-
Prepare the project and network
To prepare your Cloud de Confiance project and VPC for the deployment of SQL Server FCI, do the following:
In the Cloud de Confiance console, open Cloud Shell by clicking the Activate Cloud Shell
 button.
Set your default project ID:
gcloud config set project
PROJECT_IDReplace
PROJECT_IDwith the ID of your Cloud de Confiance project.Set your default region:
gcloud config set compute/region
REGIONReplace
REGIONwith the ID of the region you want to deploy in.
Create the cluster nodes
Deploy two VMs as cluster nodes and a third as a dedicated client to validate connectivity and failover performance.
Initialize the following variables that will be used for remaining commands.
BOOT_DISK_SIZE=50 BOOT_IOPS=10000 BOOT_THROUGHPUT=400 DATA_IOPS=10000 DATA_THROUGHPUT=400 DATA_DISK_SIZE=
200REGION=$(gcloud config get-value compute/region) ZONE1=$REGION-a ZONE2=$REGION-b SUBNET=SUBNET_NAMEMACHINE_TYPE=c3-standard-8 VPC_NAME=VPC_NAMECreate two regional disks, one data disk and another for the log. To allow both instances to access the disks, enable multi-writer mode for both disks with the --access-mode=READ_WRITE_MANY flag.
gcloud compute disks create sqlfci-mw-data-disk \
--size=$DATA_DISK_SIZE \
--type=hyperdisk-balanced-high-availability \
--region=$REGION \
--replica-zones=$ZONE1,$ZONE2 \
--provisioned-iops=$DATA_IOPS \
--provisioned-throughput=$DATA_THROUGHPUT \
--access-mode=READ_WRITE_MANY

gcloud compute disks create sqlfci-mw-log-disk \
--size=$DATA_DISK_SIZE \
--type=hyperdisk-balanced-high-availability \
--region=$REGION \
--replica-zones=$ZONE1,$ZONE2 \
--provisioned-iops=$DATA_IOPS \
--provisioned-throughput=$DATA_THROUGHPUT \
--access-mode=READ_WRITE_MANY
Create the Linux VMs and attach the multi-writer disks you created.
gcloud compute instances create node-1 \
--boot-disk-size=$BOOT_DISK_SIZE \
--boot-disk-type=hyperdisk-balanced \
--boot-disk-provisioned-iops=$BOOT_IOPS \
--boot-disk-provisioned-throughput=$BOOT_THROUGHPUT \
--zone $ZONE1 \
--machine-type $MACHINE_TYPE \
--subnet $SUBNET \
--image-family ubuntu-2204-lts \
--image-project ubuntu-os-cloud \
--disk="name=sqlfci-mw-data-disk,scope=regional,mode=rw" \
--disk="name=sqlfci-mw-log-disk,scope=regional,mode=rw" \
--scopes=compute-rw,trace,service-control,service-management,pubsub,monitoring-write,logging-write,storage-rw \
--tags=sqlfci

gcloud compute instances create node-2 \
--boot-disk-size=$BOOT_DISK_SIZE \
--boot-disk-type=hyperdisk-balanced \
--boot-disk-provisioned-iops=$BOOT_IOPS \
--boot-disk-provisioned-throughput=$BOOT_THROUGHPUT \
--zone $ZONE2 \
--machine-type $MACHINE_TYPE \
--subnet $SUBNET \
--image-family ubuntu-2204-lts \
--image-project ubuntu-os-cloud \
--disk="name=sqlfci-mw-data-disk,scope=regional,mode=rw" \
--disk="name=sqlfci-mw-log-disk,scope=regional,mode=rw" \
--scopes=compute-rw,trace,service-control,service-management,pubsub,monitoring-write,logging-write,storage-rw \
--tags=sqlfci
Create the Windows client VM,
cl-node, that you will use to test the connection.gcloud compute instances create cl-node \ --boot-disk-size=100 \ --boot-disk-type=hyperdisk-balanced \ --machine-type $MACHINE_TYPE \ --image-family windows-2025 \ --image-project windows-cloud \ --zone $ZONE1 \ --subnet $SUBNET \ --scopes=compute-rw,trace,service-control,service-management,pubsub,monitoring-write,logging-write,storage-rw
Create internal load balancer
Reserve an IP address for the cluster and load balancer.
gcloud compute addresses create sqlfci-lb-ipaddress \
--region=$REGION \
--subnet=$SUBNET \
--purpose="SHARED_LOADBALANCER_VIP"
CLUSTER_ADDRESS=$(gcloud compute addresses describe sqlfci-lb-ipaddress \
--region $REGION \
--format=value\(address\)) && \
echo "Cluster IP address: $CLUSTER_ADDRESS"
Create a health check for the cluster.
gcloud compute health-checks create tcp sqlfci-healthcheck \
--port="60008" \
--region=$REGION \
--check-interval=3 \
--timeout=2 \
--unhealthy-threshold=2 \
--healthy-threshold=5
To allow a connection to the healthcheck port, create a firewall rule.
gcloud compute firewall-rules create "allow-sqlfci-healthcheck-60008" \
--allow "tcp:60008" \
--target-tags sqlfci \
--network $VPC_NAME \
--source-ranges="35.191.0.0/16,130.211.0.0/22" \
--priority="1000"
For more information, see Firewall rules for health checks.
Create instance groups for the cluster nodes.
gcloud compute instance-groups unmanaged create sqlfci-1-uig \
--zone=$ZONE1
gcloud compute instance-groups unmanaged add-instances sqlfci-1-uig \
--zone=$ZONE1 \
--instances=node-1

gcloud compute instance-groups unmanaged create sqlfci-2-uig \
--zone=$ZONE2
gcloud compute instance-groups unmanaged add-instances sqlfci-2-uig \
--zone=$ZONE2 \
--instances=node-2
Create the load balancer backend service.
gcloud compute backend-services create sqlfci-backend-services \
--region=$REGION \
--load-balancing-scheme="INTERNAL" \
--protocol="TCP" \
--health-checks=sqlfci-healthcheck \
--health-checks-region=$REGION
gcloud compute backend-services add-backend sqlfci-backend-services \
--region=$REGION \
--instance-group=sqlfci-1-uig \
--instance-group-zone=$ZONE1
gcloud compute backend-services add-backend sqlfci-backend-services \
--region=$REGION \
--instance-group=sqlfci-2-uig \
--instance-group-zone=$ZONE2
Create the load balancer forwarding rule.
gcloud compute forwarding-rules create "sqlfci-forwarding-rule" \
--load-balancing-scheme=INTERNAL \
--network=$VPC_NAME \
--subnet=$SUBNET \
--region=$REGION \
--address=$CLUSTER_ADDRESS \
--ip-protocol="TCP" \
--ports="ALL" \
--backend-service=sqlfci-backend-services \
--backend-service-region=$REGION
Create a Cloud Storage bucket to transfer files from the primary to the secondary cluster nodes.
gcloud storage buckets create gs://
BUCKET_NAME\ --location=$REGION \ --public-access-preventionReplace
BUCKET_NAMEwith the name of the bucket to create.For more information, see Create Buckets
Install necessary software
Download, install and configure the SQL Server engine and cluster management
on the two Linux VMs, node-1 and node-2, that will participate in the Failover
Cluster.
Connect to each of your VMs using SSH. For more information, see Connect to Linux VMs and Best practices for controlling SSH network access.
Update the
hosts fileonnode-1andnode-2.Open the
hosts filefor edit.sudo vi /etc/hosts
Find the internal IP address for each Linux VM and append the host entries to the bottom of the file.
NODE1_INTERNAL_IPnode-1NODE2_INTERNAL_IPnode-2Replace
NODE1_INTERNAL_IPandNODE2_INTERNAL_IPwith the internal IP address of each Linux VM.
Check the communication between your VMs. All VMs that participate in the Always On availability group must be able to communicate with other VMs: Return to each Linux VM, run the commands from each VM, and verify that all VMs can communicate with each other.
ping -c 4 node-1
ping -c 4 node-2
Output appears similar to the following:
PING node-1 (10.128.0.37) 56(84) bytes of data.
64 bytes from node-1 (10.128.0.37): icmp_seq=1 ttl=128 time=1.91 ms
64 bytes from node-1 (10.128.0.37): icmp_seq=2 ttl=128 time=0.234 ms
64 bytes from node-1 (10.128.0.37): icmp_seq=3 ttl=128 time=0.249 ms
64 bytes from node-1 (10.128.0.37): icmp_seq=4 ttl=128 time=0.263 ms
Install SQL Server 2025.
Add SQL Server repository to the system.
curl https://packages.microsoft.com/keys/microsoft.asc | sudo tee /etc/apt/trusted.gpg.d/microsoft.asc
curl -fsSL https://packages.microsoft.com/config/ubuntu/22.04/mssql-server-2025.list | sudo tee /etc/apt/sources.list.d/mssql-server-2025.list
sudo apt-get update
Install SQL Server.
sudo apt-get install -y mssql-server
Install SQL Server developer tools. Download and install the SQL Server tools on the two Linux VMs that will participate in the Failover Cluster.
curl https://packages.microsoft.com/config/ubuntu/22.04/prod.list | sudo tee /etc/apt/sources.list.d/mssql-release.list
sudo apt-get update
sudo ACCEPT_EULA=Y apt-get install -y mssql-tools18 unixodbc-dev
Install Pacemaker. Pacemaker is an open-source high availability resource manager software, used with the Corosync Cluster engine. In this section you install Pacemaker on both cluster VMs.
Install Pacemaker on
node-1andnode-2.sudo apt-get install -y pacemaker pcs fence-agents resource-agents pacemaker-cli-utils crmsh
Install SQL Server resource agent for Pacemaker.
sudo apt-get install -y mssql-server-ha
If you have a firewall enabled on your VMs, open the firewall for SQL Server.
Check if
Uncomplicated Firewallis installed and enabled by running the following command.sudo ufw status
If the status is active, run the following commands to open the ports. If the firewall service is not running you can ignore this step.
sudo ufw allow 1433
sudo ufw allow 5022
sudo ufw reload
Configure the primary database node
In this section, you will initialize the two multi-writer disks and set up each disk with volume groups and logical groups.
Configure the LVM.
Configure the LVM settings.
Backup the existing configuration.
sudo cp /etc/lvm/lvm.conf /etc/lvm/lvm.conf.bak
Update system ID source:
sudo sed -i 's/^\(\s*system_id_source\s*=\s*\)"none"/\1"uname"/' /etc/lvm/lvm.conf
Verify the change was made successfully.
grep 'system_id_source *= *"uname"' /etc/lvm/lvm.conf
Configure the LVM volume groups and logical volumes.
sudo pvcreate /dev/nvme0n2 /dev/nvme0n3
sudo pvs
sudo vgcreate vgdata /dev/nvme0n2
sudo lvcreate -l 100%FREE -n lvdata vgdata
sudo vgcreate vglogtmp /dev/nvme0n3
sudo lvcreate -l 70%FREE  -n lvlog vglogtmp
sudo lvcreate -l 100%FREE -n lvtmp vglogtmp
sudo vgs -o+systemid
Format volumes with
xfsfile system with 64KB block size.sudo mkfs.xfs -d su=64k,sw=1 -L data /dev/vgdata/lvdata -f sudo mkfs.xfs -d su=64k,sw=1 -L dblog /dev/vglogtmp/lvlog -f sudo mkfs.xfs -d su=64k,sw=1 -L tmp /dev/vglogtmp/lvtmp -f
Verify the volumes were created.
sudo lvs
Mount and format the disks
Set up mount points for the shared disks and give the mssql user access.
Create mount points for the new volumes.
sudo mkdir /mssql
sudo mkdir -p /mssql/db_data
sudo mkdir -p /mssql/db_log
sudo mkdir -p /mssql/db_temp
Mount the LVM volumes to mount points.
sudo mount /dev/vgdata/lvdata /mssql/db_data
sudo mount /dev/vglogtmp/lvlog /mssql/db_log
sudo mount /dev/vglogtmp/lvtmp /mssql/db_temp
Set the
mssqluser as the owner of the mount points.sudo chown mssql:mssql /mssql/db_data sudo chown mssql:mssql /mssql/db_log sudo chown mssql:mssql /mssql/db_temp
Configure SQL Server:
Set variables relocating the master database to shared storage and run the
mssql-conftool.sudo MSSQL_MASTER_DATA_FILE="/mssql/db_data/master.mdf" MSSQL_MASTER_LOG_FILE="/mssql/db_data/mastlog.ldf" /opt/mssql/bin/mssql-conf setup
Choose Developer edition for the SQL Server edition and accept the license agreement.
The developer edition has all the enterprise features included, but you can use it only for non-production environments. More information is available regarding SQL Server editions and Microsoft licenses.
Specify a password for the SA account.
Verify that the
mssql-serverservice is running.systemctl status mssql-server --no-pager
Configure SQL Server and Pacemaker
Create SQL Server user for Pacemaker. Replace
SA_PASSWORDwith the password of the SA account on SQL Server andPA_PASSWORDwith password that will be used for pacemaker account.QUERY=" CREATE LOGIN [pacemaker] with PASSWORD= N'
PA_PASSWORD'; ALTER SERVER ROLE [sysadmin] ADD MEMBER [pacemaker]; GO"/opt/mssql-tools18/bin/sqlcmd -No -S localhost -U sa -P '
SA_PASSWORD' -Q "$QUERY"Add the Pacemaker login and password to the SQL Server secrets folder.
{ echo 'pacemaker' echoPA_PASSWORD' } | sudo tee /var/opt/mssql/secrets/passwd > /dev/null sudo chown root:root /var/opt/mssql/secrets/passwd sudo chmod 400 /var/opt/mssql/secrets/passwdUpdate the SQL Server configuration to use the new data, log and temp locations. You will also set the SQl Server recommended settings.
sudo /opt/mssql/bin/mssql-conf set filelocation.defaultdatadir /mssql/db_data
sudo /opt/mssql/bin/mssql-conf set filelocation.defaultlogdir /mssql/db_log
sudo /opt/mssql/bin/mssql-conf set filelocation.defaultdumpdir /mssql/db_log
sudo /opt/mssql/bin/mssql-conf traceflag 9944 3979 on
sudo /opt/mssql/bin/mssql-conf set control.alternatewritethrough 0
sudo /opt/mssql/bin/mssql-conf set control.writethrough 1
Move TempDB to shared disk
Get list of TempDB files and use them to create Alter query. This query will be used in the next step to set the new location for the TempDB files.
QUERY="
SET NOCOUNT ON;
SELECT 'ALTER DATABASE tempdb MODIFY FILE (NAME = [' + f.name + '],' + ' FILENAME = ''/mssql/db_temp/' + f.name + CASE WHEN f.type = 1 THEN '.ldf' ELSE '.mdf' END + ''');' FROM sys.master_files f WHERE f.database_id = DB_ID(N'tempdb');"
/opt/mssql-tools18/bin/sqlcmd -No -S localhost -U sa -P '
SA_PASSWORD' -Q "$QUERY"Capture the output from the previous command. You will use the output to form the next command to be executed.
QUERY="
QUERY_OUTPUT"Example query using output:
QUERY="
ALTER DATABASE tempdb MODIFY FILE (NAME = [tempdev], FILENAME = '/mssql/db_temp/tempdev.mdf');
ALTER DATABASE tempdb MODIFY FILE (NAME = [templog], FILENAME = '/mssql/db_temp/templog.ldf');
ALTER DATABASE tempdb MODIFY FILE (NAME = [tempdev2], FILENAME = '/mssql/db_temp/tempdev2.mdf');
ALTER DATABASE tempdb MODIFY FILE (NAME = [tempdev3], FILENAME = '/mssql/db_temp/tempdev3.mdf');"
Execute the generated SQL command to move the TempDB files.
/opt/mssql-tools18/bin/sqlcmd -No -S localhost -U sa -P '
SA_PASSWORD' -Q "$QUERY"Restart the SQL Server service for the changes to take effect.
sudo systemctl restart mssql-server.service
Verify the TempDB files were created.
ls -l /mssql/db_temp/
Verify the SQL Server service is running.
systemctl status mssql-server --no-pager
Configure HAProxy
Set a new password for the
hacluster.sudo passwd hacluster
To complete the setup and test whether your network load balancer is set up correctly, install and configure the
HAProxy tcp listenerboth cluster nodes:Install the HAProxy.
sudo apt-get install haproxy
Type
Yto complete installation.Edit the
haproxy.cfgfile.sudo vi /etc/haproxy/haproxy.cfg
In the
defaultssection of thehaproxy.cfg file, change the mode totcp.Append the following section at the end of the
haproxy.cfgfile.#--------------------------------------------------------------- # Set up health check listener for SQL Server Availability Group #--------------------------------------------------------------- listen healthcheck bind *:60008
Start HAProxy service.
sudo systemctl start haproxy.service
sudo systemctl status haproxy.service
Stop and disable HAProxy service.
sudo systemctl stop haproxy.service
sudo systemctl disable haproxy.service
Upload the machine key file to Cloud Storage by using the following command.
sudo gcloud storage cp /var/opt/mssql/secrets/machine-key gs://
BUCKET_NAME/Replace
BUCKET_NAMEwith the name of the bucket created.Stop and disable SQL Server service. Service from this point will be controlled by cluster.
sudo systemctl stop mssql-server.service
sudo systemctl disable mssql-server.service
Unmount shared storage.
sudo umount /mssql/db_data
sudo umount /mssql/db_log
sudo umount /mssql/db_temp
Clean up the existing default cluster configuration.
sudo pcs cluster destroy
Configure the secondary node
Create mount points for the LVM volumes. You don't have to format the disk because this disk is shared with
node-1. You already formatted the disk and configured the LVM volumes when you configurednode-1.sudo mkdir /mssql sudo mkdir -p /mssql/db_data sudo mkdir -p /mssql/db_log sudo mkdir -p /mssql/db_temp sudo chown mssql:mssql /mssql/db_data sudo chown mssql:mssql /mssql/db_log sudo chown mssql:mssql /mssql/db_temp
Configure SQL Server.
To relocate the master database to the shared data disk, set the following variables and then run the
mssql-conftool to apply the changes.sudo MSSQL_MASTER_DATA_FILE="/mssql/db_data/master.mdf" MSSQL_MASTER_LOG_FILE="/mssql/db_data/mastlog.ldf" /opt/mssql/bin/mssql-conf setup
Choose Developer edition for the SQL Server edition and accept the license agreement.
The developer edition has all the enterprise features included, but you can use it only for non-production environments. More information is available regarding SQL Server editions and Microsoft licenses.
Specify a password for the SA account.
Verify that the
mssql-serverservice is running.systemctl status mssql-server --no-pager
Create SQL Server user for the Pacemaker cluster. Replace
SA_PASSWORDwith the password of the SA account on SQL Server andPA_PASSWORDwith password that will be used for pacemaker account.QUERY=" CREATE LOGIN [pacemaker] with PASSWORD= N'
PA_PASSWORD'; ALTER SERVER ROLE [sysadmin] ADD MEMBER [pacemaker]; GO"/opt/mssql-tools18/bin/sqlcmd -No -S localhost -U sa -P '
SA_PASSWORD' -Q "$QUERY"Add the Pacemaker login and password to the SQL Server secrets folder.
{
  echo 'pacemaker'
  echo 'PA_PASSWORD'
} | sudo tee /var/opt/mssql/secrets/passwd > /dev/null
sudo chown root:root /var/opt/mssql/secrets/passwd
sudo chmod 400 /var/opt/mssql/secrets/passwd
Update SQL Server configuration to use the new data, log and temp locations. You will also set the SQL Server recommended settings.
sudo /opt/mssql/bin/mssql-conf set filelocation.defaultdatadir /mssql/db_data
sudo /opt/mssql/bin/mssql-conf set filelocation.defaultlogdir /mssql/db_log
sudo /opt/mssql/bin/mssql-conf set filelocation.defaultdumpdir /mssql/db_log
sudo /opt/mssql/bin/mssql-conf traceflag 9944 3979 on
sudo /opt/mssql/bin/mssql-conf set control.alternatewritethrough 0
sudo /opt/mssql/bin/mssql-conf set control.writethrough 1
Move TempDB to the shared data disk.
Get list of TempDB files and use them to create the Alter query.
QUERY="
SET NOCOUNT ON;
SELECT 'ALTER DATABASE tempdb MODIFY FILE (NAME = [' + f.name + '],' + ' FILENAME = ''/mssql/db_temp/' + f.name + CASE WHEN f.type = 1 THEN '.ldf' ELSE '.mdf' END + ''');' FROM sys.master_files f WHERE f.database_id = DB_ID(N'tempdb');"
/opt/mssql-tools18/bin/sqlcmd -No -S localhost -U sa -P '
SA_PASSWORD' -Q "$QUERY"Capture the output from previous command. You will use the output to form the next command to be executed.
QUERY="
QUERY_OUTPUT"Example query using output:
QUERY="
ALTER DATABASE tempdb MODIFY FILE (NAME = [tempdev], FILENAME = '/mssql/db_temp/tempdev.mdf');
ALTER DATABASE tempdb MODIFY FILE (NAME = [templog], FILENAME = '/mssql/db_temp/templog.ldf');
ALTER DATABASE tempdb MODIFY FILE (NAME = [tempdev2], FILENAME = '/mssql/db_temp/tempdev2.mdf');
ALTER DATABASE tempdb MODIFY FILE (NAME = [tempdev3], FILENAME = '/mssql/db_temp/tempdev3.mdf');"
To move the TempDB files, execute the generated SQL command.
/opt/mssql-tools18/bin/sqlcmd -No -S localhost -U sa -P '
SA_PASSWORD' -Q "$QUERY"For the changes to take effect, restart the SQL Server service.
sudo systemctl restart mssql-server.service
Verify SQL Server service is running.
sudo systemctl status mssql-server --no-pager
Verify TempDB files were created.
ls -l /mssql/db_temp/
Stop and temporarily disable the SQL Server service.
sudo systemctl stop mssql-server.service
sudo systemctl disable mssql-server.service
To ensure both nodes use the same key for SQL Server, download the machine key file from
node-1.sudo rm /var/opt/mssql/secrets/machine-key sudo gcloud storage cp gs://
BUCKET_NAME/machine-key /var/opt/mssql/secrets/machine-key sudo chown mssql:mssql /var/opt/mssql/secrets/machine-key sudo chmod 0600 /var/opt/mssql/secrets/machine-keyConfigure LVM settings.
Backup existing configuration.
sudo cp /etc/lvm/lvm.conf /etc/lvm/lvm.conf.bak
Update system ID source.
sudo sed -i 's/^\(\s*system_id_source\s*=\s*\)"none"/\1"uname"/' /etc/lvm/lvm.conf
Verify change by running:
cat /etc/lvm/lvm.conf | grep uname
Output appears similar to the following:
#     Set the system ID from the hostname (uname) of the system.
system_id_source = "uname"
Verify change was made successfully.
grep 'system_id_source *= *"uname"' /etc/lvm/lvm.conf
Set a new password for the
hacluster.sudo passwd hacluster
To complete the setup and test whether your network load balancer is set up correctly, install and configure the
HAProxy tcp listeneron both cluster nodes.Install the HAProxy.
sudo apt-get install haproxy
Choose
Yto complete installation.Edit the
haproxy.cfgfile.sudo vi /etc/haproxy/haproxy.cfg
In the defaults section of the
haproxy.cfg file, change the mode totcp.Append the following section at the end of the
haproxy.cfgfile.#--------------------------------------------------------------- # Set up health check listener for SQL Server Availability Group #--------------------------------------------------------------- listen healthcheck bind *:60008
Start HAProxy service.
sudo systemctl start haproxy.service
sudo systemctl status haproxy.service
Stop and disable HAProxy service.
sudo systemctl stop haproxy.service
sudo systemctl disable haproxy.service
Cleanup existing default cluster configuration.
sudo pcs cluster destroy
Complete cluster configuration
Return to node-1 to continue the cluster configuration.
Authenticate as the
haclusteruser.sudo pcs host auth node-1 node-2 -u hacluster -p "
HA_PASSWORD"Create cluster called
ubuntu_fci.sudo pcs cluster setup ubuntu_fci node-1 addr="
NODE1_INTERNAL_IP" node-2 addr="NODE2_INTERNAL_IP" --start --enableSet no-quorum-policy for two node cluster.
sudo pcs property set no-quorum-policy="ignore"
Create Virtual IP address cluster resource.
sudo pcs resource create pcs-cluster-vip ocf:heartbeat:IPaddr2 ip="
CLUSTER_ADDRESS" cidr_netmask=32 nic=ens3 op monitor interval=30sReplace
CLUSTER_ADDRESSwith the IP address reserved earlier.Create cluster resource objects for all shared volumes.
sudo pcs resource create vgdata ocf:heartbeat:LVM-activate vgname=vgdata vg_access_mode=system_id activation_mode=exclusive
sudo pcs resource create vglogtmp ocf:heartbeat:LVM-activate vgname=vglogtmp vg_access_mode=system_id activation_mode=exclusive
sudo pcs resource create data_dir ocf:heartbeat:Filesystem device="/dev/mapper/vgdata-lvdata" directory="/mssql/db_data" fstype="xfs"
sudo pcs resource create log_dir ocf:heartbeat:Filesystem device="/dev/mapper/vglogtmp-lvlog" directory="/mssql/db_log" fstype="xfs"
sudo pcs resource create tmp_dir ocf:heartbeat:Filesystem device="/dev/mapper/vglogtmp-lvtmp" directory="/mssql/db_temp" fstype="xfs"
Create resource group and add all created objects to the new group.
sudo pcs resource group add sql_group pcs-cluster-vip vgdata vglogtmp data_dir log_dir tmp_dir
Create the cluster resource for Microsoft SQL Server service and add it to existing resource group.
sudo pcs resource create sql_fci ocf:mssql:fci op stop timeout=60s --group sql_group
Create cluster resource for HAProxy and add it to the same group.
sudo pcs resource create pcs-healthcheck systemd:haproxy.service op monitor interval=20s timeout=30s --group sql_group
Create cluster constraint controlling the start sequence for resources.
sudo pcs constraint order set pcs-cluster-vip vgdata vglogtmp data_dir log_dir tmp_dir sql_fci pcs-healthcheck
Set up a STONITH fence
STONITH is a fencing strategy for maintaining the integrity of nodes in a HA cluster. STONITH service works at the node level and protects the cluster from nodes that are either unresponsive or in an unknown state. We recommend the fence_gce fencing device specialized for Compute Engine on Cloud de Confiance by S3NS.
Set up fencing devices
Check if the
fence_gce- Fence agent for Compute Engine is installed onnode-1.sudo pcs stonith list | grep fence_gce
For more information, see:
- Fence agent for Google Compute Engine.
To see the parameters associated with the agent, run the following command:
sudo pcs stonith describe fence_gce
Configure cluster fencing resources.
sudo pcs stonith create node-1-fence fence_gce \ plug=node-1 \ zone=
ZONE1\ project=PROJECT_ID\ pcmk_reboot_timeout=300 pcmk_monitor_retries=4 pcmk_delay_max=30 \ op monitor interval="300s" timeout="120s" \ op start interval="0" timeout="60s" sudo pcs stonith create node-2-fence fence_gce \ plug=node-2 \ zone=ZONE2\ project=PROJECT_ID\ pcmk_reboot_timeout=300 pcmk_monitor_retries=4 pcmk_delay_max=30 \ op monitor interval="300s" timeout="120s" \ op start interval="0" timeout="60s"Replace
ZONE1andZONE2with the zone where the Linux VMs are deployed and replacePROJECT_IDwith your project ID.You can test the status of the fencing agents by running the status command.
sudo fence_gce -o status -n node-1 --zone=
ZONE1sudo fence_gce -o status -n node-2 --zone=ZONE2Output appears similar to the following:
Status: ON
Replace ZONE1 and ZONE2 with the zone where the Linux VMs are deployed.
Create location constraints for your fencing devices to ensure that they are running only on the intended instances.
sudo pcs constraint location node-1-fence avoids node-1
sudo pcs constraint location node-2-fence avoids node-2
Enable fencing in your pacemaker cluster and set the cluster fencing timeout.
sudo pcs -f stonith_cfg property set stonith-enabled=true
sudo pcs property set stonith-timeout="300s"
Cleanup the cluster startup process.
sudo pcs resource cleanup
Check the status of the cluster.
sudo crm status
Output appears similar to the following:
  Cluster Summary:
    * Stack: corosync
    * Current DC: node-1 (version 2.1.2-ada5c3b36e2) - partition with quorum
    * Last updated: Tue Jun  2 21:36:47 2026
    * Last change:  Mon Apr 27 12:31:58 2026 by root via crm_resource on node-1
    * 2 nodes configured
    * 10 resource instances configured

  Node List:
    * Online: [ node-1 node-2 ]

  Full List of Resources:
    * Resource Group: sql_group:
      * pcs-cluster-vip   (ocf:heartbeat:IPaddr2):         Started node-2
      * vgdata    (ocf:heartbeat:LVM-activate):    Started node-2
      * vglogtmp  (ocf:heartbeat:LVM-activate):    Started node-2
      * data_dir  (ocf:heartbeat:Filesystem):      Started node-2
      * log_dir   (ocf:heartbeat:Filesystem):      Started node-2
      * tmp_dir   (ocf:heartbeat:Filesystem):      Started node-2
      * sql_fci   (ocf:mssql:fci):                 Started node-2
      * pcs-healthcheck   (systemd:haproxy.service):       Started node-2
    * node-1-fence       (stonith:fence_gce):     Started node-2
    * node2-fence        (stonith:fence_gce):     Started node-1
Test the fencing devices
After the setup of the fencing devices, we recommend you test them using the following steps.
Stop the fence on
node-2.Connect to
node-1and run the following command to test the fence device associated withnode-2from your cluster.fence_gce -o off -n node-2 --zone=
ZONE2Output appears similar to the following:
Success: Powered OFF
Check the status of the cluster.
sudo crm status
Output appears similar to the following:
    Cluster Summary:
      * Stack: corosync
      * Current DC: node-1 (version 2.1.2-ada5c3b36e2) - partition with quorum
      * Last updated: Tue Jun  2 21:52:00 2026
      * Last change:  Mon Apr 27 12:31:58 2026 by root via crm_resource on node-1
      * 2 nodes configured
      * 10 resource instances configured

    Node List:
      * Online: [ node-1 ]
      * OFFLINE: [ node-2 ]

    Full List of Resources:
      * Resource Group: sql_group:
        * pcs-cluster-vip   (ocf:heartbeat:IPaddr2): Started node-1
        * vgdata    (ocf:heartbeat:LVM-activate):    Started node-1
        * vglogtmp  (ocf:heartbeat:LVM-activate):    Started node-1
        * data_dir  (ocf:heartbeat:Filesystem):      Started node-1
        * log_dir   (ocf:heartbeat:Filesystem):      Started node-1
        * tmp_dir   (ocf:heartbeat:Filesystem):      Started node-1
        * sql_fci   (ocf:mssql:fci):                 Started node-1
        * pcs-healthcheck   (systemd:haproxy.service):       Started node-1
      * node-1-fence       (stonith:fence_gce):     Stopped
      * node-2-fence        (stonith:fence_gce):     Started node-1
You will also see that
node-2is turned off in Compute Engine.
Restart the fence on
node-2.Return to
node-1and restart the instance again by running the following command.fence_gce -o on -n node-2 --zone=
ZONE2Output appears similar to the following:
Success: Powered ON
Check the status of the cluster in Pacemaker and Compute Engine. After a short time, you will see that
node-2is back online.$ sudo crm status
Test failover
You are now ready to test if the failover works as expected.
- Create a username and password for the VM instance
- Connect to the VM by using Remote Desktop and sign in using the username and password created in the previous step.
- Connect to the Windows VM on
cl-nodethrough Remote Desktop. - Open a PowerShell session.
Connect to the server by running the following script. Every five seconds, the script connects to the SQL Server using the availability group listener and queries the server name.
while ($True){
  try {
    $Conn = New-Object System.Data.SqlClient.SqlConnection
    $Conn.ConnectionString = "Server=CLUSTER_ADDRESS;User ID=sa;Password=SA_PASSWORD;Initial Catalog=master"
    $Conn.Open()

    $Cmd =  $Conn.CreateCommand()
    $Cmd.CommandText = "SELECT SERVERPROPERTY('ComputerNamePhysicalNetBIOS')"

    $Result = $Cmd.ExecuteReader()
    if ($Result.Read()) {
      $currentNode = $Result.GetString(0)
      Write-Host "Current Node: $currentNode at $(Get-Date)"
    }

    $Conn.Close()
    Start-Sleep -Seconds 5
  }
  catch {
      Write-Host "SQL Connection Failed at $(Get-Date). Retrying..."
      Start-Sleep -Seconds 15 # Wait before retrying
  }
}
Replace
CLUSTER_ADDRESSwith the listener IP address andSA_PASSWORDwith the password of the SA account on SQL Server.Output appears similar to the following:
  Current Node: node-1 at 06/09/2026 20:24:35
  Current Node: node-1 at 06/09/2026 20:24:40
  Current Node: node-1 at 06/09/2026 20:24:45
  Current Node: node-1 at 06/09/2026 20:24:50
  Current Node: node-1 at 06/09/2026 20:24:55
Leave the script running.
Trigger a failover to
node-2: fromnode-1, return to the SSH terminal and run the following command.sudo pcs resource move sql_group node-2
Return to the PowerShell session on
cl-node.- Observe the output of the running script and notice that the server name
changes from
node-1tonode-2as a result of the failover.
Output appears similar to the following:
  Current Node: node-1 at 06/09/2026 20:28:51
  Current Node: node-1 at 06/09/2026 20:28:56
  SQL Connection Failed at 06/09/2026 20:29:16. Retrying...
  Current Node: node-2 at 06/09/2026 20:29:31
  Current Node: node-2 at 06/09/2026 20:29:36
- Observe the output of the running script and notice that the server name
changes from
Initiate a failback to
node-1. From the command line in node-1, run the following commandsudo pcs resource move sql_group node-1
Return to Powershell on
cl-node. Stop the script by pressingCtrl+C.
Clean up
After you finish the tutorial, you can clean up the resources that you created so that they stop using quota and incurring charges. The following sections describe how to delete or turn off these resources.
Deleting the project
The easiest way to eliminate billing is to delete the project that you created for the tutorial.
To delete the project:
- In the Cloud de Confiance console, go to the Manage resources page.
- In the project list, select the project that you want to delete, and then click Delete.
- In the dialog, type the project ID, and then click Shut down to delete the project.