
Migrate Apache Hive Metastore tables to Cloud de Confiance
This document shows you how to migrate your Iceberg and Hive tables managed by Apache Hive Metastore to Cloud de Confiance using the BigQuery Data Transfer Service.
The Apache Hive Metastore migration connector in the BigQuery Data Transfer Service lets you seamlessly migrate your Hive Metastore tables to Cloud de Confiance at scale. This connector supports both Hive and Iceberg tables from on-premises installations and cloud environments, including Cloudera setups. The Hive Metastore migration connector supports files stored in the following data sources:
- Apache Hadoop Distributed File System (HDFS)
- Amazon Simple Storage Service (Amazon S3)
- Azure Blob Storage or Azure Data Lake Storage Gen2
With the Hive Metastore migration connector, you can use Cloud Storage as the file storage and register your Hive Metastore tables with one of the following metastores:
Lakehouse runtime catalog Iceberg REST Catalog
We recommend using the Lakehouse runtime catalog Iceberg REST Catalog for all your Iceberg data.
The Lakehouse runtime catalog Iceberg REST Catalog creates interoperability between your query engines by offering a single source of truth for all of your Iceberg data. You can use BigQuery to query the data, in addition to Apache Spark and other OSS engines. The Lakehouse runtime catalog Iceberg REST Catalog only supports Iceberg table formats.
Lakehouse runtime catalog Hive Catalog (Preview)
We recommend using the Lakehouse runtime catalog Hive Catalog for all your Hive tables.
The Lakehouse runtime catalog Hive Catalog lets you register your migrated Hive tables with Lakehouse runtime catalog using a Hive Catalog. This offers a serverless metastore for Apache Hive tables. You can use BigQuery to query the data (subject to format limitations), in addition to Apache Spark and other OSS engines.
-
Dataproc Metastore supports both Hive and Iceberg table formats. You can only use Apache Spark and other OSS engines to read and write data to Dataproc Metastore.
This connector supports both full and metadata-only transfers. Full transfers will transfer both your data and metadata from your source tables to your target metastore. You can create a metadata-only transfer if you already have your data in Cloud Storage and if you only want to register your data to a destination metastore.
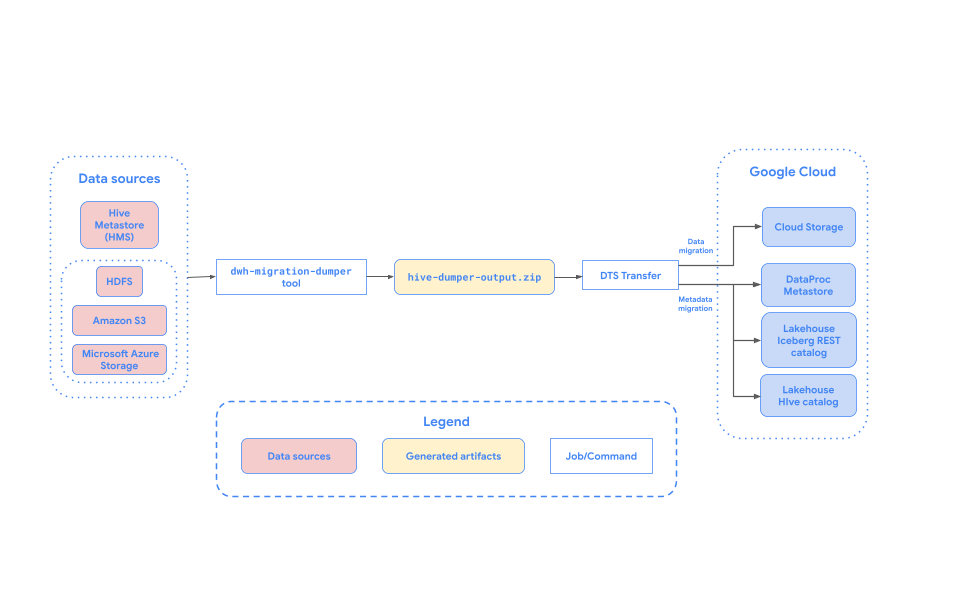
The following diagram provides an overview of the migration process.
Limitations
Hive Metastore table transfers are subject to the following limitations:
- Hive Metastore transfers must have a minimum of 30 minutes between 2 scheduled runs. On demand runs can still be triggered at any interval.
- File names must comply with Cloud Storage object naming requirements.
- Cloud Storage has a 5 TiB limit for single objects. Files within your Hive Metastore tables larger than 5 TiB will fail to transfer.
- Storage Transfer Service has specific behaviors if data is changed at the source while a transfer is in progress. We don't recommend writing to tables while the table is being actively migrated. For a list of other Storage Transfer Service limitations, see known limitations.
Lakehouse runtime catalog Hive Catalog limitations
When using the Lakehouse runtime catalog Hive Catalog (BIGLAKE_HIVE_CATALOG) as your destination metastore, the following limitations and considerations apply:
- The Lakehouse runtime catalog Hive Catalog ID must only contain lowercase letters, numbers, and underscores (
_). It must not contain dashes (-) or uppercase letters. - You can't view or manage Lakehouse runtime catalog Hive Catalogs in the Cloud de Confiance console. However, the migrated tables are visible and queryable under the target BigQuery dataset.
- All Lakehouse runtime catalog Hive Catalog limitations for open-source metadata formats and data types apply.
- For information about compatibility with formats like CSV and JSON, see Supported storage formats.
- For information about unsupported data types (such as
UNIONor nested arrays) and column statistics, see metastore limitations and partition limitations.
Data ingestion options
The following sections provide more information about how you can configure your Hive Metastore transfers.
Incremental transfers
When a transfer configuration is set up with a recurring schedule, every subsequent transfer updates the table on Cloud de Confiance by S3NS with the latest updates made to the source table. For example, all data updates and all insert, delete, or update operations with schema changes are reflected in Cloud de Confiance by S3NS with each transfer.
Filter partitions
You can transfer a subset of partitions from your Hive
tables by providing a custom filter JSON file stored in
Cloud Storage. When scheduling the transfer, supply the full
Cloud Storage path to this JSON file using the partition_filter_gcs_path
parameter.
The following is an example of the filter JSON file structure:
{
  "filters": [
    {
      "table": "db1.table1", "condition": "IN", "partitions":
      ["partition1=value1/partition2=value2"]
    },
    {
      "table": "db1.table2", "condition": "LESS_THAN", "partitions":
      ["partition1;value1"]
    },
    {
      "table": "db1.table3", "condition": "GREATER_THAN", "partitions":
      ["partition1;value1"]
    },
    {
      "table": "db1.table4", "condition": "RANGE", "partitions":
      ["partition1;value1;value2"]
    }
  ]
}
Filter conditions
The condition field in the JSON file supports the following values, each with
a specific format for the partitions array:
IN: Specifies the exact partition paths to include. Thepartitionsarray contains strings representing the exact directory structure of the partitions relative to the table base path (for example,["partition_key1=value1/partition_key2=value2"]). You can specify multiple paths in the array.LESS_THAN: Includes partitions where the primary partition key value is less than or equal to the specified value. Thepartitionsarray must contain a single string in the format["<partition_key>;<value>"].GREATER_THAN: Includes partitions where the primary partition key value is greater than or equal to the specified value. Thepartitionsarray must contain a single string in the format["<partition_key>;<value>"].RANGE: Includes partitions where the primary partition key value falls within the specified range (inclusive). Thepartitionsarray must contain a single string in the format["<partition_key>;<start_value>;<end_value>"].
The filter conditions are subject to the following rules and restrictions:
- Inclusive values: Filter conditions for
GREATER_THAN,LESS_THAN, andRANGEare inclusive of the values provided. For example, aLESS_THANfilter with a value of2023includes partitions up to and including2023. - Partition deletion: If an existing destination partition satisfies the partition filter and is no longer present at the source, then it is dropped from the destination metastore. However, the underlying data files for that partition aren't deleted from the Cloud Storage destination bucket.
- Single table restrictions:
- Multiple filters on the same table aren't allowed.
- You can't mix different condition types (for example:
GREATER_THANandIN) on the same table.
- Target partition column: Filter conditions like
GREATER_THAN,LESS_THAN, andRANGEmust target the primary partition column. - Prefix limitations: The specified filter combination must not resolve to
more than 1000 prefixes per table. For example, a filter like
year>2020on a table partitioned byyear/month/daymust result in fewer than 1000 uniqueyear=prefixes.
Before you begin
Before you schedule Hive Metastore transfer, perform the steps in this section.
Enable APIs
Enable the following APIs in your Cloud de Confiance project:
- Data Transfer API
- Storage Transfer API
- BigLake API
A service agent is created when you enable the Data Transfer API.
Configure permissions
To configure permissions for a Hive Metastore transfer, do the steps in the following sections.
- The user or the service account creating the transfer should be granted the
BigQuery Admin role (
roles/bigquery.admin). If you use a service account, it's only used to create the transfer. A service agent (P4SA) is created upon enabling the Data Transfer API.
To ensure that the service agent has the necessary permissions to run a Hive Metastore transfer, ask your administrator to grant the following IAM roles to the service agent on the project:
- Storage Transfer Admin (
roles/storagetransfer.admin) - Service Usage Consumer (
roles/serviceusage.serviceUsageConsumer) - Storage Admin (
roles/storage.admin) -
To migrate metadata to Lakehouse runtime catalog (Iceberg REST Catalog or Hive Catalog):
BigLake Admin (
roles/biglake.admin) -
To migrate metadata to Dataproc Metastore:
Dataproc Metastore Data Owner (
roles/metastore.metadataOwner)
For more information about granting roles, see Manage access to projects, folders, and organizations.
Your administrator might also be able to give the service agent the required permissions through custom roles or other predefined roles.
- Storage Transfer Admin (
If you are using a service account, grant the service agent the
roles/iam.serviceAccountTokenCreatorrole with the following command:gcloud iam service-accounts add-iam-policy-binding SERVICE_ACCOUNT --member serviceAccount:service-PROJECT_NUMBER@gcp-sa-bigquerydatatransfer.s3ns-system.iam.gserviceaccount.com --role roles/iam.serviceAccountTokenCreator
Grant the Storage Transfer Service service agent (
project-PROJECT_NUMBER@storage-transfer-service.s3ns-system.iam.gserviceaccount.com) the following roles in the project:roles/storage.admin- If you are migrating from on-prem/HDFS, you must also
grant the
roles/storagetransfer.serviceAgentrole.
You can also configure more granular permissions. For more information, see the following guide:
Generate metadata file for Apache Hive
Run the dwh-migration-dumper tool to extract
metadata for Apache Hive.
The tool generates a file named hive-dumper-output.zip which can be uploaded
to a Cloud Storage bucket. This Cloud Storage bucket is referred to in
this document as DUMPER_BUCKET.
You can also schedule periodic uploads using a script. For more information, see
Automate dumper tool execution with a cron job.
Configure Storage Transfer Service
Select one of the following options:
HDFS
An storage transfer agent is required for on-premises or HDFS transfers.
To set up the agent, do the following:
- Install Docker on on-premises agent machines.
- Create a Storage Transfer Service agent pool in your Cloud de Confiance by S3NS project.
- Install agents on your on-premises agent machines.
Amazon S3
Transfers from Amazon S3 are agentless transfers.
To configure the Storage Transfer Service for a Amazon S3 transfer, do the following:
- Setup access credentials for AWS Amazon S3.
- Note the access key ID and secret access key after setting up your access credentials.
- Add IP ranges used by Storage Transfer Service workers to your list of allowed IPs if your AWS project uses IP restrictions.
Microsoft Azure
Transfers from Microsoft Azure Storage are agentless transfers.
To configure the Storage Transfer Service for a Microsoft Azure Storage transfer, do the following:
- Generate a Shared Access Signature (SAS) token for your Microsoft Azure storage account.
- Note the SAS token after generating it.
- Add IP ranges used by Storage Transfer Service workers to your list of allowed IPs if your Microsoft Azure storage account uses IP restrictions.
Schedule a Hive Metastore transfer
Select one of the following options:
Console
Go to the Data transfers page in the Cloud de Confiance console.
Click Create transfer.
In the Source type section, select Hive Metastore from the Source list.
For Location, select a location type, and then select a region.
In the Transfer config name section, for Display name, enter a name for the data transfer.
In the Schedule options section, do the following:
- In the Repeat frequency list, select an option to specify how often this data transfer runs. To specify a custom repeat frequency, select Custom. If you select On-demand, then this transfer runs when you manually trigger the transfer.
- If applicable, select either Start now or Start at set time, and provide a start date and run time.
In the Data source details section, do the following:
- For Transfer strategy, select one of the following:
FULL_TRANSFER: Transfer all data and register metadata with the target metastore. This is the default option.METADATA_ONLY: Register metadata only. You must have data already present in the correct Cloud Storage location referenced in the metadata.
- For Table name patterns, specify HDFS data lake tables to transfer by providing table names or patterns that match tables in the HDFS database. You must use Java regular expression syntax to specify table patterns. For example:
db1..*matches all tables in db1.db1.table1;db2.table2matches table1 in db1 and table2 in db2.
- For BQMS discovery dump gcs path, enter the path to the
hive-dumper-output.zipfile that you generated when creating a metadata file for Apache Hive. If you are using dumper output automation withcron, provide the Cloud Storage folder path configured in--gcs-base-path, which contains dumper output ZIP files.- For Storage type, select one of the following options. This
field is only available if Transfer strategy is set to
FULL_TRANSFER: HDFS: Select this option if your file storage isHDFS. In the STS agent pool name field, you must provide the name of the agent pool that you created when you configured your Storage Transfer Agent.S3: Select this option if your file storage isAmazon S3. In the Access key ID and Secret access key fields, you must provide the access key ID and secret access key that you created when you set up your access credentials.AZURE: Select this option if your file storage isAzure Blob Storage. In the SAS token field, you must provide the SAS token that you created when you set up your access credentials.
- For Storage type, select one of the following options. This
field is only available if Transfer strategy is set to
- Optional: For Partition Filter gcs path, enter a full Cloud Storage path to a custom filter JSON file to filter partitions from source tables.
- For Destination gcs path, enter a path to a Cloud Storage bucket to store your migrated data.
- Choose the Destination Metastore type from the drop-down list:
DATAPROC_METASTORE: Select this option to store your metadata in Dataproc Metastore. You must provide the URL for the Dataproc Metastore in Dataproc metastore url.BIGLAKE_REST_CATALOG: Select this option to store your metadata in the Lakehouse runtime catalog Iceberg REST catalog. Catalog is created based on the destination Cloud Storage bucket.BIGLAKE_HIVE_CATALOG(Preview): Select this option to store your metadata in the Lakehouse runtime catalog Hive Catalog. You must provide a catalog name in BigLake Metastore Hive Catalog ID. If the catalog does not exist, it will be automatically created.
- Optional: For Service account, enter a service account to use with this data transfer. The service account should belong to the same Cloud de Confiance by S3NS project where the transfer configuration and destination dataset is created.
- For Transfer strategy, select one of the following:
bq
To schedule Hive Metastore transfer, enter the bq mk
command and supply the transfer creation flag --transfer_config:
  bq mk --transfer_config
  --data_source=hadoop display_name='TRANSFER_NAME'
  --service_account_name='SERVICE_ACCOUNT'
  --project_id='PROJECT_ID' location='REGION'
  --params='{
    "transfer_strategy":"TRANSFER_STRATEGY",
    "table_name_patterns":"LIST_OF_TABLES",
    "table_metadata_path":"gs://DUMPER_BUCKET/hive-dumper-output.zip",
    "target_gcs_file_path":"gs://MIGRATION_BUCKET",
    "metastore":"METASTORE",
    "destination_dataproc_metastore":"DATAPROC_METASTORE_URL",
    "destination_bigquery_dataset":"BIGLAKE_METASTORE_DATASET",
    "blms_hive_catalog_id":"HIVE_CATALOG_ID",
    "translation_output_gcs_path":"gs://TRANSLATION_OUTPUT_BUCKET/metadata/config/default_database/",
    "storage_type":"STORAGE_TYPE",
    "agent_pool_name":"AGENT_POOL_NAME",
    "aws_access_key_id":"AWS_ACCESS_KEY_ID",
    "aws_secret_access_key":"AWS_SECRET_ACCESS_KEY",
    "azure_sas_token":"AZURE_SAS_TOKEN",
    "partition_filter_gcs_path":"FILTER_GCS_PATH"
    }'
Replace the following:
TRANSFER_NAME: the display name for the transfer configuration. The transfer name can be any value that lets you identify the transfer if you need to modify it later.SERVICE_ACCOUNT: the service account name used to create your transfer.The service account should belong to the same Cloud de Confiance by S3NS project where the transfer configuration and destination dataset is created.PROJECT_ID: your Cloud de Confiance by S3NS project ID. If--project_idisn't supplied to specify a particular project, the default project is used.REGION: location of this transfer configuration.TRANSFER_STRATEGY: (Optional) Specify one of the following values:FULL_TRANSFER: Transfer all data and register metadata with the target metastore. This is the default value.METADATA_ONLY: Register metadata only. You must have data already present in the correct Cloud Storage location referenced in the metadata.
LIST_OF_TABLES: a list of entities to be transferred. Use a hierarchical naming spec -database.table. This field supports RE2 regular expression to specify tables. For example:db1..*: specifies all tables in the databasedb1.table1;db2.table2: a list of tables
DUMPER_BUCKET: the Cloud Storage bucket containing thehive-dumper-output.zipfile. If you are using dumper output automation withcron, then changetable_metadata_pathto be the Cloud Storage folder path configured with--gcs-base-pathin cron setup—for example:"table_metadata_path":"<var>GCS_PATH_TO_UPLOAD_DUMPER_OUTPUT</var>".MIGRATION_BUCKET: Destination GCS path to which all underlying files will be loaded. Available only iftransfer_strategyisFULL_TRANSFER.METASTORE: The type of metastore to migrate to. Set this to one of the following values:DATAPROC_METASTORE: To transfer metadata to Dataproc Metastore.BIGLAKE_REST_CATALOG: To transfer metadata to Lakehouse runtime catalog Iceberg REST Catalog (recommended for Iceberg tables).BIGLAKE_HIVE_CATALOG: To transfer metadata to Lakehouse runtime catalog Hive Catalog (recommended for Apache Hive tables) (Preview).
DATAPROC_METASTORE_URL: The URL of your Dataproc Metastore. Required ifmetastoreisDATAPROC_METASTORE.HIVE_CATALOG_ID: The ID of the Lakehouse runtime catalog Hive Catalog. Required ifmetastoreisBIGLAKE_HIVE_CATALOG. If the catalog does not exist, it will be automatically created.STORAGE_TYPE: Specify the underlying file storage for your tables. Supported types areHDFS,S3, andAZURE. Required iftransfer_strategyisFULL_TRANSFER.AGENT_POOL_NAME: the name of the agent pool used for creating agents. Required ifstorage_typeisHDFS.AWS_ACCESS_KEY_ID: the access key ID from access credentials. Required ifstorage_typeisS3.AWS_SECRET_ACCESS_KEY: the secret access key from access credentials. Required ifstorage_typeisS3.AZURE_SAS_TOKEN: the SAS token from access credentials. Required ifstorage_typeisAZURE.FILTER_GCS_PATH: (Optional) A full Cloud Storage path to a custom filter JSON file to filter partitions.
Run this command to create the transfer configuration and start the Hive managed tables transfer. Transfers are scheduled to run every 24 hours by default, but can be configured with transfer scheduling options.
When the transfer is complete, your tables in Hadoop cluster will be
migrated to MIGRATION_BUCKET.
Automate dumper tool execution with a cron job
You can automate incremental transfers by using a
cron job to execute the
dwh-migration-dumper tool. Automating the metadata extraction to ensure that
an up-to-date dump from the data source is available for subsequent incremental
transfer runs.
Before you begin
Before using this automation script, you must do the following:
Complete all prerequisites for the dumper tool.
Install the Google Cloud CLI. The script uses the
gsutilcommand-line tool to upload dumper output to Cloud Storage.To authenticate with Cloud de Confiance to allow
gsutilto upload files to Cloud Storage, run the following command:gcloud auth application-default login
Scheduling the automation
Save the following script to a local file. This script is designed to be configured and executed by a
crondaemon to automate the extraction and upload process of dumper output.#!/bin/bash # Exit immediately if a command exits with a non-zero status. set -e # Treat unset variables as an error when substituting. set -u # Pipelines return the exit status of the last command to exit with a non-zero status. set -o pipefail # These values are used if not overridden by command-line options. DUMPER_EXECUTABLE="DUMPER_PATH/dwh-migration-dumper" GCS_BASE_PATH="gs://PATH_TO_DUMPER_OUTPUT" LOCAL_BASE_DIR="LOCAL_BASE_DIRECTORY_PATH" # Optional arguments for cloud environments DUMPER_HOST="" DUMPER_PORT="" HIVE_KERBEROS_URL="" HIVEQL_RPC_PROTECTION="" KERBEROS_AUTHENTICATION="false" # Function to display usage information usage() { echo "Usage: $0 [options]" echo "" echo "Runs the dwh-migration-dumper tool and uploads its output to provided Cloud Storage path." echo "" echo "Required Options:" echo " --dumper-executable
The full path to the dumper executable." echo " --gcs-base-pathThe base Cloud Storage folder to upload dumper output files to. The script generates timestamped ZIP files in this folder." echo " --local-base-dirThe local base directory for logs and temp files." echo "" echo "Optional Hive connection options:" echo " --hostThe hostname for the dumper connection." echo " --portThe port number for the dumper connection." echo "" echo "To use Kerberos authentication, include the following options." echo "If --kerberos-authentication is specified, then --host, --port," echo "--hive-kerberos-url and --hiveql-rpc-protection are all required:" echo "" echo " --kerberos-authentication Enable Kerberos authentication." echo " --hive-kerberos-urlThe Hive Kerberos URL." echo " --hiveql-rpc-protection" echo " The hiveql-rpc-protection level, equal to the value of" echo " 'hadoop.rpc.protection' in '/etc/hadoop/conf/core-site.xml'," echo " with one of the following values:" echo " - authentication" echo " - integrity" echo " - privacy" echo "" echo "Other Options:" echo " -h, --help Display this help message and exit." exit 1 } # This loop processes command-line options and overrides the default configuration. while [[ "$#" -gt 0 ]]; do case $1 in --dumper-executable) DUMPER_EXECUTABLE="$2" shift # past argument shift # past value ;; --gcs-base-path) GCS_BASE_PATH="$2" shift shift ;; --local-base-dir) LOCAL_BASE_DIR="$2" shift shift ;; --host) DUMPER_HOST="$2" shift shift ;; --port) DUMPER_PORT="$2" shift shift ;; --hive-kerberos-url) HIVE_KERBEROS_URL="$2" shift shift ;; --hiveql-rpc-protection) HIVEQL_RPC_PROTECTION="$2" shift shift ;; --kerberos-authentication) KERBEROS_AUTHENTICATION="true" shift ;; -h|--help) usage ;; *) echo "Unknown option: $1" usage ;; esac done # This runs AFTER parsing arguments to ensure no placeholder values are left. if [[ "$DUMPER_EXECUTABLE" == "DUMPER_PATH"* || "$GCS_BASE_PATH" == "gs://PATH_TO_DUMPER_OUTPUT" || "$LOCAL_BASE_DIR" == "LOCAL_BASE_DIRECTORY_PATH" ]]; then echo "ERROR: One or more configuration variables have not been set. Please provide them as command-line arguments or edit the script." >&2 echo "Run with --help for more information." >&2 exit 1 fi # If Kerberos authentication is enabled, check for required fields. if [[ "$KERBEROS_AUTHENTICATION" == "true" ]]; then if [[ -z "$DUMPER_HOST" || -z "$DUMPER_PORT" || -z "$HIVE_KERBEROS_URL" || -z "$HIVEQL_RPC_PROTECTION" ]]; then echo "ERROR: If --kerberos-authentication is enabled, --host, --port, --hive-kerberos-url and --hiveql-rpc-protection must be provided." >&2 echo "Run with --help for more information." >&2 exit 1 fi fi # Remove trailing slashes from GCS_BASE_PATH, if any. GCS_BASE_PATH=$(echo "${GCS_BASE_PATH}" | sed 's:/*$::') # Create unique timestamp and directories for this run EPOCH=$(date +%s) LOCAL_LOG_DIR="${LOCAL_BASE_DIR}/logs" mkdir -p "${LOCAL_LOG_DIR}" # Ensures the base and logs directories exist # Define the unique log and zip file path for this run LOG_FILE="${LOCAL_LOG_DIR}/dumper_execution_${EPOCH}.log" ZIP_FILE_NAME="dts-cron-dumper-output_${EPOCH}.zip" LOCAL_ZIP_PATH="${LOCAL_BASE_DIR}/${ZIP_FILE_NAME}" echo "Script execution started. All subsequent output will be logged to: ${LOG_FILE}" # --- Helper Functions --- log() { echo "$(date '+%Y-%m-%d %H:%M:%S') - $@" >> "${LOG_FILE}"; } cleanup() { local path_to_remove="$1" log "Cleaning up local file/directory: ${path_to_remove}..." rm -rf "${path_to_remove}" } # This function is called when the script exits to ensure cleanup and logging happen reliably. handle_exit() { local exit_code=$? # Only run the failure logic if the script is exiting with an error if [[ ${exit_code} -ne 0 ]]; then log "ERROR: Script is exiting with a failure code (${exit_code})." local gcs_log_path_on_failure="${GCS_BASE_PATH}/logs/$(basename "${LOG_FILE}")" log "Uploading log file to ${gcs_log_path_on_failure} for debugging..." # Attempt to upload the log file on failure, but don't let this command cause the script to exit. gsutil cp "${LOG_FILE}" "${gcs_log_path_on_failure}" > /dev/null 2>&1 || log "WARNING: Failed to upload log file to Cloud Storage." else # SUCCESS PATH log "Script finished successfully. Now cleaning up local zip file...." # Clean up the local zip file ONLY on success cleanup "${LOCAL_ZIP_PATH}" fi log "*****Script End*****" exit ${exit_code} } # Trap the EXIT signal to run the handle_exit function, ensuring cleanup always happens. trap handle_exit EXIT # Validates the dumper log file based on a strict set of rules. validate_dumper_output() { local log_file_to_check="$1" # Check for the specific success message from the dumper tool. if grep -q "Dumper execution: SUCCEEDED" "${log_file_to_check}"; then log "Validation Successful: Found 'Dumper execution: SUCCEEDED' message." return 0 # Success else log "ERROR: Validation failed. The 'Dumper execution: SUCCEEDED' message was not found." return 1 # Failure fi } # --- Main Script Logic --- log "*****Script Start*****" log "Dumper Executable: ${DUMPER_EXECUTABLE}" log "Cloud Storage Base Path: ${GCS_BASE_PATH}" log "Local Base Directory: ${LOCAL_BASE_DIR}" # Use an array to build the command safely dumper_command_args=( "--connector" "hiveql" "--output" "${LOCAL_ZIP_PATH}" ) # Add optional arguments if they are provided if [[ -n "${DUMPER_HOST}" ]]; then dumper_command_args+=("--host" "${DUMPER_HOST}") log "Using Host: ${DUMPER_HOST}" fi if [[ -n "${DUMPER_PORT}" ]]; then dumper_command_args+=("--port" "${DUMPER_PORT}") log "Using Port: ${DUMPER_PORT}" fi if [[ -n "${HIVE_KERBEROS_URL}" ]]; then dumper_command_args+=("--hive-kerberos-url" "${HIVE_KERBEROS_URL}") log "Using Hive Kerberos URL: ${HIVE_KERBEROS_URL}" fi if [[ -n "${HIVEQL_RPC_PROTECTION}" ]]; then dumper_command_args+=("-Dhiveql.rpc.protection=${HIVEQL_RPC_PROTECTION}") log "Using HiveQL RPC Protection: ${HIVEQL_RPC_PROTECTION}" fi log "Starting dumper tool execution..." log "COMMAND: JAVA_OPTS=\"-Djavax.security.auth.useSubjectCredsOnly=false\" ${DUMPER_EXECUTABLE} ${dumper_command_args[*]}" JAVA_OPTS="-Djavax.security.auth.useSubjectCredsOnly=false" "${DUMPER_EXECUTABLE}" "${dumper_command_args[@]}" >> "${LOG_FILE}" 2>&1 log "Dumper process finished." # Validate the output from the dumper execution for success or failure. validate_dumper_output "${LOG_FILE}" # Upload the ZIP file to Cloud Storage gcs_zip_path="${GCS_BASE_PATH}/${ZIP_FILE_NAME}" log "Uploading ${LOCAL_ZIP_PATH} to ${gcs_zip_path}..." if [ ! -f "${LOCAL_ZIP_PATH}" ]; then log "ERROR: Expected ZIP file ${LOCAL_ZIP_PATH} not found after dumper execution." # The script will exit here with an error code, and the trap will run. exit 1 fi gsutil cp "${LOCAL_ZIP_PATH}" "${gcs_zip_path}" >> "${LOG_FILE}" 2>&1 log "Upload to Cloud Storage successful." # The script will now exit with code 0. The trap will call cleanup and log the script end.To make the script executable, run the following command:
chmod +x PATH_TO_SCRIPT
Schedule the script using
crontab, replacing the variables with appropriate values for your job. Add an entry to schedule the job. The following examples run the script every day at 2:30 AM:If you are running on a host that has direct access to Hive Metastore and doesn't require Kerberos authentication, run the following command:
# Run the Hive dumper daily at 2:30 AM for incremental BigQuery transfer.
30 2 * * * PATH_TO_SCRIPT \
  --dumper-executable PATH_TO_DUMPER_EXECUTABLE \
  --gcs-base-path GCS_PATH_TO_UPLOAD_DUMPER_OUTPUT \
  --local-base-dir LOCAL_PATH_TO_SAVE_INTERMEDIARY_FILES
If your Hive Metastore instance requires Kerberos authentication, run the following command:
# Run the Hive dumper daily at 2:30 AM for incremental BigQuery transfer with Kerberos authentication.
30 2 * * * PATH_TO_SCRIPT \
  --dumper-executable PATH_TO_DUMPER_EXECUTABLE \
  --gcs-base-path GCS_PATH_TO_UPLOAD_DUMPER_OUTPUT \
  --local-base-dir LOCAL_PATH_TO_SAVE_INTERMEDIARY_FILES \
  --kerberos-authentication \
  --host HIVE_HOST \
  --port HIVE_PORT \
  --hive-kerberos-url HIVE_KERBEROS_URL \
  --hiveql-rpc-protection HIVEQL_RPC_PROTECTION
Scheduling considerations
To avoid data staleness, run the dumper tool before your scheduled data transfer.
We recommend performing a few trial runs of the script manually to determine the
average time it takes for the dumper tool to generate its output. Use this
timing to set a cron job schedule that precedes your transfer run to
ensure data freshness.
Monitor and view transfer status
You can monitor resource-level transfers for individual tables to track progress, view granular error details, and query the state of specific resources being migrated.
To view the progress and status of your resources, select one of the following options:
Console
In the Cloud de Confiance console, go to the Data transfers page.
Click your transfer configuration from the list.
On the Transfer details page, click the Tables transferred tab.
View the list of resources being transferred. You can see details like the following:
- Last transfer status: the current state of the resource based on the latest resource transfer, including completion progress.
- Table name: the name of the resource being transferred. Click the resource name to see a detailed view of the resource.
- Latest run: the last transfer run that updated the resource.
- Status summary: granular progress metrics or error messages if the transfer failed.
- Last successful run: the last run that successfully transferred the resource.
Use the filter bar to search for specific resources by name or filter by
their current status, for example, Failed transfers. The Table name
filter supports wildcard matching—for example, using *—but wildcard
matching isn't supported for other filter fields.
API
You can query the status of transfer resources using the BigQuery Data Transfer Service API.
List all resources and their statuses
To list all resources and their statuses, use the
projects.locations.transferConfigs.transferResources.list method.
Run the API request with the following information:
  GET https://bigquerydatatransfer.googleapis.com/v1/projects/PROJECT_ID/locations/LOCATION/transferConfigs/CONFIG_ID/transferResources
  Example Response (abridged) (JSON):
  {
    "transferResources": [
      {
        "name": "projects/.../transferResources/table1",
        "latestStatusDetail": {
          "state": "RESOURCE_TRANSFER_SUCCEEDED",
          "completedPercentage": 100.0
        },
        "updateTime": "2026-02-03T22:42:06Z"
      }
    ]
  }
curl command:
  curl -X GET

  "https://bigquerydatatransfer.googleapis.com/v1/projects/PROJECT_ID/locations/LOCATION/transferConfigs/CONFIG_ID/transferResources"

  -H "Authorization: Bearer $(gcloud auth print-access-token)"

  -H "Accept: application/json"
You can filter the results by resource name or state. For example, to find
all failed transfers, add
?filter=latest_status_detail.state="RESOURCE_TRANSFER_FAILED"
to the request URL.
Replace the following:
CONFIG_ID: the ID of the transfer configuration.LOCATION: the location where the transfer configuration was created.PROJECT_ID: the ID of the Cloud de Confiance project that's running the transfers.
Get a specific resource
To get the status of a specific table or partition, use the
projects.locations.transferConfigs.transferResources.get method.
Run the API request with the following information:
GET https://bigquerydatatransfer.googleapis.com/v1/projects/PROJECT_ID/locations/LOCATION/transferConfigs/CONFIG_ID/transferResources/RESOURCE_ID
curl command:
  curl -X GET

  "https://bigquerydatatransfer.googleapis.com/v1/projects/PROJECT_ID/locations/LOCATION/transferConfigs/CONFIG_ID/transferResources/RESOURCE_ID"

  -H "Authorization: Bearer $(gcloud auth print-access-token)"

  -H "Accept: application/json"
Replace the following:
CONFIG_ID: the ID of the transfer configuration.LOCATION: the location where the transfer configuration was created.PROJECT_ID: the ID of the Cloud de Confiance project that's running the transfers.RESOURCE_ID: the ID of the resource, for example, the table name.
Quotas and concurrency limits
For every BigQuery Data Transfer Service run, the Hive Metastore connector runs one Storage Transfer Service job per table.
Once the quota is reached, the transfer waits until more quota is available. Storage Transfer Service jobs are created in the customer project and are subject to Storage Transfer Service quotas and limits.
Pricing
There is no cost to use the Apache Hive Metastore connector to transfer your data. After the data is transferred, you're charged with storing the data in your destination. For more information, see the following: